Tag Archives: Kynar paint

Kynar paint for Barndominiums

Kynar Paint for Barndominiums

Many potential barndominium owners are looking to get the greatest value for their investment and many see this as their ‘forever’ home. If you fall into this category, I would highly recommend exploring Kynar® painted steel.

I could extol aesthetic reasons to use Kynar painted steel for longer than anyone would be willing to listen.
Polyvinylidene fluoride is acknowledged as the premium resin for coil coatings. Popularly known by its original trade name Kynar, PVDF is a kind of fluoropolymer, a family which includes Teflon and Halar. Key to these chemicals’ toughness is the bond between carbon and fluoride, the strongest possible polymeric connection.

PVDF resin has superior chalk resistance and gloss retention, as well as stain and chemical resistance. It is softer than SMPs and polyesters, however, making it highly formable without risk of cracking, but also relatively easy to scratch during transport or installation. PVDF is most durable when it makes up 70 percent of resin; higher concentrations do not coat well, since acrylic is important for dispersion during coating processes.

There are two general classes of pigments. Organic, or carbon-based, pigments are generally synthetic and relatively inexpensive to make. However, organics have fairly weak molecular bonds which are easily broken down by moisture, UV and pollutants, and so, are prone to fading. Inorganic pigments are those which do not contain carbon, and may be naturally occurring or manufactured. They generally offer good fade resistance, with an exception of carbon black. Many simple inorganics are metal oxides, such as widely used iron oxide and titanium dioxide.

Kynar 500/Hylar 5000 systems, which are required to contain 70 percent PVDF, do not vary greatly between manufacturers. Since these paints carry 20- to 30- year warranties which allow for extremely little face, these companies all use ceramics and appropriate inorganic pigments.
One manufacturer we purchase Kynar 500 painted steel from is McElroy Metal. Here is a photo which really shows off performance differences between Kynar and SMP: http://www.mcelroymetal.com/elements/files/Kynar%20500%20VS.%20SP%20Flyer

Sadly, PVDF paints are not available nationwide. Personally – if available where I was planning to build and color choice was other than White, I would make an investment for better paint. I want my building to look as close to new as possible, for as long as I own it!

At NFBA’s (National Frame Building Association) 2019 Expo I cornered Sherwin-William’s representative for further information on Fluropon® (PVDF). Please enjoy this video:

https://drive.google.com/open?id=14fzlL1agiMOZ6Sq67ce6H5JrF9iSc1Kp

Painting Tips for Post Frame building Owners

Painting Tips for Post Frame building Owners

Generally, post frame buildings are fairly maintenance-free, which is among the many reasons they’re so popular. Whether your building is for residential, commercial, or agricultural use, you undoubtedly have come to depend on it. 

When it’s time to repaint the original metal coating on your post frame building to keep it looking sharp and crisp, leverage the experience of professional painters. Even if your paint vision is strictly aesthetic if say you prefer a different panel color or want a company logo painted on your roof, for instance, there are many points to consider.

Trust the Pros 

Whether you want to paint your building’s exterior and/or just its roof or interior, go with the pros. Sure, painting a post frame building can be a DIY job. However, it’s best for building owners to spend a bit more and leave the job to licensed, experienced professionals who understand the many unique requirements of post frame building painting.

Professionals will fully understand the scope and requirements of correctly painting a post frame building it’s definitely not the same as painting your bedroom or dining room. Let several contractors deliver a detailed cost estimate and a timeline for your particular project. 

Ask whether your painting can be done in one day (weather permitting), or whether the job needs to be completed in stages.

The Right Paint for the Surface

Outdoor surfaces are exposed to wide temperature fluctuations. Over the years, post frame buildings get hammered by rain, wind, hail, even the sun. You need quality paint that’s tough and long-lasting and can withstand nature’s harshest elements. 

Most post frame buildings use a unique paint coating, whether it’s silicone modified paint (SMP) or Kynar paint over the metal surfaces. This type of paint has been specifically applied in the factory before our building was constructed but there are paints that can properly adhere to these finished should you want to change your building’s look and paint in the field.

Professional paint contractors are experienced with working with these paint systems. It would be a challenge to paint Kynar finish without the appropriate equipment and DIY results may not look great. Take their recommendations and make the best investment you can for your property. 

And if you’re also painting your building’s roof, some roof paints have characteristics that make them more reflective than others, meaning better energy efficiency. Trust the pros to help you select the right paint for your post frame building. You will want your building to still withstand the elements and be washable so take your time and do it right. 

Extending the life of your post frame building doesn’t need to be complicated. Metal has long been popular for exteriors of buildings due to its durability. With a freshly painted surface with Kynar or SMP paint your building can resist fading, chalking, and can shed dirt and mildew more easily. 

To prevent fading and chalking differences, you will want to be sure to choose the same type of paint previously used to coat your building if you are simply planning on painting individual panels. Professionals can assist you to ensure your building looks great after the task is complete! 

Preparation Before Paint

It’s your building and your money. You want to ensure your paint job is done correctly. Proper paint preparation is an essential part of the process. Removing dirt, debris, and deposits from the metal is an important pre-paint step. Also take time to address any mildew, condensation, or rust issues before painting begins. 

Other essential prep work includes a power wash and rinse. A thorough cleaning should be followed by a light sanding of minor scratches (or sandblasting of larger areas) if needed. Windows, doors, and light fixtures should be taped. And surrounding areas, including shrubs and plants, should be protected from potential overspray. 

Other repairs might be in order before repainting, if so, now’s the time. It’s also important to consider the weather where your post frame building is located. If it’s too hot or too cold, the paint will not affix properly and its best to wait. Let Mother Nature, and your painting pros, guide the precise scheduling of your job.

Safety First

Experienced painting professionals will take all necessary precautions and show up with the right equipment including paint and safety supplies to work on your job. They’ll have the necessary fall protection equipment too, such as harnesses and lifts, to safely do the work, which is essential for roof repainting jobs especially. 

Conclusion

Don’t struggle with trying to DIY painting your pole building, trust the professionals to Breathe new life into the look of your building for you. When your post frame building is prepped and painted professionally it will give your property a fresh new look!

Best Barndominium Steel Roofing and Siding in Coastal Areas

If you are one of many looking to install steel roofing and/or siding on your new barndominium, shouse (shop/house) or post frame home, understanding differences between galvanized and galvalume is essential to getting top performance you expect from your new steel roofing or siding..

In most residential steel roofing applications including near-coastal areas — beach homes located near shore, and even homes located in the middle of heavy salt-spray — severe marine environments, Galvalume steel will be a better and more corrosion-resistant option than galvanized steel.

Read more about Galvalume at https://www.hansenpolebuildings.com/2013/04/galvalume/

Galvalume steel should not be used in contact with concrete or mortar, as both are highly alkaline environments. Bare Galvalume steel and painted Galvalume sheets will suffer rapid corrosion when in contact with mortar and concrete.

Bare Galvanized steel and painted Galvanized steel perform better in this type of environment.

Now, because aluminum, one of two metals in Galvalume coating, provides a barrier protection for steel, instead of galvanic or self-healing protection in galvanized steel, scratches and cut edges in Galvalume are less protected.

Galvalume steel is best for use in prefabricated metal wall panels and standing seam metal roof applications with concealed fasteners.

Normally, Galvalume is offered in both bare and pre-coated (pre-painted) versions. Most residential-grade Galvalume metal roofing products – like galvanized steel – are coated with Kynar 500 or Hylar 5000 paint finishes. (For extended reading on Kynar: https://www.hansenpolebuildings.com/2014/05/kynar/ )

Galvalume has an excellent performance lifespan in bare exposures (unpainted panels) as well. Both galvanized steel and Galvalume weigh 100 to 150 pounds per 100 square feet and contain about 35% recycled steel post-consumer content.

Galvalume is similar in investment to galvanized steel.

In the early 1800s galvanized steel was invented and developed for commercial use, so it has nearly 200 years of proven track record. Carbon sheet steel is dipped in molten zinc. It’s more than a coating, however. A chemical bond occurs and produces telltale “spangles,” a crystalline surface pattern found on galvanized steel.

Bethlehem Steel developed galvalume introducing it to the world in 1972, so it’s been in use nearly 60 years. Similar to galvanized steel, Galvalume is produced by a hot-dip process. Instead of 100% zinc, this dip is 55% aluminum, 43.5% zinc and 1.5% silicon.

  • Zinc bonds with a steel surface to create a barrier to corrosion-causing moisture
  • Aluminum naturally resists corrosion and reflects heat too
  • Silicon enhances coating adhesion coating, keeping it in place when steel is rolled, stamped or bent

How Corrosion Occurs in Each

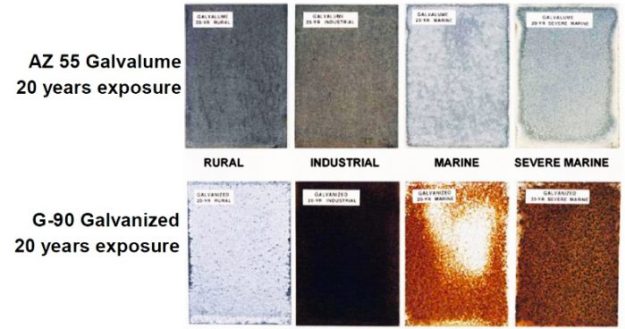
Unpainted Galvalume vs. galvanized steel exposure over time.

Death of metal roofing, as we all know, is corrosion. Galvalume and galvanized steel roofing are affected differently by corrosion.

Galvalume: Aluminum has tremendous corrosion resistance, so it will generally corrode more slowly than galvanized steel. One exception is when coating is penetrated – scratched or chipped by falling or blowing debris, for example.

This exposed sheet metal beneath the coating will quickly corrode. However, aluminum coating will prevent corrosion from spreading; it will be contained.

Galvanized steel: More than just coating steel, galvanizing steel produces a chemical bond resistant to corrosion, scratches and nicks. Galvanized steel will self-heal for small scratches and along cut-edges.

Over-time, when galvanization layer in galvanized steel panels wears down or is penetrated, corrosion will begin to spread.

Uncoated/Unpainted Galvanized Steel vs. Galvalume Wear: 10, 15, 20 Years and Beyond

To illustrate differences in performance between galvanized and Galvalume steel, let’s consider how these two kinds of steel would perform in an uncoated/unpainted steel roofing application.

Note: With a quality paint finish such as Kynar 500, both G-90 galvanized steel and Galvalume steel should provide consistent, rust-free performance for 30 plus years when used in accordance with manufacturers’ specifications.

With unpainted steel galvanized steel often holds its rust-free good looks longer than Galvalume thanks to self-healing properties of zinc.

5 to 10 Years: A galvanized roof will look “perfect” except for some corrosion beginning where fasteners penetrated steel during installation. Galvalume roofing may show corrosion at nicks and scratches and around field-installed fastener holes.

10 to 15 years: Galvalume roofing will look about the same, but with a few more nicks producing isolated spots and lines of corrosion. Galvanized steel roofing will start showing its age. Corrosion has continued to spread outward from its starting point.

20 years: Changes in Galvalume roofing are slow and imperceptible, though if you compared a picture of the roof when new to its current state, nicks and scratches would be visible. You might also notice a slight patina common to ageing aluminum.

Galvanized roof, depending on climatic factors, might show a light rust hue. This is a result of the zinc layer wearing away, leaving steel substrate exposed.

Beyond 20 years: Lifespan for unpainted galvanized roofing is 15-25 years depending on climate, less where oceanic salt spray is common. Unpainted Galvalume has a lifespan up to 40 years. Once corrosion has penetrated any steel roofing substrate, steel integrity will suffer and your steel roof will begin to fall apart.

For maintaining good looks and longevity in coastal applications Kynar paint over galvalume is a winning combination!

A Contractor for Your Barndominium Part III

A Contractor for Your Barndominium (Part III)

Miscellaneous Topics:

Do Not Change Your Plan

Once your plans have been permitted, do not make changes. This allows openings for expensive “Change Orders,” and will have an allowable timeline effect. In cases, this will require you to resubmit to your local jurisdiction and could involve months of waiting.

Deal only with a licensed building contractor.

Many states, as well as smaller jurisdictions require contractors for construction services to be registered or licensed. License number should be displayed on all business cards, proposals and any other contractor materials.

Verify the license.

Do not just assume registration is valid. I once hired a contractor who provided a copy of his license to me. Only later (when there was a problem) did I find out it had expired and had been altered. Call issuing agency to confirm it is valid.

Require insurance.

Require both a certificate of insurance showing liability insurance coverage AND proof of workers compensation insurance for all workers. Some contractors are registered with an industrial insurance account, however they report their workers as having zero hours, and pay no premiums. These workers are NOT covered.

If someone is hurt, and uninsured, you can very well be held liable.

Know who you are dealing with.

Doing business with a Contractor who has a good reputation for doing jobs right, in an ethical manner and at a reasonable cost is an ideal situation. Ask for references and then verify them.

What I Would Pay Extra For:

Fully engineered structural plans specific to my building at my site (I would not build without them)..

Steel roofing and/or siding (other than bare Galvalume or White) with Kynar paint, fastened with 1-1/2” powder coated diaphragm screws.

Greater than Building Code minimum wind and/or snow loads.

5/8” Type X drywall. Added investment is minimal, it is more resistant to dents and affords greater fire resistance.

Inspections and Codes

Building Codes are a bare minimum standard. Their main focus is on Life/Safety/Hygiene issues and limited structural capacity. Code is not quality. I know of no tradesperson who would build anything for themselves merely “to code.” Building standards are written to protect occupants for a limited time during catastrophic events. It is assumed all structures will be partially, if not completely damaged.

Inspectors and inspections vary per individual. How much do they know? How much time do they have to spend on this site? Codes they are familiar with are bare minimum standards and they cannot go beyond them. Politics sometimes plays a role and back-up from their Building Official varies. Most jurisdictions do not do roofing inspections. This generally is a directive from higher ups and deals with Safety. Most contractors do not follow State Safety Requirements for their workers and it puts workers and Inspectors in potentially dangerous situations.

Do Not Pay for Anything not On-Site or Completed

Re-read this over and over. 

Make payments for materials jointly to General Contractor AND supplier (avoids liens).

Require written lien releases from all parties who have provided materials or labor through your General Contractor.

When your General Contractor says he or she is completed, again have your architect walk through with you. Make a written “punch list” of all deficiencies discovered and provide to General. Only once all of these items have been corrected and an Occupancy Permit has been provided from your Building Department, should you make final payment.

Do Not pay ahead on a promise!

After reading all of this you may be wondering what you are paying a General Contractor to do, as your frequent involvement is needed in order to achieve your ideal dream outcome. If this happens to be your case, it may behoove you to pocket these funds and do it yourself!

Fluropon Roofing Coating

Fluropon® Roofing Coating 

I have extolled virtues of Kynar® (PVDF) paint for post frame buildings previously: https://www.hansenpolebuildings.com/2014/05/kynar/. Fluropon® is a trade name for Valspar’s PVDF factory applied steel roofing coating (paint) system. Sherwin-Williams acquired Valspar  in 2017.

At NFBA’s (National Frame Building Association) 2019 Expo I cornered Sherwin-William’s representative for further information on Fluropon®. Please enjoy this video:

Looking for a best solution to keep your new post-frame building looking new for years? Look to PVDF.

Your Hansen Pole Buildings’ Designer can assist you in making good decisions for paint finish on your new building. Call today 1 (866) 200-9657.

Help! My Overhead Door Jambs are Rotting!

Help! My Overhead Door Jambs Are Rotting!

I am fairly certain this problem occurs more often than I hear about. Reader DAVID in ROLLING PRAIRIE writes:

“Enclosed are two pictures showing my pole building’s overhead door. One picture is the inside door jamb that is decaying from water damage and the other one is a picture of the outside J channel and siding above the overhead door. My question what items need to be removed and what needs to be done to repair and seal the inside door jamb area? This an FBi building built in 1989. The outside upper J channel appears not to be sagging and there is no evidence of any leaks from roofing or front walls.


Thank you in advance for any help given.”

Mike the Pole Building Guru responds:

Thank you for sending photos. As you can tell from photo of outside J Channel, water has been collecting in channel, resulting in wall steel deterioration. Water most likely enters your building through one or more of – a hole or holes have rusted through J Channel, an uncaulked splice along top jamb length, or poorly executed (and possibly uncaulked) trim intersection at opening corners.

If it was my own building, I would approach a solution in this fashion:

In order to repair this area properly will involve having to remove some siding. Your building’s siding was fastened with nails, meaning it will be destroyed in removal process. Therefore, I’d remove all steel siding and trims from this building wall and replace them. Over 29 years your paint has faded and chalked significantly. For replacement I would go with Kynar painted panels (read more about Kynar here: https://www.hansenpolebuildings.com/?s=Kynar). While in steel replacement mode, I would add wainscot to this wall, regardless of whether building balance has it or not. Wainscot will enhance your building’s appearance, as well as providing short length panels easily replaced if damaged.

I would remove present overhead door jamb boards and, as a precautionary measure, replace them with pressure preservative treated lumber. Any cut ends I would treat liberally with Copper Napthenate solution. Cover the entire framed wall with Weather Resistant Barrier (think Tyvek). Wrap barrier completely around wood jambs and staple to inside wall. Wooden overhead jambs should be covered with steel trim with an integrated J Channel to receive siding. Place self-adhesive flashing tape (3M All Weather Flashing Tape 8067 or similar) between weather resistant barrier and overhead jamb trim. Avoid a splice in horizontal trim across the top, if possible. Some steel roll formers will make trims long enough for a 16 foot wide door. Overlap trims at corners so any water potentially seeping in rolls onto yet another steel piece. Place liberal caulking amounts behind and between any trim splices or overlaps, especially near corners.

When installing steel siding above door opening, cut panels so bottom edge lands 1/2″ above integrated J Channel low point. This will reduce steel panel premature decay possibility. Use form fitted inside closure strips between these panels and jamb trim flange above the door opening.

Good luck, and please do send me pictures of the final result!


Spray Foam and a Post Frame Cabin

Spray Foam and a Post Frame Cabin

Hansen Pole Buildings’ Designer Rick Carr is a delight to work with. Other than his fondness for the Green Bay Packers, he is a great guy! Rick not only subscribes to my daily blogs, he reads them. A recent article peaked Rick’s inquisitive mind (view the culprit here: https://www.hansenpolebuildings.com/2017/11/properly-insulate-roof-purlins/). This article prompted Rick to write:

“A question on this, if you anticipate needing to replace the steel, in say 40 years, would you put house wrap over the purlins, then the steel, then closed cell foam from underneath.  The idea being that you can’t remove the steel if the closed cell foam is applied directly to the to the steel from underneath?

If I ever find land for a fishing cabin, this is what I would consider. 

A 28×40 cabin with partial open ceiling and half ceiling load trusses with joists.

Then, how would you build and insulate the interior wall from the ceiling to the underside of the purlins, that would be at a truss?”

Mike the Pole Barn Guru writes:
I’d start by investing in the best steel money can buy – I’d go with a Kynar paint finish (https://www.hansenpolebuildings.com/2014/05/kynar/) over a Galvalume substrate, this combination will give the greatest possible longevity for both paint system and the steel itself.

From my research, it appears astute applicators of closed cell spray foam insulation know which adhesives to incorporate in their mixtures so as the foam will stick to the building wrap.

For those interior walls which will be part of the abbreviated second floor, Once the gypsum wallboard is installed on the “living” side, spray foam can be applied from the attic side of the sheetrock. For the wall between your vaulted ceiling and the bonus room area, once drywall is on one side the same spray process can be followed.

My revelation of the day – I’ve become a convert to closed cell spray foam insulation!


Pole Barn Communication

My lovely bride and I have been married for heading on 15 years. To some, this may seem like a lot, to my grandparents and great-grandparents (who were together for 50 years and more) – hardly a drop in the bucket.

Phone CommunicationIn most relationships, success (or lack thereof) is created by communication. Lots of clear, concise dialogue makes for a happy marriage (whether a marriage of two partners in matrimony, or between client and pole barn provider). Don’t talk so much, or don’t pay attention to what the other party is saying, and a rocky road can result.

This morning I received some clear communication from a client:

“Purchased a 40 x 60 pole building from your co in 2005. Most of the building is fine. I contacted the company approximately 2-3 years ago with two problems; 1. The insulation has gone south and is falling from the roof and secondly, the paint on the south east of building has faded from green to almost a grayish white. I contacted your company and was told (after a couple of weeks or more) that you would sell me more insulation at your cost and I could put it in. As for the roof your company said that a representative from the manufacturer would be in contact so as to examine the roof. That was 2-3 years ago and nobody has contacted me or followed through on these problems. As you know the computer is a very good tool at times like this, and I assure you I intend to use it to relay my story on the net covering pole barns and buildings. I feel this will stop potential customers from dealing with such problems with your company. I have since taken pictures that I fully intend to post on the internet.  I regret to take this action and will wait 7 days for your response before proceeding. Any suggestions?”

Well, my first suggestion would be we do not have to be threatened to get action. In fact, we believe so much in the buildings we provide, we will put the information out ourselves!  Any client who writes in order to have a problem solved, we appreciate kind, considerate and “moving forward” efforts.  We most definitely will do everything we can to see their issue is solved in a timely manner.

Go do in internet search for “pole barn (or pole building) problems (or horror stories)”. You will find a few of them – and in regards to a select few providers or builders – lots of them. To the best of our knowledge, there is not a single derogatory posting about Hansen Pole Buildings anywhere on the internet. After providing thousands of pole building kit packages since 2002, this says something about the integrity of our company and the quality of our products.

Getting back on track…..

The original building kit package included reflective roof insulation manufactured by a Canadian company which is no longer in business (and was closed prior to the client’s notification of an apparent issue). Upon doing some research, the best guesses as to why the originally supplied insulation was delaminating (the inside white vinyl facing was flaking off) was due to either the adhesives used in fabrication by the manufacturer, or improper storage of the product onsite by the purchaser.

Having used this manufacturer’s product in thousands of buildings, we had only ever received a handful of concerns with this issue. As the client reports, we did (and still would) offer to supply replacement insulation manufactured by our current supplier (which is produced using a better adhesive).

Sidebar: the originally provided and installed insulation still is working as an effective condensation control, it just flakes off pieces of the white vinyl.

The steel for this client’s building was produced by Fabral® and is their MP-Panel™, which comes with a 25-Year limited paint warranty. From the warranty at www.Fabral.com:

“Fade or change in color in excess of five (5) units of color difference (“NEBS” units) for vertical siding panels ad seven (7) units of color difference (“NBS” units) roof panels for a period of ten (10) years when measured in accordance with the standard procedure specified in ASTM D-224 (latest) paragraph 6.3, on a washed test area.

NOTE: Most coated surfaces, when exposed to the sun, will fade to some degree over a period of time. Five NEBS units is a noticeable, but not usually objectionable, degree of color change. Colors may also darken or change hue rather than fade, particularly on exposure in polluted environments. The NBS units are intended to apply to color change in either direction in comparison with the original or unexposed color. It is understood that fading or color change may not be in uniform if the surfaces are not equally exposed to the sun and elements.”

Under the terms of the warranty, the building owner was to have notified Fabral® “in writing” within 30 days after the discovery of the defect. Although the building owner did not provide Fabral® with proper notice, one of their representatives had been to the building, shortly after the initial contact was made (we keep notes in a client’s file on every inquiry of this sort). It is possible the client does not recall this visit, or the resulting communication from Fabral®, as it was determined then, the fade rate of the paint was within the allowable limitations.

I’ve written before about paint fade: https://www.hansenpolebuildings.com/blog/2014/04/paint-fade/

Morals of the story: when offered a solution by a supplier, either accept it, or offer a counter offer – don’t just stew on it or rehash it; as often as possible send and receive important communications in writing; and when ordering painted steel in which fade rate is critical – invest in the best available paint system, Kynar.

For more reading about Kynar®: https://www.hansenpolebuildings.com/blog/2014/05/kynar/

Dear Guru: Pole Barn Bird Aviary?

Welcome to Ask the Pole Barn Guru – where you can ask questions about building topics, with answers posted on Mondays.  With many questions to answer, please be patient to watch for yours to come up on a future Monday or Saturday segment.  If you want a quick answer, please be sure to answer with a “reply-able” email address.

Email all questions to: PoleBarnGuru@HansenPoleBuildings.com

DEAR POLE BARN GURU: Barn Swallows. While most people dislike their nests, I like their bug eating and air acrobatics. A post on an Ag. BBS mentioned Canada building pole nesting barns to provide replacement habitat due to the demolition of old bank barns.

I have seen many a sofit and sliding door track ruined by English Starlings. Sparrows frequently get into big box stores.   How can a builder design in or out Bird habitat? CHILLING IN CHAFFEE

DEAR CHILLING: We’ve done pole buildings which have been specifically designed as aviaries – they make a very affordable design solution for bird aficionados. Bird aviary netting can be added on the inside to control the areas of the building where birds are wanted.

As for how to keep birds out…

Design to keep them outside to begin with. Sliding doors (or any other door which does not seal tight) are an invitation for birds to come share the space.

I live in the serious woods – it is the middle of a forest. My shop has three overhead doors, three entry doors and a sliding patio door. In nearly 20 years I have had exactly one bird inside – the bird who pecked a hole through the cedar siding and into the attic!

If your pole building will be unfinished on the inside, and you tend to leave doors open, the potential for birds living inside can be reduced by designing to minimize nesting locations.

DEAR POLE BARN GURU:I have a pole barn built in the late 70s. The paint has worn off the walls partially and the roof totally. What kind of paint and how should I prepare the surface? I was told Valspar Reserve would be a good choice of paint. BARN LADY IN BYRON

DEAR BARN LADY: The paint systems of 40 years ago were just nothing like what is available today. What your 1970’s era pole barn had on it was probably

polyester paint:

https://www.hansenpolebuildings.com/blog/2014/05/polyester-paint/

You can repaint steel. Here is information on preparation:

https://www.hansenpolebuildings.com/blog/2013/01/repainting-steel/

As to what to use for paint, think of your building as being an automobile – any high quality automotive paint would be a possibility. I am not sure if Valspar® Reserve™ will work on steel, from the research I have done, it is unclear.

In my humble opinion only – the best route to go would be to replace the roofing and siding with new painted steel, preferably with a PVDF. This will be your longest lasting paint system. Read about it here:

https://www.hansenpolebuildings.com/blog/2014/05/kynar/