NEW Hansen Pole Building Columns in Brackets
Even though our glu-laminated columns are pressure preservative treated entirely through, there are some people who are just not convinced of longevity of properly pressure preservative treated wood in ground.
We have a solution for you.
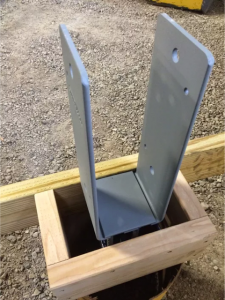
 There is only one commercially available with any significant moment (bending) resisting ability and ICC-ESR approved. (Read about ICC-ESR approvals here: https://www.hansenpolebuildings.com/2012/01/icc-es/). Sturdi-Wall Plus brackets meet these requirements (https://www.hansenpolebuildings.com/2019/05/sturdi-wall-plus-concrete-brackets/).
Now these brackets are not free, however we again have gone out and ordered multiple pallets of them in order to get an absolute lowest cost.
BUT WAIT, THERE’S MORE
(I know, sounds like a late night TV commercial – but we are not throwing in a Ginsu)
For bracket mounted situations, we are offsetting some of bracket costs, by use of untreated columns. Yes, these are same high strength as our treated base columns produced by Richland Laminated Columns, LLC.
No, it will not completely offset bracket costs, however it does make a significant difference.
Planning on a bracket mounted column application? We have you covered with high quality at an affordable investment!
What happens next to door openings?
Unlike many providers, Hansen Pole Buildings has always provided columns on both sides of entry, sliding and overhead door openings. Other than for buildings ordered specifically with bracket mounted columns, these have always been embedded. And pressure preservative treated. And prone to same challenges of warp and twist.
We have decided to change this picture. We hunted down kiln dried Douglas-Fir 4×6 #2 timbers to use as columns next to doors (where a glu-laminated column does not already exist) and are bracket mounting them as well. For those not used to working with Douglas-Fir, is has a reputation as being an exception product to frame with, as it tends to maintain being very straight.
Call 1.866.200.9657 TODAY to participate in “The Ultimate Post-Frame Building Experience”.
And, don’t forget to watch for our next article!
 At a minimum, site preparation includes: