Pressure Preservative Treated Columns in Alkali Soils
ERIC in PAHRUMP writes:
“I have questions about the posts. In my quote it says the posts are direct buried. This concerns me due to the type of soil we have here in Pahrump, Nevada. The ground has a lot of alkali in it and will eat just about anything. Galvanized metal posts last maybe 10 years, treated wood posts about 10 to 15 years. I know your posts are treated, certainly much better than a treated 4×4 from the store, but would it be better to anchor them above grade? Would Perma-Column like the one included be better? I would still wrap the column and the post with some kind of weather barrier as an extra layer of protection. Has there been any concerns about highly acidic soils?”
One of the first post frame building kits I provided, back in 1980, happened to be to a tire dealer in Pahrump!
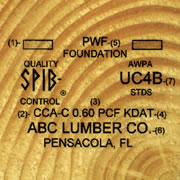 Structurally, embedded columns are your best design solution, as there is no hinge point above ground. All of our pressure treated lumber is Southern Pine (including treated portions of glulam columns) and is rated for structural in ground use (UC-4B). Plus, we have it kiln dried after treating to meet FDN – foundation requirements (maximum moisture content of 19%). 2x Southern Pine treated to UC-4B is typically treated throughout. Your store bought ‘treated’ 4×4 are likely either merely dipped in chemical, or treated for above ground use only. Effectiveness of pressure preservative treating is impacted by chemicals leaching into soil.
How CCA Works:
· CCA (Chromated Copper Arsenate) is a wood preservative penetrating wood fibers during a pressure treatment process.
· Chemical components (copper, chromium, and arsenic) bond with wood, providing long-lasting protection.
Kiln drying lumber after pressure treating can help reduce chemical leaching, but effectiveness varies based on several factors.
Chemical Leaching Reduction
· Heat Treatment: Kiln drying involves high temperatures, this can help stabilize wood and potentially reduce mobility of chemicals.
· Moisture Content: Lower moisture levels achieved through kiln drying can decrease likelihood of leaching, as water is a primary medium for transporting chemicals.
CCA pressure treating chemicals do not typically react negatively to kiln drying processes.
Compatibility with Kiln Drying
· Kiln drying primarily removes moisture from wood, which can enhance effectiveness of CCA by reducing risk of fungal growth.
Alkali Soils Characteristics
· Alkali soils have high pH levels (typically above 8.5) and can contain high levels of sodium.
· These conditions can affect durability and performance of various materials, including treated wood.
Effects on CCA-Treated Wood
· High pH levels in alkali soils can lead to leaching of copper from CCA-treated wood.
· Copper leaching may reduce wood’s effectiveness in preventing decay and insect damage over time.
· Studies indicate copper leaching can range from 0.1 to 0.5 mg/cm² per year, depending on environmental conditions such as moisture and temperature. 20% moisture content is generally necessary for leaching to occur. Chemical leaching of CCA-treated wood typically occurs at elevated temperatures, particularly above 60°C (140°F).
· Initial leaching may be higher immediately after treatment but generally stabilizes over time. Leaching can occur within the first few months of exposure to rain or humidity.
· Presence of sodium can also affect structural integrity of wood, however not Southern Pine.
 Resorcinol waterproof glue is a great (although expensive) product. It is a high performance, two component adhesive designed to provide strongest, most durable bonds in severe service applications. After curing, Resorcinol is unaffected by either salt or fresh water, and other typically corrosive aquatic conditions, as well as outdoor exposure and temperatures ranging from tropical to subzero.
 Provided column holes were not backfilled with pre-mix concrete (they probably were not), you could temporarily support any given deteriorated column above grade, then cut off the column just above top of concrete slab. From outside, excavate around offending column and remove it. Coat cutoff column bottom end with a waterproof sealant, such as an asphalt emulsion. Place a Sturdi-Wall Plus® wet set bracket on bottom of cutoff upper portion of the column. Clean all loose dirt from bottom of excavation. Use an appropriately sized Sonotube® extending down to at least below frost-line and backfill tube with premix concrete. Backfill around exterior of tube with compactable fill, compacting to at least 95%, no less often than every six inches.


