Tag Archives: pressure preservative treated lumber

Overhead Door Jambs

Overhead Door Jambs With Bracket Mounted Columns
Of course there are many methods of post frame construction-ours just happens to be best (at least we like to think so)!
Reader TOM in BOSCOBEL writes:
“I set laminated 2×6 beams into wet set anchors. I am ready to attach the 2×6 jambs to the rough opening, to prepare for overhead door installation. I secured the posts to the wet set anchors using carriage bolts. What is the best way to attach the 2×6 jambs when the anchors are protruding into the opening 1/4″ plus the head of the carriage bolts? Thinking I could router the bottoms to fit over the brackets, giving me a flush and plumb fit jamb.”
Mike the Pole Barn Guru writes:
Well, Tom could router out vertical overhead door side towards bracket to fit over tab of wet set bracket (for extended reading on wet set brackets please see: https://www.hansenpolebuildings.com/2019/05/sturdi-wall-plus-concrete-brackets/), however there is an easier approach as outlined in this excerpt from Hansen Pole Buildings’ Construction Manual:
Overhead door columns: Usually 4×6 pressure treated, if required, will typically be oriented 6” toward wind, unless wall columns are 6×6 or larger. Correct orientation will be shown on building plans. Space between columns, for residential doors, will be approximately door width plus 1”. For commercial (ribbed) doors space between columns will be approximately door width plus 3”.

As overhead door columns have been set from dimensions called out on building plans, the only requirement is to create a “picture frame” to place the overhead door behind.

Vertical jambs will be cut from pressure preservative treated lumber and installed first. If a choice is available, use the straightest possible boards for these.

If overhead door opening columns are 6×4 (with 6-inch face towards wind) jambs will be 2×6 (with sidings other than steel or vinyl 2×8).

If overhead door opening columns are 4×6 (with 4-inch face towards wind), 6×6 or 3-ply 2×6 glu-laminated, jambs will be 2×8 (with sidings other than steel or vinyl 2×10).

If overhead door opening columns are 4×8, 6×8 or 3-ply 2×8 glu-laminated, jambs will be 2×10 (with sidings other than steel or vinyl 2×12).

In steel sided applications, jambs maybe multiple members (e.g. two 2×4 or a 2×6 plus a ripped 2×4, rather than a 2×8), as they cover with steel trim.

Cut vertical jambs to length first. They will be 1-1/2 inch less in length than residential overhead door vertical height (e.g. 9’10-1/2” long for a 10’ tall door), ½ inch less for commercial doors. When installed, vertical jamb bottom edge will begin 4 inches above splash plank bottom. Install with cut end up. See Figure 24-1

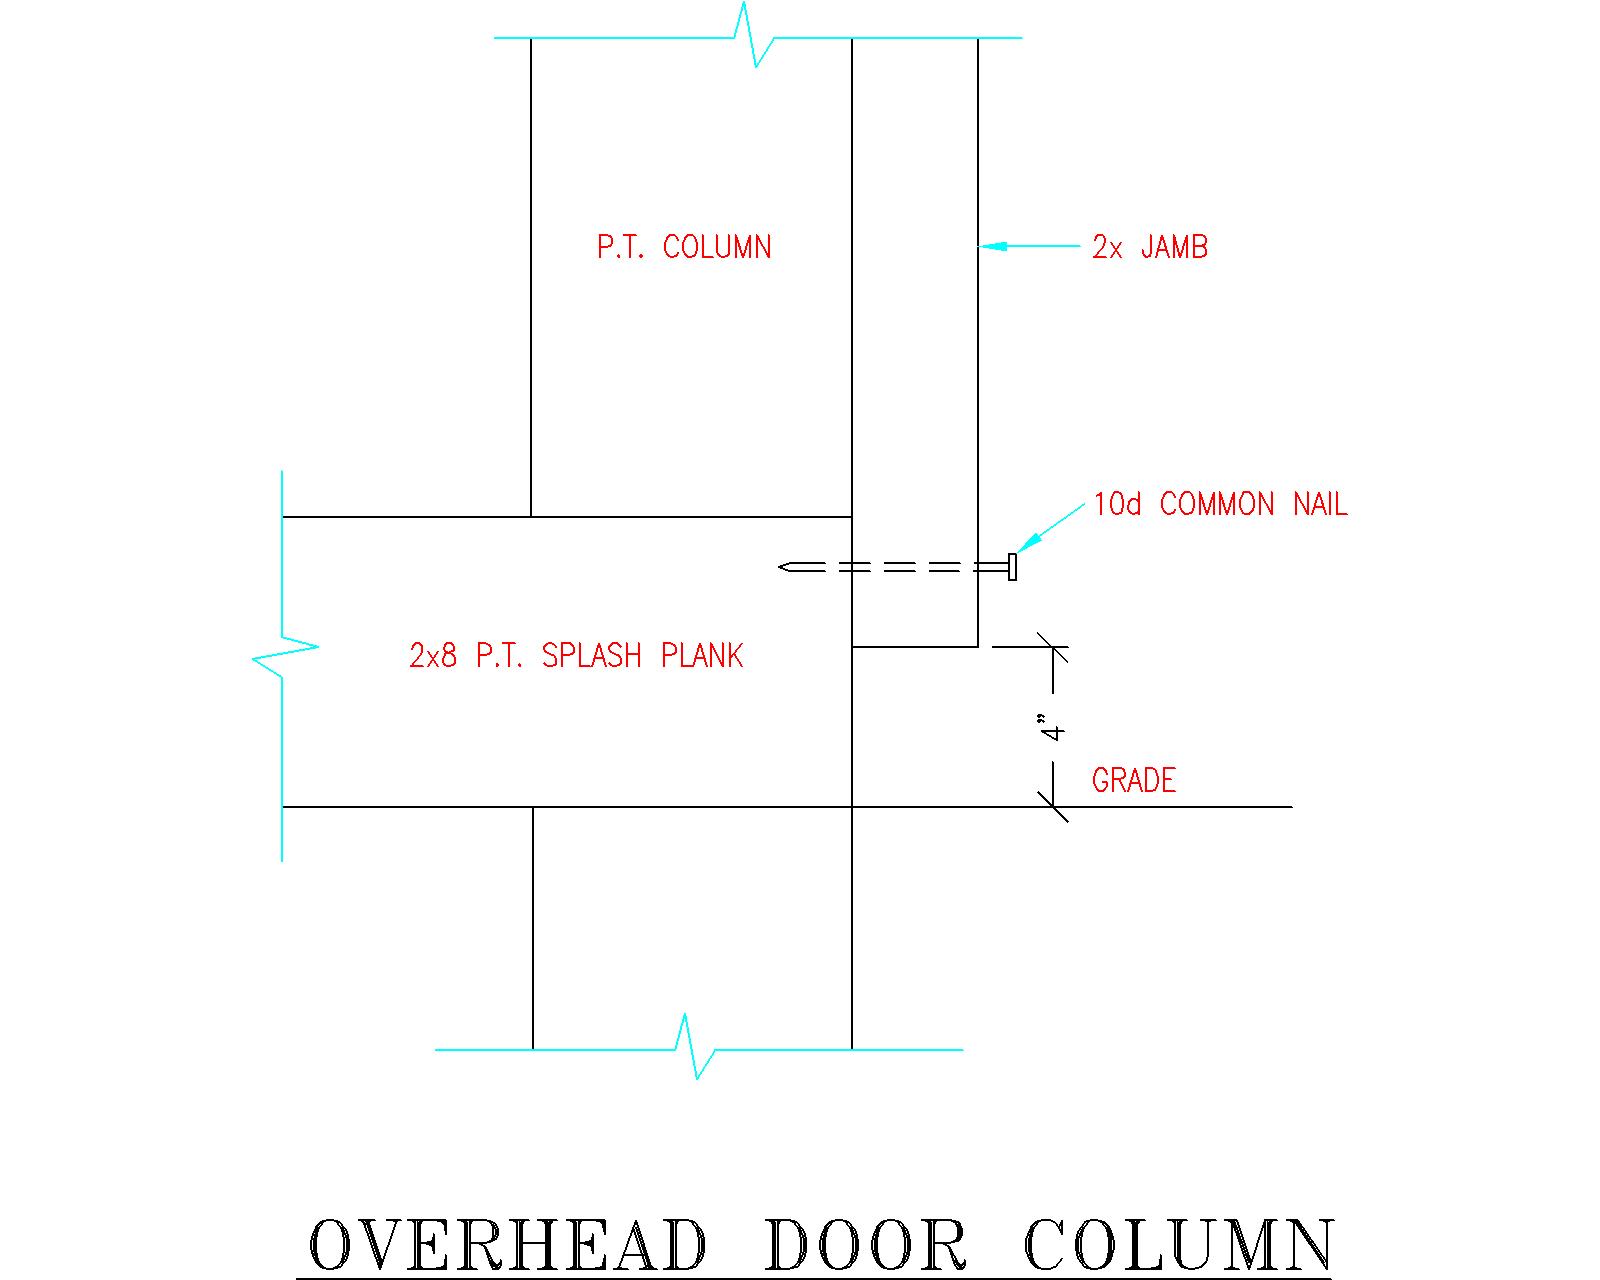
Figure 24-1: Overhead Door Column

Hold vertical jamb in place with any “crown” out and vertical jamb edge top and bottom 1-1/2” outside column edge. See Figure 24-2

For vinyl siding hold vertical jamb 1-15/16” outside column edge. For other (non-steel) sidings, hold inside jamb edges flush with column inside faces.

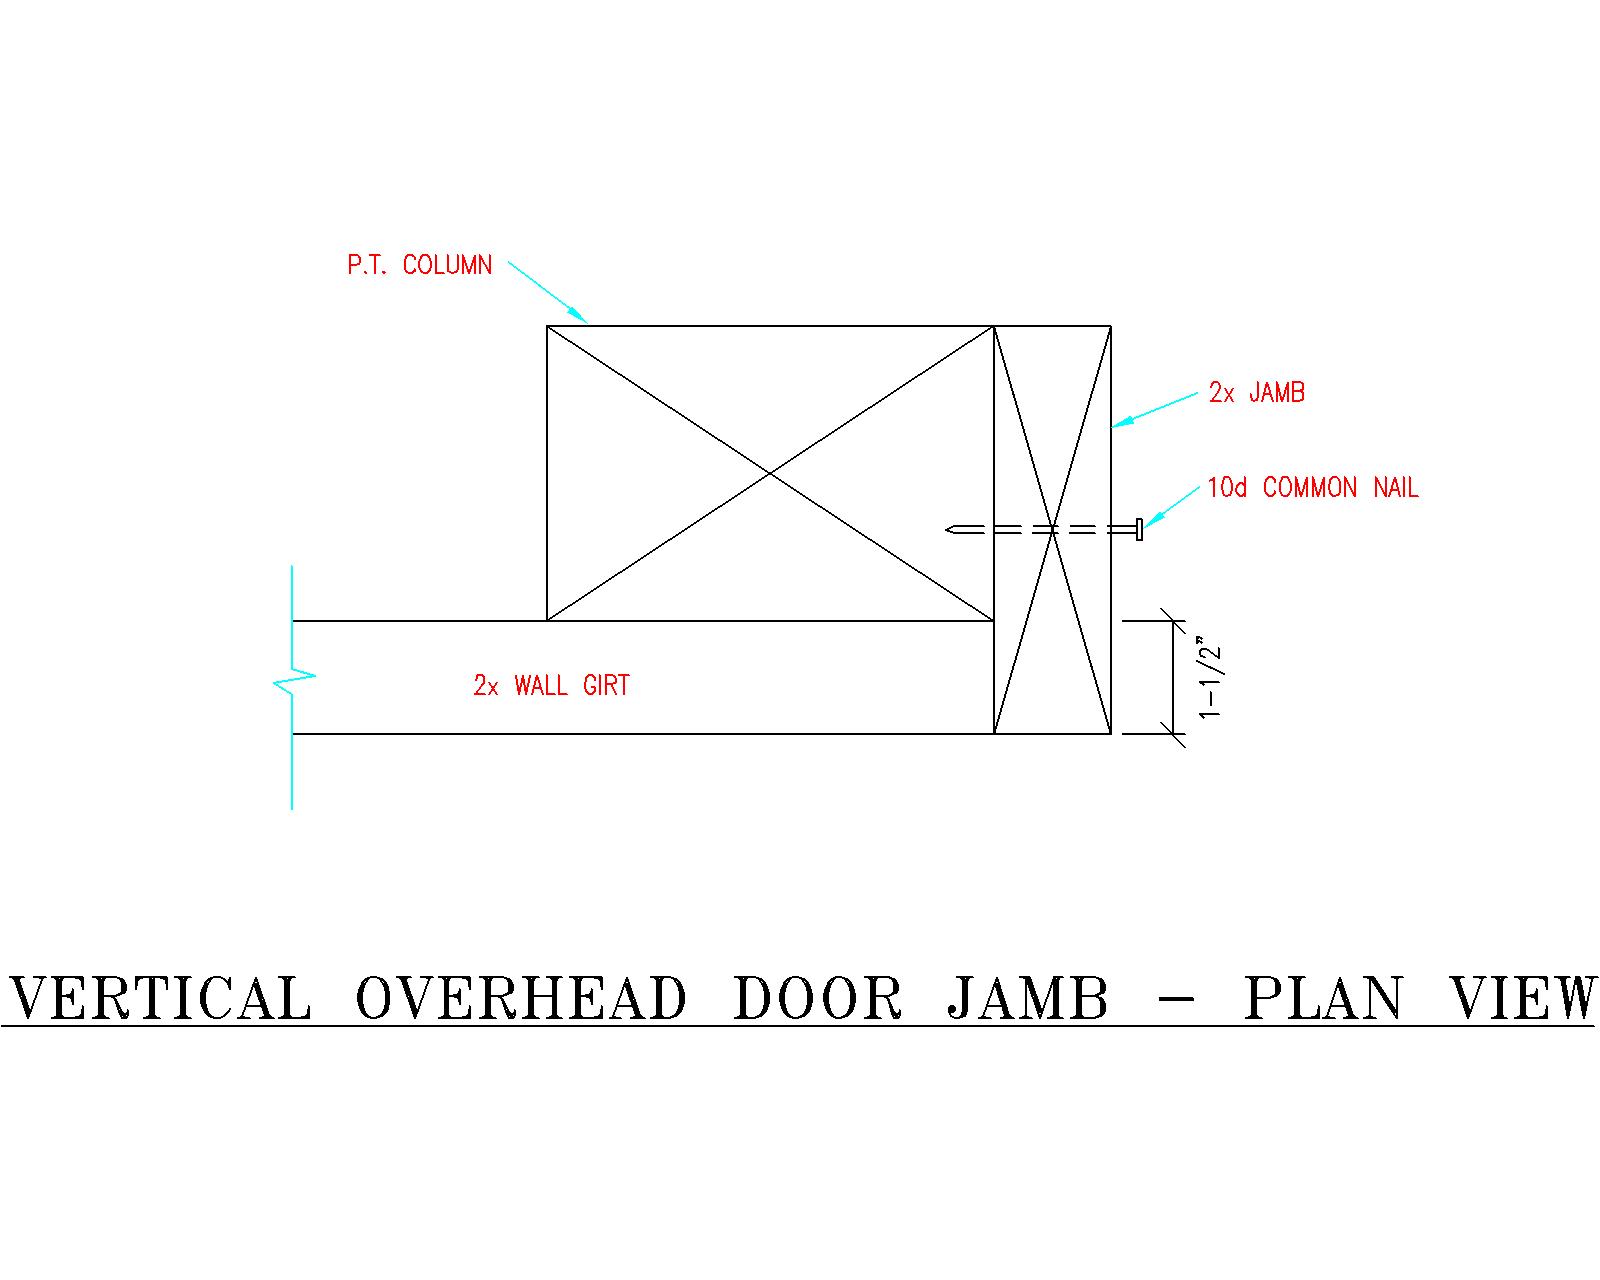
Figure 24-2: Vertical Overhead Door Jamb – Plan View

Tack into place with one 10d common nail at each jamb top and bottom.

Important: Do NOT drive door jamb nails in completely yet!


Place shims between vertical jambs and overhead door columns so jambs are plumb in both directions. For installation when overhead door column(s) are wet set bracket mounted, use shims thick enough to avoid having to notch into vertical jambs to accommodate bracket and bolt heads.

Ideally, space between vertical jambs for residential doors is approximately equal to overhead door width, less 2”. Commercial doors space is equal to door width.

For example: For a 10’ width residential door, space between jambs will be about 9’10”. If this varies slightly, rest assured, doors will still seal.

OK, now nail jambs securely into place!

Cut horizontal jamb to length: at width between jambs plus 3”. Place horizontal jamb flat, on vertical jamb tops, flush with vertical jamb outside edges and with any crown out. Nail downward through horizontal jamb ends into vertical jamb top butt ends to secure in place.

Mike the Pole Barn Guru adds: And there you have it! Good Luck and let me know how it all works out.

Storing Lumber for a New Pole Building

Storing Lumber for Your New Post Frame Building

Ideally, use lumber promptly. Otherwise store in a cool, dry location, avoiding direct sunlight and preferably indoors where humidity variations will be minimal.

Dry lumber

Unlike green lumber, keep kiln or air-dried lumber away from moisture, otherwise product may lose value added by careful seasoning. Dry lumber if saturated with water, such as from rain, melting snow or contact with wet ground, can lose dimensional stability, warp and otherwise deteriorate. Lumber exposed to alternate wetting and drying will check, split, warp and discolor.

If stored outdoors, keep dried lumber off the ground and protected by paper, wrapping, tarpaulins, or canvas. Paper wrapping offers short-term protection and, if torn, repair immediately. Dilapidated wrapping holding rainwater may increase moisture regain more than if lumber had no protection.

Why use dry lumber? Lumber grade stamped at a 19% or less moisture content is termed “dry lumber”. Dry lumber is relatively dimensionally stable – meaning shrinkage probability is negligible. University research studies have shown an 8’ long 2×4 will lose approximately 1” in length, when naturally drying. Drying lumber also reduces chances mold or other fungi will attack wood. “Green” (20% or higher moisture content – not color) lumber is prone to warp, cup and split as part of natural drying process. Holding power of nails driven into green wood drying in place drops substantially over time.

Read more about dry vs. green lumber here: https://www.hansenpolebuildings.com/2011/09/499green-lumber-vs-dry-lumber/

Air flow is the most important factor in outside lumber storage. Allow large air volumes to circulate freely around stacked lumber in order to evaporate moisture from lumber. Provide an open storage area with no trees or buildings blocking air flow. Remove weeds, grasses and other vegetation around lumber as they harbor insects and fungal spores.

Good water drainage in storage area is important. Standing water adds to humidity increasing mold and stain possibilities on lumber.  

When stacking lumber on stickers (also known as dunnage), place stickers in perfect vertical alignment with one another. Otherwise, sagging will occur. Solid stacked lumber is often stored in packaged units bound with tie straps (or banding) for easier handling. Separate stacked units by spacers, usually at least 4”, and aligned with lower stickers to prevent sagging.

Storing lumber under a roof offers better protection by keeping material dry and bright.

Lumber, especially pressure preservative treated, is particularly susceptible to warping and twisting while curing.  These materials are best incorporated into the new building as quickly as possible.  In the event lumber will not be used immediately, keep bound tightly.

Bands placed by lumber company will rarely be adequate to maintain dimensional stability.  Tight chains or cable restraints around lumber at frequent intervals, tightened as material dries, may help. Even these measures may be inadequate to prevent lumber warp, twist and bow.

In any case, prior to installation in the new building, protect pressure treated lumber from direct sunlight and rain.

Do I Need Any Additional Vapor Barrier?

Do I Need Any Additional Vapor Barrier?

Reader TOM in NEW LONDON writes:

“Have a 40 x 60 pole barn which I have poured a 20 X 60 6″ concrete floor with radiant heat. I have installed 1 1/2″ R 7.5 rigid pink board between the 2 X 6 side boards against the steel. I will be installing R 19 kraft faced insulation in the 2 x 6 side walls and R 38 kraft faced insulation in the ceiling. The area above the ceiling insulation is completely open to the roof.  Eaves soffit is vented. Do I need any additional vapor barrier? Have I done anything wrong?
Thank you.”

Some basic commentary, from your photo, to begin with. I obviously do not have the benefit of having your building’s engineered plans or sealed truss drawings to reference, so some of my commentary will be based upon best guesses.

I would sincerely doubt your building’s roof trusses have been designed to support loads induced into them from knee braces. Please read more in regards to this subject here: https://www.hansenpolebuildings.com/2012/01/post-frame-construction-knee-braces/. Your first step should be to contact the truss manufacturer to verify ability of your building’s trusses to withstand loads from knee braces. With an assumption trusses were not so designed, second step will be to contact the engineer who designed your building to find out if your building will still be structurally sound with knee braces removed. If, by some chance, an engineer was not engaged to produce your building plans, a competent one should be retained to do an analysis of your situation.

Any lumber in contact with concrete needs to be pressure preservative treated – this would include plates between columns and bottom plate of your framed stud wall. You really do not want to have these boards decay within finished walls.

If you do not have a well-sealed vapor barrier beneath your concrete slab-on-grade, you need to use a good sealant over top of it.

Moving forward, to your question at hand. In order to install kraft faced batts along your building’s sidewalls, you will need to add additional framing. Most folks place another set of wall girts upon column insides. If so, in your case, then R 19 batts are not going to be adequate – as they will leave an air gap between batts and pink board. My recommendation would be to use BIBs (https://www.hansenpolebuildings.com/2011/11/bibs/) in walls, with a vapor barrier to inside face of framing before adding the finished wall material. To get best thermal performance, a layer of closed cell foam insulation board can be glued to wall framing inside, then glue gypsum wallboard (sheetrock) or your choice of other products to insulation boards. This inner layer of foam board, if joints are sealed, will act as your vapor barrier. Have your building engineer confirm your building walls will be stiff enough to keep drywall joints from cracking.

Now – roof system. Before adding a ceiling, verify your building’s roof trusses will support this added weight. Most post frame building trusses will not! Trusses should have a minimum bottom chord dead load of five psf (pounds per square foot) to support framing and drywall. Your building does not have a vapor barrier between roof purlins and roof steel. Only cure for this now will be to have two or more inches of closed cell foam insulation sprayed to the underside. If you fail to do this, you will have moisture/condensation issues in your attic. You also do not want to have a vapor barrier in your ceiling line – so kraft faced batts are out. I’d recommend 15-20 inches of blown in fiberglass insulation. Make sure to not block air intake from soffits. If your ridge cap isn’t currently vented, it needs to be.


Tom could have avoided a great deal of pain and expense had he and his building provider been communicating in regards to climate controlling this structure. Unfortunately, most post frame building kit suppliers and contractors are focused only upon providing a low price, instead of best design solution for their clients.


Treated Lumber for In Ground Use

Treated Lumber – Justine Schools a Major Lumberyard Chain

When it comes to pressure preservative treated lumber, ignorance from the supply side seems to be bliss and there are way too many folks out there happily selling under treated product.

For your entertainment pleasure I bring you a discourse between Hansen Pole Buildings Lumber Wizard Justine and the manager of one of a 145 plus location lumberyard chain which supplies materials to both post frame builders and DIYers.

Justine: “Good Morning. Can you confirm 4×6’s and 6×6’s treated to .23 retention level?”

Manager: “No. They are ground contact treated to .14pcf.  And our 2×4 and 2×6 are above ground .05pcf. We do not carry .23pcf in any of or lumber treatments.”

Justine: “I need these to be in ground contact treated.  So if you’re using MCA I need them to be .23 which I have gotten with Xxxxxx many times.  Would you please quote those.”

Manager: “UC4A .15 is ground contact for structural posts and deck posts. 

I can special order in UC4B .23 (or .31) Critical – for permanent wood foundations in full units for you. You would have to purchase 24qty of the 4x6x14’s and 24 of the 6x6x14’s and it will take me a couple weeks to get in.

Let me know if you want to do that?”

Justine: “Good Morning (another manager in same chain),

.15 cannot be buried in the ground, it doesn’t meet code.

.23 I have ordered in pieces and less then bunk units with Xxxxxx many times.

2nd Manager, can you help 1st Manager with this one.”

Second Manager: As my location is a part of the Xxxxxx Lumber division I am able to pull the post out of our location in Millersburg.  My suggestion to 1st Manager would be to check and see if he can have them top loaded by the piece on his next treated truck.  Other than that I am not sure how to help.”

First Manager: “I just talked to Escue the treatment plant and they do not sell less than a unit. They will not top load a few boards.

 According to Federal Gov’t Regulations (AWPA Standards) the .14pcf UC4A Can be buried in the ground. It is absolutely in ground contact.”

Justine: “You are false, It can touch the ground but cannot be buried in the ground.  Code is UC4B is in ground use.

Have you tried Universal Forest as I know Xxxxxx branches use them as well.”

First Manager: “Unfortunately someone is feeding you false information  – Here is an ICC (International Code Council) report – all of the treatment plants are on there – ( Universal Forrest Included).

Look at Page 5 – .15pcf — Ground Contact – In ground

              Page 5 – UC4A – Ground Contact – In ground

I would like to take care of you on this job for 2nd Manager, but I can only sell you what I have Sir…”

Humorous sidebar – First Manager has not yet realized Justine is a member of the female side of the human species.

Here is where I step in to do some educating:  This is not meant to put you down, however you have been given some bad information.


Please read this article, then look up the cited section of the International Building Code which confirms Justine is correct:
https://www.hansenpolebuildings.com/2012/10/pressure-treated-posts-2/.

Thank you for your understanding.”

 Considering ordering post frame building materials or a pole building kit package from a lumberyard? This is a chain of locations which absolutely should know better, yet does not. Do you want to risk your beautiful new pole barn having posts which rot away?

I think not.