How to Frame an Overhead Door Opening
Reader DAVID in SPURGEON asks:
“How to frame in an opening for a 10 foot by 10 foot overhead door?”
This except from Hansen Pole Buildings’ Construction Manual should get you going:
Chapter 24: Overhead Door Openings
Most Common Mistakes:
- Column(s) next to door turned the wrong direction.
- Header placed at incorrect height.
- Wall out of square prior to framing opening.
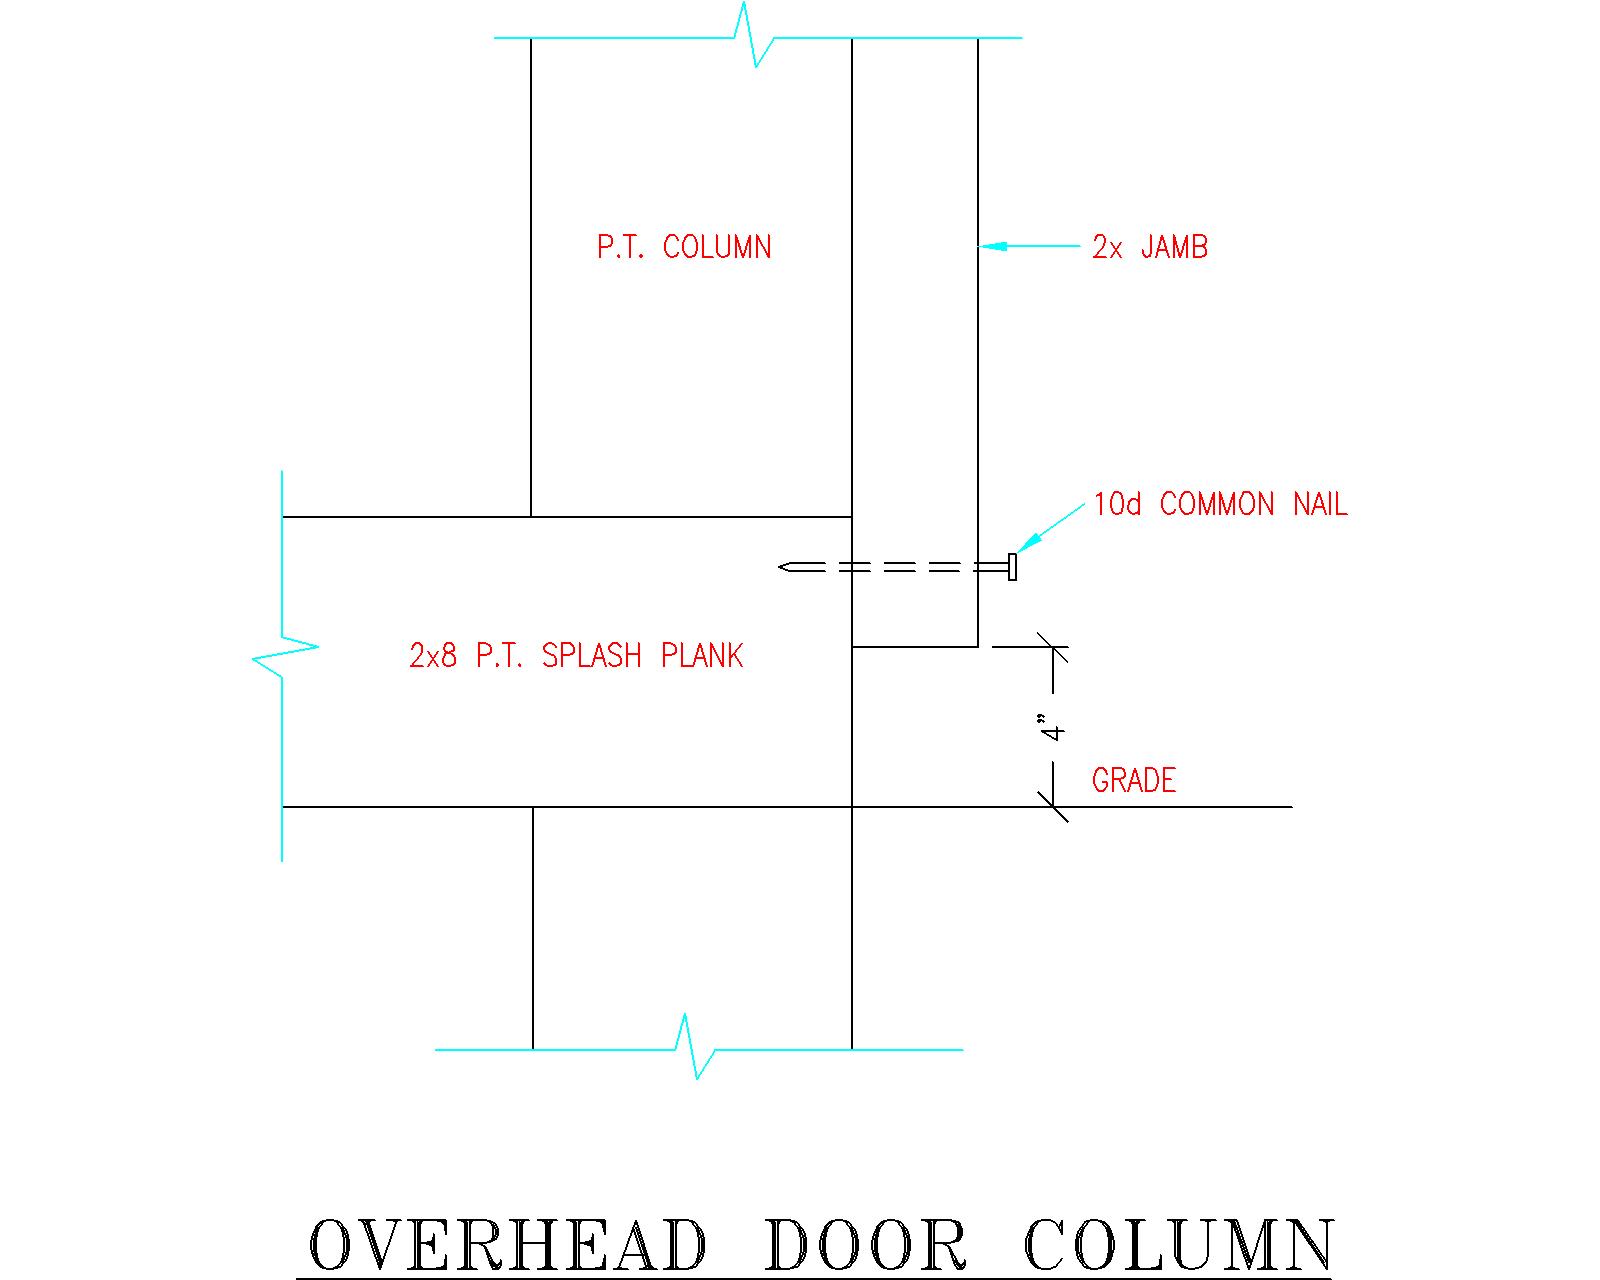
- Door opening bottom at other than 3-1/2” above bottom of splash plank.
- Failure to install
A ears in residential door applications. - Vertical Jamb bottoms set other than at 4” above bottom of splash plank.
Overhead door columns: Usually 4×6 pressure treated, if required, will typically be oriented 6” toward wind, unless wall columns are 6×6 or larger. Correct orientation will be shown on building plans. Space between columns, for residential doors, will be approximately door width plus 1”. For commercial (ribbed) doors space between columns will be approximately door width plus 3”.
Overhead door openings are planned so as to allow an approximate 1” overlap where overhead door panels and jambs meet. This helps to minimize possible weather infiltration.
What if no concrete slab on grade is planned for? Chances are good, as some future date, someone will add a concrete slab. Door bottom should always be placed at 3-1/2” above splash plank bottom. Build a gravel (or similar material) berm across the opening, up to the bottom of the door (again 3-1/2” above splash plank bottom) in order to provide a seal easily removable if and when a concrete slab on grade is poured.
With wall columns 6×8 or 2×8 glulams (or larger), it is possible a 2×4 filler (or fillers) will need to be added to the inside face of a smaller dimension column on one or both sides of overhead door openings. This will be indicated on plans with language like “4×6 SYP #2 W/ 2×4 STD FILLER ON INSIDE FACE”. This filler should be installed on the inside face of the column in question, with bottom of filler 1” above top of concrete slab, vertical edge tight to overhead door jamb and top at height of header. Attach with 2-10d common nails 12” on center.
As overhead door columns have been set from dimensions called out for on building plans, only requirement is to create a “picture frame” to place the overhead door behind.
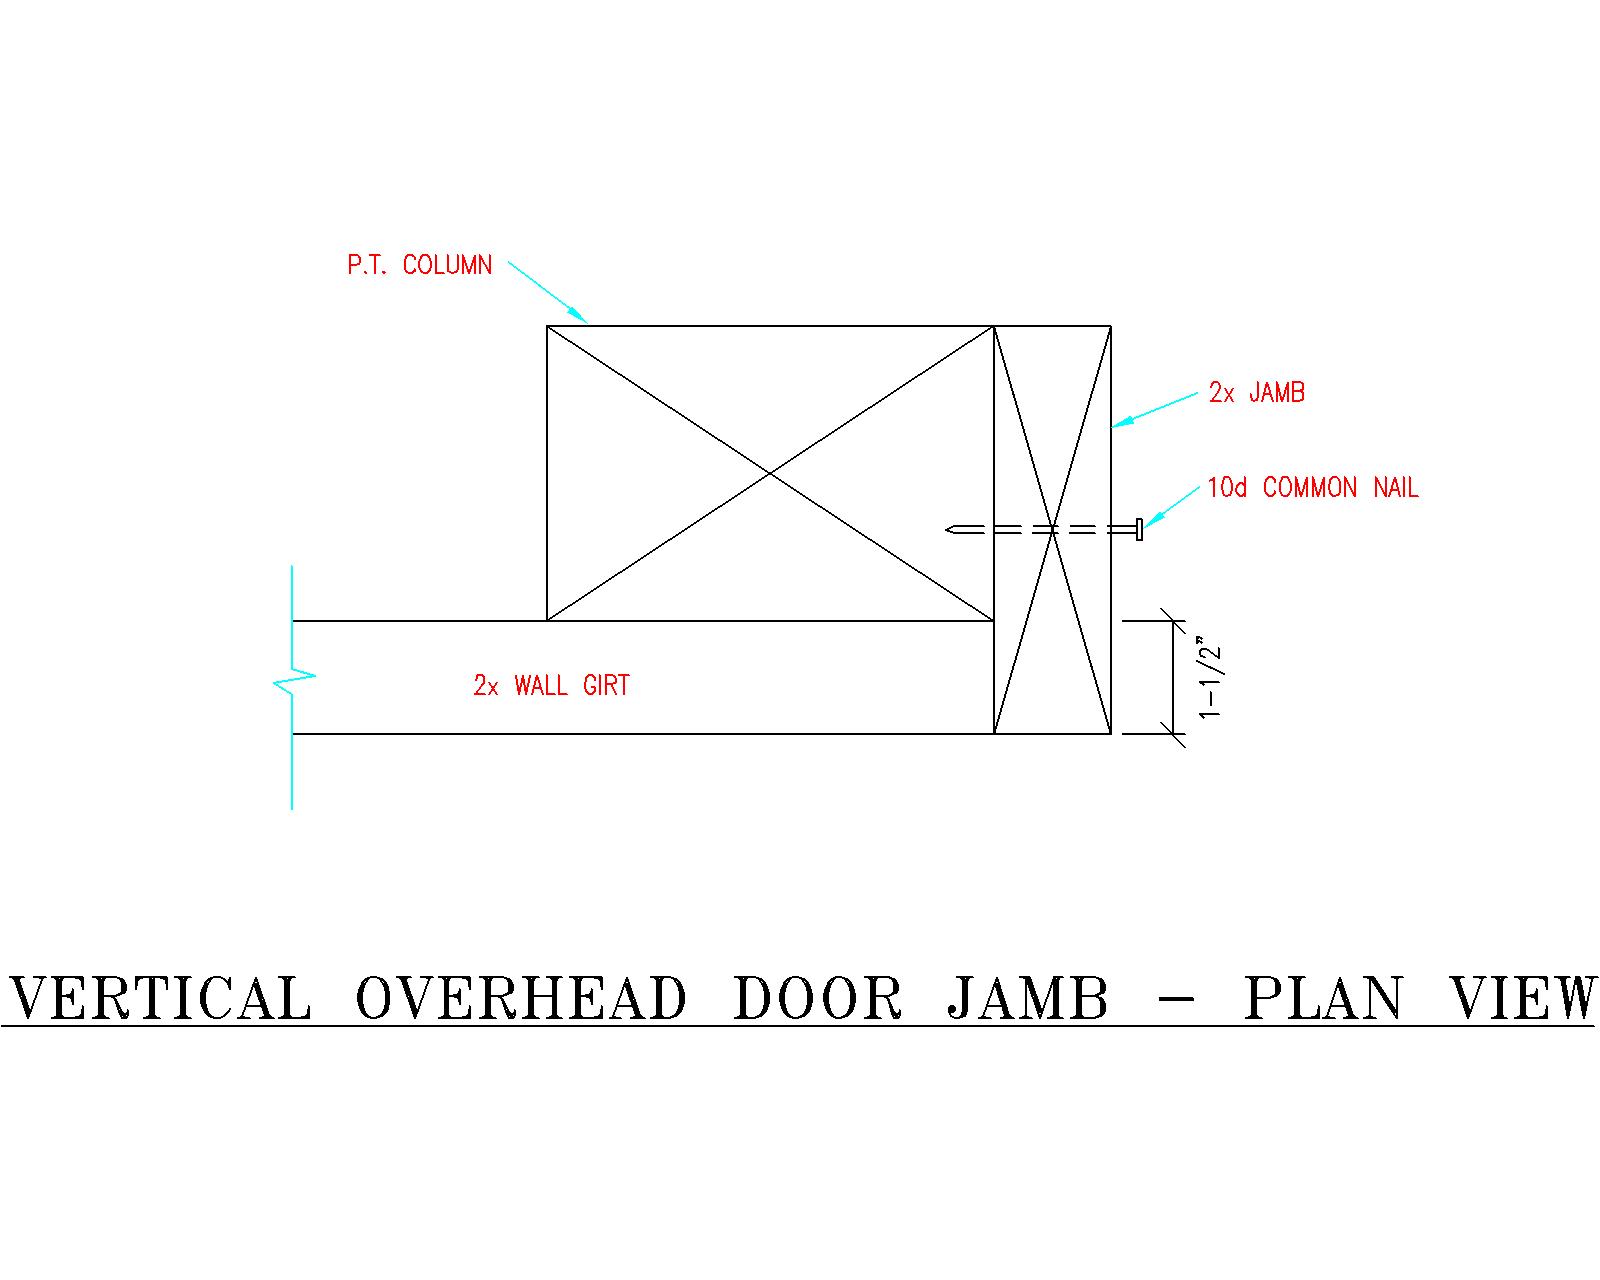
Vertical jambs will be cut from pressure preservative treated lumber and installed first. If a choice is available, use straightest possible boards for these.
If overhead door opening columns are 6×4 (with 6-inch face towards wind) jambs will be 2×6 (with sidings other than steel or vinyl 2×8).
If overhead door opening columns are 4×6 (with 4-inch face towards wind), 6×6 or 3-ply 2×6 glu-laminated, jambs will be 2×8 (with sidings other than steel or vinyl 2×10).
If overhead door opening columns are 4×6 with a 2×4 Std. interior filler, 4×8, 6×8 or 3-ply 2×8 glu-laminated, jambs will be 2×10 (with sidings other than steel or vinyl 2×12).
In steel or vinyl sided applications, jambs may be multiple members (e.g. two 2×4 or a 2×6 plus a ripped 2×4, rather than a 2×8), as they cover with steel trim.
Cut vertical jambs to length first. They will be 1-1/2 inch less in length than residential overhead door vertical height (e.g. 9’10-1/2” long for a 10’ tall door), ½ inch less for commercial doors. When installed, vertical jamb bottom edge will begin 4 inches above splash plank bottom. Install with cut end up. See Figure 24-1
Figure 24-1: Overhead Door Column
Hold vertical jamb in place with any “crown” out and vertical jamb edge top and bottom
1-1/2” outside column edge. See Figure 24-2
*For vinyl siding hold vertical jamb 1-15/16” outside column edge. For other (non-steel) sidings, hold inside jamb edges flush with column inside faces or inside face of commercial bookshelf girts.
Figure 24-2: Vertical Overhead Door Jamb – Plan View
Tack into place with one 10d common nail at each jamb top and bottom.
Important: Do NOT drive door jamb nails in completely yet!
Place shims between vertical jambs and overhead door columns so jambs are plumb in both directions. For installation when overhead door column(s) are wet set bracket mounted, use shims thick enough to avoid having to notch into vertical jambs to accommodate bracket and bolt heads.
Ideally, space between vertical jambs for residential doors is approximately equal to overhead door width, less 2”. Commercial doors space is equal to door width.
For example: For a 10’ width residential door, space between jambs will be about 9’10”. If this varies slightly, rest assured, doors will still seal.
OK, now nail jambs securely into place!
Cut horizontal jamb to length: at width between jambs plus 3”. Place horizontal jamb flat, on vertical jamb tops, flush with vertical jamb outside edges and with any crown out. Nail downward through horizontal jamb ends into vertical jamb top butt ends to secure in place.
Dog Ears
Dog ears are only used on residential overhead door openings. Dog ears are for appearance only and, while not recommended, may be omitted.
From lumber cutoffs, cut two 17” long “dog ears” for each overhead door opening. It is possible to get three dog ears from one board 48” in length. See Figure 24-3
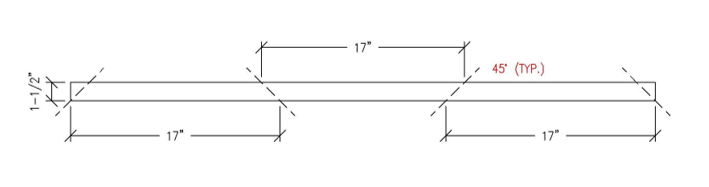
Figure 24-3: Cutting Dog Ears
If windows are to be in overhead door top section, dog ears can be cut slightly shorter to prevent window trim from rubbing as door is raised and lowered.
Install dog ears in framed opening upper corners. See Figure 24-4
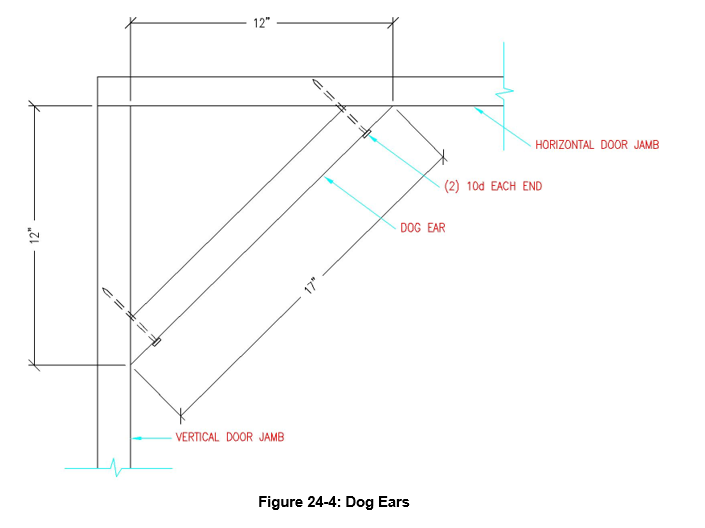
Figure 24-4: Dog Ears
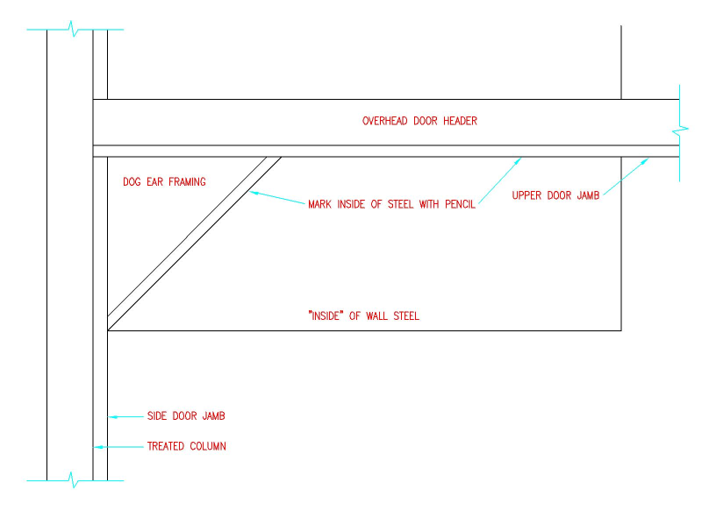
Figure 24-5: Dog Ears – View From Inside Building
Overhead Door Header
For doors 12’ and less in width, install 2×6 overhead door header, above horizontal jamb, with “crown” up. Doors over 12’ wide, header will be 2×8. Header extends to at least column middles on each side of opening.
There is only a header on column outside faces. See Figure 24-6
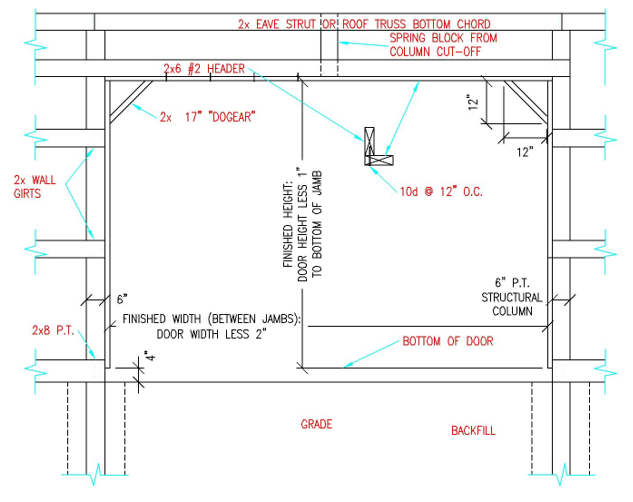
Figure 24-6: Exterior Girts Residential Overhead Door Installation
Nail upward, through horizontal overhead door jamb, into door header bottom 1-1/2” edge with 10d common nails, 12” o.c.
Using a cutoff piece from a building column, install a spring block at header center on horizontal jamb top. PLEASE NOTE: There will be no spring block for coil door applications.