Tag Archives: barn girts

Tipping Up Post Frame Walls

Reader JIMMY in ROCK HILL writes:

“I want to get your opinion on the pole barn building method seen in the linked video. (RR buildings) https://www.youtube.com/watch?v=fVwUl4cm8fQ I am impressed at the built in efficiency of his process. Is there a benefit to his post ground connection, (i am aware that his method will use lots more concrete. and I assume those brackets aren’t cheap)
I know you don’t recommend attaching the girts till after trusses are on…
I’d appreciate your thoughts.”

Rural Renovators has done a fabulous job of producing videos – if nothing else it is helping to make awareness of post frame construction more widespread. There have been over a million views of this particular video alone!

Things to consider with this method of mounting columns, rather than embedding them – cost of sonotubes (an 18″ diameter tube 4′ long will run around $20), a little over twice as much concrete will be needed for holes (roughly $15 on an 18″ diameter hole), brackets (roughly $50 plus shipping) and mounting hardware. This will be offset slightly by columns being four feet shorter in length. Due to soil bearing capacities, there are many instances where larger diameter holes will be needed, but for this discussion’s sake – probably $75 per hole in minimum added investment is not unrealistic.

As to a structural benefit, I personally prefer to avoid creating a hinge point at grade. Embedded columns take away needs for this connection and connections are a wink link in any structural system. Let’s face it, placing a relatively small column in a relatively large hole and shifting it to where you want it is pretty low tech and fairly forgiving.

Rural Renovators accurately sets all column bases to an equal height, allowing for walls to be framed on ground and tipped up. This does require the use of one or more pieces of equipment – ones your average DIYer does not own, so would have to borrow, or in most cases rent. Due to end and sidewalls sharing common corners, it precludes being able to frame up two walls completely on the ground.

In most cases 2x girts placed wide face (barn style) to wind do not meet Building Code requirements, making bookshelf style girts a common structural solution. On buildings without eave overhangs (extended truss tails) trusses can still be raised straight up column sides with barn style girts, however bookshelf girts take this option away. This means lifting equipment would be necessary to get trusses into place successfully.

For Rural Renovators, they have built themselves a niche in their geographic service area by doing things differently than any possible competitors. This is at the very least brilliant marketing – as when everyone constructs things identically, it forces price to become a defining difference!

Wall Girts Are Not Sexy

Wall Girts Are Not Sexy

Thought I had forgotten about Features and Benefits? Guess again!

My 1990’s salesman Jerry was proud of his ability to rattle off a litany of features, without explaining to clients benefits of any of them. This one feature I can imagine meant little or nothing to clients, as wall girts are not sexy!

FEATURE: Bookshelf style 2×6 #2 and better, kiln dried wall girts

Interior StairwellBENEFIT: Set flat like shelves, girts oriented this direction are strong enough to withstand wind loads, stiff enough to meet Code deflection requirements and keep finishes such as gypsum wallboard (sheetrock) from cracking. Spaced 24 inches on center, they create a deep wall cavity for insulation.

EXTENDED READING ABOUT THIS SUBJECT:

On deflection limitations: https://www.hansenpolebuildings.com/2012/03/girts/

For insulation: https://www.hansenpolebuildings.com/2018/09/making-framing-work-with-bookshelf-girts/

WHAT OTHERS DO: Most often, “barn” style girts placed flat on outside of wall columns.

pole spacing
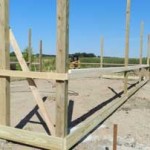
Concept of girts being nailed to column exteriors is they (in theory) do not have to be trimmed therefore saving labor (as well as any need to measure). Being ignored in this is lumber typically comes approximately 5/8 inch over specified lengths, making trimming needed anyhow. Most common column spacings are multiples of exactly two feet – eight, 10, 12, etc., and those 5/8 inches add up across a very long or wide post frame building.

Usually girts as specified upon plans (or plans themselves) have never been checked by an engineer and they sail right through most plan checks, in part because they are done “how we’ve always been doing them”.

In some cases every other girt will have another member attached to form a “T” or an “L” – however intermediate member (one between T or L girts) still fails to meet Code deflection limitations and often proves insufficient to resist wind loads.

Generally, little or no consideration has been given to additional forces upon girts when buildings are partial enclosed or three sided: https://www.hansenpolebuildings.com/2014/03/three-sided-building/

WHAT WE DID IN 1980: Remember, Lucas Plywood & Lumber was in a region where low grade green lumber was king! We used green 2×6 #3, barn style, spaced upon two foot centers. Ignorance was bliss and we were happy, as this solution was cheap, however not structurally adequate.

If you are not well versed regarding issues surrounding green lumber, you will want to read this information: https://www.hansenpolebuildings.com/2011/09/499green-lumber-vs-dry-lumber/


Pole Building Wall Girts

Movin’ On Up!

Well Leroy will never be confused with Sherman Hemsley of the iconic TV series “The Jeffersons” but his crew was certainly movin’ on up!

Leroy mentioned the man he works for provides neither plans nor a materials list for his crew to build from. They just make the building “work” from the materials which are dropped off. Somehow, this seems less than scientific, especially as they cut all of the notches in the columns for the single trusses spaced every eight feet, then had to go back and cut them all again! It seems they had forgotten to compensate for the purlins, which would run over the tops of the trusses. The crew easily burned several hours in this adventure!

It was of interest to hear Leroy espousing how much money was being saved by his employer using rough cut 5×6 (yes, 5×6 for those in most of the rest of the country) for posts instead of surfaced 6x6s.

At 4-3/4” x 5-3/4” the Section Modulus of the rough 5×6 is 26.17, as compared to the slightly greater 6×6 at 27.73 (within 6% anyhow). As long as the site of this building was Exposure B or C for wind, either size would work – Exposure D, either is a failure (assuming we are talking about Southern Pine lumber, not some lesser species).

For more fun with posts: https://www.hansenpolebuildings.com/2014/08/lumber-bending/

What I found particularly interesting was the attempts to cut truss notches in the posts, while they will settle further into the ground due to the lack of an adequate footing underneath. If you didn’t read the past two days’ blogs, go back and find out how much concrete was put in the posts, and why it’s nowhere near adequate to keep this building from settling (or heaving due to frost).

I’ve always built by doing the roof first, it made things easier to square up. Leroy’s boys were putting up wall girts as quickly as they could, however. I was impressed by the use of 2×4 1650 msr lumber for the wall framing. This was the first good idea I found my neighbor’s pole building experience.

Learn about msr lumber here: https://www.hansenpolebuildings.com/2012/12/machine-graded-lumber/

Pole Barn Wall GirtsOn this building, the girts were unusually spaced – 31 inches from the top of the pressure treated skirt board, to the bottom of the first girt, then 25-1/4 inches on center above. This means the bottom girt has to carry a tributary load of 29 inches.

With an Exposure B wind condition, they will carry the bending loads (https://www.hansenpolebuildings.com/2012/03/girts/), however with spans of greater than 24 inches on center, which they all are, results in excess deflection beyond the limitations of the building codes. Adding two more rows of wall girts would have at least been something to even things out.

Now the clincher –only the 40 foot sidewalls were framed prior to all of the windows and the entry door being installed. No apparent attempt was made to insure the corners were plumb, and no apparent connection to the other walls was constructed. The entry door was installed without adding a post on one side for stability! It just sort of “hung there” on the one post.

On the windows, if the wall has to be racked very far to have a plumb corner, undue stresses will be placed upon the frames, resulting in windows which bind when being opened, or possibly cracking from the stresses induced! I’d not want anyone standing below this building if they do decide to square it up.

Come back next week and we’ll see if this saga comes to a close!

Them Girts, They Be a Bending

In order to follow the deflection criteria of the International Building Codes, other than for fairly small wall column spacings with low wind speeds, pole building wall girts need to be installed in a “bookshelf” fashion.

What even is “deflection criteria”?

Dictionary.com defines deflection as, “the deviation of the indicator of an instrument from the position taken as zero.”

In layperson’s terms, when you push on something with a known force, how far does it bend (or deflect)?

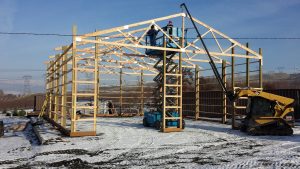
Prior to the adoption of the International Building Codes, wall members which did not support a brittle finish material (e.g. drywall), were not limited in how far they could deflect.

Not so with the new code.

For those of you who care to look it up and read along, Table 1604.3 lists deflection limits. For walls with brittle finishes, the limitation is L/240 (where “L” is the span or length of the supporting member). For flexible finishes, the limit is L/120. Footnote A includes, “For secondary wall members supporting formed metal siding, the design wind load deflection shall not exceed L/90.”

The smaller the value L is divided by, the larger the allowable deflection is.

Ignoring the width of nominal six inch building columns the allowable deflection of wall girts for an 8’ bay (with steel siding) would be 1”; a 10’ bay 1.27”; 12’ bay 1.54”.

Using the least possible loads allowed by code – which would be 85 mile per hour winds, B wind exposure and a building Occupancy class of I (I = a building which represents a low hazard to human life in the event of failure) combined with the stiffest possible commonly used lumber (Douglas Fir or Southern Yellow Pine #2) and spaced 24 inches on center, some problems occur.

Using 2×6 lumber on 10’ bays the actual deflection is 1.507” and on 12’ bays 3.226”. On 8’ bays IF 2×4 #2 is actually used (it is rarely available in lumber yards), then it would deflect 0.924” and be OK. Another issue with the 2×4 girts on 8’ bays, is this style of construction is most prevalent in areas where the minimum wind speed is 90 mph.

Keeping all variables the same, except increasing the wind speed to 90 mph, increases the deflection of a 2×4 #2 to over an inch on an eight foot bay!

Shopping for your new ideal dream pole building? If so, ask specifically how the wall girts are placed. Anything other than “bookshelf” style pretty much guarantees the building being proposed, is not code conforming!