Tag Archives: post frame building kit

Local Building Supply is Wrong Choice

With an advent of internet providers such as Amazon (www.amazon.com ) there has been more pressure to “buy local”. Sometimes buying local can be a blessing, but when it comes to a new post-frame (pole barn) building – even an attempt to buy local can prove to be an experience (and not a pleasant one).

Reader MAGNUS in HUDSON writes:

“I’m looking for a quote on a 36’x60’ pole barn. I’m pretty motivated to get this going – I’d like to start raising walls in mid-June. I’ve been trying to work with my local building supply (small town, stay local if possible) but they’re just letting me down on timing, and at this point I’m looking for solid alternatives. I’m pretty impressed with all the info on your site (in fact, I spent a bunch of time there over the past few months getting educated, and almost went with you without even checking with the locals.)

I’ve got cash in hand for this, so at this point it’s just trying to get plans in hand so I can get my permit and get some ground prep started. I’m leaving the country for about 2 weeks from the end of May to mid-June. My goal has been to get the earthwork done (some grading and fill + gravel pad) before I leave so I can begin erecting as soon as I get back. That’s feeling pretty tight now, though I thought I had plenty of time a month ago when I started with the locals.

I know I’ve forgotten a few important details as I put this drawing and notes together tonight. I’m available by phone most of the day Monday and Tuesday for any clarification questions. I’ll try to get the few items from your checklist that I don’t know filled in on Monday.”

Mike the Pole Barn Guru writes:

Your local building supply probably is staffed by very nice people. They probably know most people in town by first name. They are not post-frame (pole barn) experts. In fact, if they are above novice level you would be doing well!

There is a chance there is someone on their staff who can actually sort of do a material’s list for a pole barn. Keep in mind, there is not a “plan” they are working from, so no one is checking for adequacy of structural design. This list of pieces may, or may not, even be enough pieces to sort of put a building together. My experience is a list such as this will be inaccurate for quantities, will leave things out, add in a few unnecessary pieces and result in waste, confusion and a less than satisfactory end resultant.

Some local building supplies have gone as far as investing in computer software, supposedly capable of putting together a list of materials. I have yet to see one of these programs able to do an accurate list on anything beyond a basic box – and they cannot supply engineering. Again, it is nothing better than a guess list!

Even if your local building supply somehow had a relationship with an engineer, who could provide sealed plans for your new post frame building – they are not specialists. At Hansen Pole Buildings we have buying power to get post frame building specific products in massive quantities at wholesale prices. Some of these are items we have manufactured specifically for us, when we found commercially available products were lacking in quality or features.

Let’s say your local building supply was somehow able to provide engineer sealed plans specific to your building, do an accurate material takeoff, get product to your building site – they are not going to have detailed assembly instructions to guide you through to completion. Chances are no one there has ever constructed an engineered post frame building, so when you or your builder get stuck, or make an error, it is up to you to solve it!

If you, or anyone, believes there is another post frame building kit supplier offering a better value to their clients, let us know what they are doing Hansen Pole Buildings isn’t. Frankly, we do not believe it to be possible.

Ready for “The Ultimate Post Frame Building Experience”™? Dial 1 (866) 200-9657 and speak to a Building Designer today!

Engineering Your Pole Building for Free

Please Let Me Engineer Your Post Frame Building For Free

Pole Barn Guru BlogBecause I am not a Registered Design Professional, I can’t engineer your new post frame building for you. And, if I was, I most certainly would not be doing it for free. Typically an engineer should be compensated somewhere in the area of 8 to 12% of the value of the project, depending upon how involved they have to be with it, as well as if a visit (or visits) to the site are included.

Reader TERRY in FORT WAYNE had written and had his original request fly off into cyberspace, so he tried again:

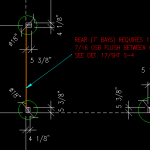
“Mike, Thanks for getting back to me. That doesn’t surprise me!! Questions: 1) My barn will be 44’x32′ x15′ wall height with the trusses running the 44′ way. What size of holes do I need to bore for my post anchors? I’m not barring my post, pouring concrete to the top with 18″ tall “U” brackets made from 1/4″ plate and (4) jay hooks 18″ long on the bottom of brackets that will be in the concrete 18″s. Also what size header do I need on the truss support side if I install trusses every 24″ with plywood and shingles with A 16′ oh door opening .( Wanted to match my existing garage roof.) I will be tying the new barn to the existing garage on one end. If not a good idea what header to use with trusses at 8′ and wood purlin and metal roof? Let me know if you need any more info. Thanks for your help. Dirt is clay and figured at 3-4K in my area.

If you have any questions please call.

Thanks.”

Mike the Pole Barn Guru replies:
You are asking questions of me which should be directed to the RDP (Registered Design Professional – architect or engineer) who designed your building and provided the plans. These will include the foundation design as well as any truss carriers.

Some commentary – there are wet set brackets made specifically for post frame buildings. I would recommend you invest in them rather than trying to fabricate (or have fabricated) your own, unless they were designed by your RDP and inspected by him or her after production. For Clay soils, the Building Code allows a value of only 1500 psf – any greater values should be used only if an onsite soils test has been done by a registered engineer, else you are at risk of settling issues. See Table 1806.2 https://codes.iccsafe.org/public/document/IBC2015/chapter-18-soils-and-foundations.

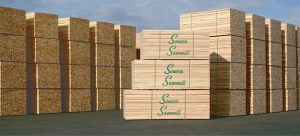
If you are not too deep into your project and do not have an RDP involved, I would strongly encourage you to deal with a post frame building kit supplier who can provide engineer sealed plans and calculations for your building, along with the materials to assemble it and complete instructions.


How to Install Fiberglass Batt Insulation

How to Install Fiberglass Batt Insulation in a Post Frame Building Attic
There are times when I overlook things which seem obvious to me, but do not appear to be so to the innocent beginner doing their own construction work. This past week we were contacted by one of our new post frame building kit owners, who had hired a contractor to assemble his building. The contractor was apparently facing some challenges when it came to installing the unfaced fiberglass insulation batts in the attic space.

First step – unless your post frame building has trusses spaced every two feet, chances are good the ceiling joists must be installed between the truss bottom chords.

Exception (and not covered in this article) would be if your building is going to use steel liner panels for a ceiling and the trusses are spaced appropriately to be able to support the liner.

Step two is to install the ceiling material, which in most cases is going to be 5/8” sheetrock (although other materials such as OSB or plywood could be used). Do not install a vapor barrier between the ceiling materials and the ceiling framing.

Step three – lay down boards or plywood sheeting to help you be able to walk safely in the attic space.
When installing fiberglass insulation, observe all safety precautions. Fiberglass can release tiny fibers, which can be harmful if breathed into the lungs and which may irritate the skin. Wear protective gear.

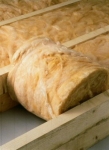
The necessary R-value for the attic will depend upon the manufacturer and style of insulation chosen. Check with the manufacturer’s instructions on the packaging to determine how much insulation thickness is needed to achieve the desired R-value.

Once you’ve determined the amount and type of insulation needed, and the insulation has been purchased, begin staging the rolls in the attic. Place rolls around the perimeter of the attic for easier access during the installation.

Fourth – When laying insulation, it’s a common mistake to cover up the soffit vents. Soffits are part of the overall ventilation scheme, and covering them blocks essential air flow in the attic. With the widely spaced trusses typical of post frame construction, insulation baffles can be created by using rigid insulation boards to maintain a minimum two inch airflow above any insulation.

Fifth – Begin laying in the insulation, starting at an area furthest from the attic access.
When rolling the insulation, cut it to length using a utility knife.

When you reach the end of a line, pull the insulation back slightly, then place it on a joist so there is a solid surface to cut on. Using a straightedge as a guide, make your cut.
After making the first cut, use the remaining portion of the roll and work back in the other direction. When you reach the end of the roll, butt a new roll up to the cut piece and finish the run.

Once the perimeter is reached, cut the end of the roll to fit. Using this technique results in the best use of the insulation and reduces wasted material.
Lay the rows snugly together to prevent undesirable gaps or spacing.
When you run into an obstacle like a cross-brace or pipe, cut a notch in the insulation roll to fit around the obstacle, then continue with the run.

Areas around the perimeter of some attics can be rather tight and confining. Just keep rolling out the insulation, but don’t compress or squeeze it into tight spots, as this can decrease the insulation value.

When Everything Doesn’t Go Perfect Part I

When Everything Doesn’t Go Perfect (and the sky falls)

not perfectThe key to any successful construction project is not necessarily how everything went perfect, but instead it is how the things which did not go perfect were resolved. When one considers the average post frame building kit package materials have been touched by in excess of FOUR THOUSAND pairs of hands, it is truly amazing anything ever gets built!

Here is a true recent true story:

DEAR POLE BARN GURU:  I read many posts in your blog prior to purchasing a kit. I have contemplated hiring the erection of my building to a local contractor. When I requested information on suggested contractors, I found there is only one in my state. He is approximately 400 miles from my location. Here is my question: Where in the heck do you get your range of costs for constructing a building? You blog suggests up to $5 / square foot. I have multiple quotes and they are in excess of $16 per square foot. I have had nothing but problems with this purchase. Materials were not delivered per the plan. Every delivery I was told that I had to accept the materials in less than 24 hours from notification. I never knew ahead of time if I needed to have a forklift to offload the materials, so I had to make arrangements each time to be sure that the offloading could occur. The lumber substitutions from 4×6 to 6×6 complicates the build because the dimensions don’t agree with the plans. I will have to purchase additional 2 x 8 material because the full dimension 6×6 posts need to be straddled by two 2x12s and have a web between them. The plans call for a 2×6, but I don’t dare have a ½” to ¾” gap in the setup. There is no one I can talk to within Hansen. The material scheduler merely sends out the same form letter each time. The salesman has forgotten who I am. These issues are not mentioned in your blog.

DEAR CLIENT: Thank you for your investment in a new Hansen Pole Building. I will endeavor to answer your questions as thoroughly and completely as possible. To begin with, our business is the success it is because we both value input from our clients and we take it to heart. We endeavor to have only satisfied clients, and for the most part have been very successful with it.

I appreciate your having read many of my blog articles. I strive to be both entertaining and informative.

Where in the heck do I get my range of costs for constructing a building? In a not too distant past life, I was a post frame building contractor, with as many as 35 crews constructing buildings in six states. The general rule of thumb is the cost of labor should run no more than 50-60% of the price paid for the materials package. This was developed from my years as a general contractor, where we took our materials cost and doubled it, with us getting 25% for being great and wonderful contractors and the construction crew getting the other 25%. The cost of materials for your building was roughly $18,444 – from experience a knowledgeable crew of installers should spend no more than 154 person hours to complete this building. 50% of your purchase price of $18,444 would be $9,222 divided by 154 person hours pays each installer roughly $60 per hour – not bad wages. (for more reading on this subject: https://www.hansenpolebuildings.com/2014/03/contractor-costs/)

At $16 per square foot, my guess is your quotes are coming from general contractors (https://www.hansenpolebuildings.com/2014/11/builders/)  who are going to have subcontract labor do the assembly. 1600 square feet at $16 would be over $25,000 and I sincerely doubt any installer would be worth over $160 per hour. At those wages, I would consider strapping on my nail apron, getting out my screw gun and going back to physically doing construction.

So how do you go about finding an actual technician who can construct your building? If you do need a contractor, I recommend placing an ad on Craigslist under “labor gigs” such as:

Contractor needed to assemble pole building kit package on my clear level site in X County. 40’x40’x9′ fully enclosed “monitor style” barn with prefabricated 4/12 roof slope roof trusses in the 16′ width raised center. (1) 12’x14′ and (2) 8’x7′ sectional steel overhead doors and (1) prehung steel entry door. I will provide all materials except for nail gun nails. Willing to pay around $9000-9500 depending upon experience and references.

I’ve used this approach personally to find the actual “nail pounders” in all parts of the country, with great success.

Come back tomorrow folks, to hear…”the rest of the story”.