How to Install Fiberglass Batt Insulation in a Post Frame Building Attic
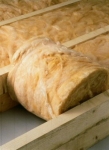
There are times when I overlook things which seem obvious to me, but do not appear to be so to the innocent beginner doing their own construction work. This past week we were contacted by one of our new post frame building kit owners, who had hired a contractor to assemble his building. The contractor was apparently facing some challenges when it came to installing the unfaced fiberglass insulation batts in the attic space.
First step – unless your post frame building has trusses spaced every two feet, chances are good the ceiling joists must be installed between the truss bottom chords.
Exception (and not covered in this article) would be if your building is going to use steel liner panels for a ceiling and the trusses are spaced appropriately to be able to support the liner.
Step two is to install the ceiling material, which in most cases is going to be 5/8” sheetrock (although other materials such as OSB or plywood could be used). Do not install a vapor barrier between the ceiling materials and the ceiling framing.
Step three – lay down boards or plywood sheeting to help you be able to walk safely in the attic space.
When installing fiberglass insulation, observe all safety precautions. Fiberglass can release tiny fibers, which can be harmful if breathed into the lungs and which may irritate the skin. Wear protective gear.
 The necessary R-value for the attic will depend upon the manufacturer and style of insulation chosen. Check with the manufacturer’s instructions on the packaging to determine how much insulation thickness is needed to achieve the desired R-value.
Once you’ve determined the amount and type of insulation needed, and the insulation has been purchased, begin staging the rolls in the attic. Place rolls around the perimeter of the attic for easier access during the installation.
Fourth – When laying insulation, it’s a common mistake to cover up the soffit vents. Soffits are part of the overall ventilation scheme, and covering them blocks essential air flow in the attic. With the widely spaced trusses typical of post frame construction, insulation baffles can be created by using rigid insulation boards to maintain a minimum two inch airflow above any insulation.
Fifth – Begin laying in the insulation, starting at an area furthest from the attic access.
When rolling the insulation, cut it to length using a utility knife.
When you reach the end of a line, pull the insulation back slightly, then place it on a joist so there is a solid surface to cut on. Using a straightedge as a guide, make your cut.
After making the first cut, use the remaining portion of the roll and work back in the other direction. When you reach the end of the roll, butt a new roll up to the cut piece and finish the run.
Once the perimeter is reached, cut the end of the roll to fit. Using this technique results in the best use of the insulation and reduces wasted material.
Lay the rows snugly together to prevent undesirable gaps or spacing.
When you run into an obstacle like a cross-brace or pipe, cut a notch in the insulation roll to fit around the obstacle, then continue with the run.
Areas around the perimeter of some attics can be rather tight and confining. Just keep rolling out the insulation, but don’t compress or squeeze it into tight spots, as this can decrease the insulation value.


