Tag Archives: rigid insulation

Insulating Pole Barn Scissor Trusses Reader

Insulating Pole Barn Scissor Trusses Reader

ROB in OAK HARBOR writes:

“What is the best way to insulate the ceiling/attic of a pole barn with scissor trusses? There is a approximate 4 to 6 foot gap between the underneath side of the roof deck and the peak of the scissor truss. On the wall ends there is hardly any space at all. They are not raised scissor trusses. Thank you!”

Here is where lack of planning by your building provider has left you in an uncomfortable situation. Raised heel trusses would have made for such an easy design solution.

For extended reading on raised heel trusses, please see: https://www.hansenpolebuildings.com/2012/07/raised-heel-trusses/

Architect Terry Smith of TDSA Architecture in Washington state recently contacted NAIMA with a question about how to properly insulate scissor roof trusses. Terry rightly pointed out insulation is intended to be most effective when uniformly applied or layered to cover full extent of space being insulated. But there are instances, such as narrow areas near top plate of scissor trusses and sloped ceilings, where this is not possible.

Terry could not find any guidance in his state’s building energy code to address how to properly insulate narrow areas near top plate of scissor trusses where this area is very narrow. Similarly, fully insulating sloped ceilings to meet code requirements can be tricky. There is no code specific guidance to specifically how to do either properly.

General Guidance on Insulating Narrow Areas

Generally, R-60 is code requirement for Ottawa county, you can install full height R-60 for areas where there are no height constraints, and then fill areas having constrained heights (but making sure to install eave baffles). Alternatively, you could have a raised heel truss and install a minimum of R-49 across entire attic floor per 2021 IECC R402.2.1 (similar provisions exist in other IECC versions).

Guidance for Sloped Ceilings

Insulation Institute spoke with Johns Manville Research Manager and Engineer Francis (JR) Babineau regarding whether state codes provide specific guidance on insulating sloped ceilings. After conducting his own search for answers from state building energy code guidelines, J.R. noted only written information he found relative to insulating sloped ceilings was from California:

“If the ceiling is sloped (for instance, with scissor trusses), loose fill insulation can be used as long as the slope of the ceiling is no more than 4:12. If the ceiling slope is greater than 4:12, loose fill should be used only if the insulation manufacturer will certify the installation for the slope of the ceiling.”

See reference link here: https://energycodeace.com/site/custom/public/reference-ace-2019/index.html#!Documents/35insulationproducts.htm

Bottom line: insulation manufacturer must certify installation for ceiling slope. But is this happening or do code officials simply sign off on insulation presence – regardless of whether it is or can be installed at required thickness given slope?

When Codes Do Not Specify

While state building energy codes can provide prescriptive guidance, properly insulating sloped ceilings and scissor trusses – appear to be areas where additional guidance would help clarify intended code requirement is met. Prescriptive guideline absences could leave much to individual interpretation and put onus on manufacturers to address a problem avoided with proper guidance from state building energy codes.

For your building, I will assume you have properly vented soffits and ridge. In area closest to sidewalls, where trusses have minimal height, I would install rigid insulation boards at exterior roof slope pitch, allowing one inch of clear air flow above. Rigid insulation should be extended towards peak until reaching a region where full blown in insulation depth can be achieved.

Isolating Heated and Unheated Barndominium Concrete Floors

Isolating Heated and Unheated Barndominium Concrete Floors

Loyal reader MIKE in COUPEVILLE writes:

“I see you recently posted a detailed drawing on insulating the perimeter of a pole barn, very helpful. 

https://www.hansenpolebuildings.com/2020/03/meeting-barndominium-slab-requirements/

I’m currently looking at purchasing a large pole barn, it will be 84’x42′ with posts 12′ apart.  I plan to make 2 of the 12’x42′ bays on one end a heated living quarters in the near future.  I’m curious how you would propose to insulate/isolate the 4” slab of the heated living quarter’s side from the unheated shop/garage side.  I’m thinking more 2” high density foam laid vertically basically making them two separate slabs one 24’x42′ for the heated living quarters and the other 60’x42′ for the unheated shop.  The issue I see with this method is it is effectively separating the slabs and I’m assuming the engineering of the building, I’m especially concerned about this because the insulation/break would be the whole 42′ width of the slab and right where the 12′ on center posts are.  Will this method compromise the structural integrity of the building?  Will your engineers call it out in the plans if asked to?  Or is there some other way to insulate the slab between heated and unheated portions of a build? 

Thanks for your time and I’ve enjoyed reading many of your blog posts.”

Mike the Pole Barn Guru responds:

Thank you for being a loyal reader and for your kind words, they are appreciated.

One question I have often asked clients is, “Do you mind if I treat your building as if it was going to be my own”? 


If your building was going to be mine, I would place vertical wall insulation around the building’s entire perimeter. This shop may be unheated today, but it would not take me very many winters of working in it to decide I want heat in it. I would also put rigid insulation under my entire floor surface as well as pex-al-pex tubes for radiant heat – divided into zones so shop and living quarters could be heated independent of each other.


As to your idea of a thermal break across your building’s width, there would be no structural detriment from it as it would (for practical purposes) function as a very large expansion joint. As your building’s weight does not rest upon its slab on grade, your slab’s structural contribution to your overall structure is in reducing wind shear forces having to be transferred from roof surface, through endwalls to ground, creating a constrained condition. https://www.hansenpolebuildings.com/2018/11/importance-of-constrained-posts/

If requested we can have our engineers include this detail within your sealed plans.

Steel Siding vs. Hardieboard Siding

DEAR POLE BARN GURU: What’s more energy efficient when building a house with steel siding versus Hardieboard siding? QUESTIONING IN QUEBEC

DEAR QUESTIONING: Hardiepanel® is a registered trademark and product of the James Hardie Company. It has an R value of 0.34 per 1/2 inch of thickness. Steel siding panels have a negligible R value, so the Hardiepanel® would be marginally more energy efficient, however probably not enough to make a difference in the entire assembly. If the Hardiepanel® is applied over 7/16″ OSB (oriented strand board), the R value of the OSB is 0.51. For more information on Hardiepanel® please visit the James Hardie website: https://www.jameshardie.com/Products/HardiePanel-Vertical-Siding

Mike the Pole Barn Guru

DEAR POLE BARN GURU: I am moving to Lancaster, California and would love to build a Hansen Residential Pole Building. Do you all build in California or know of anyone?

Thank you. LOOKING IN LANCASTER

DEAR LOOKING: We provide complete pole building kit packages, designed for the average person who will read directions to successfully construct themselves, everywhere in the USA. We ourselves are not contractors, however if you need one, we can assist you in locating one.

Mike the Pole Barn Guru

DEAR POLE BARN GURU: I have an uninsulated aluminum pole barn with ridges in the panels with horizontal 2×6’s 36in apart floor to ceiling and every 9ft or so a vertical 4×4. Would it be beneficial to do 2in rigid insulation between the 2×6’s ? What would be the proper way to attach the rigid to the metal or wood? Do I need a vapor barrier? If so – between metal and rigid? I wish I could send you a picture. BARNING IN BATH

DEAR BARNING: You (or any other person with a question) can always email photos to PoleBarnGuru@HansenPoleBuildings.com. You can do this from most cell phones as well.

If your idea is to try to climate control your pole building, then any type of insulation is a step in the right direction. Keep in mind, the majority of your heat loss (over ¾) is vertical – you are losing it through the roof. If you do not have any insulation at the ceiling line, there would be the place to start, as well as being the best return on your investment.

Ideally you should have a housewrap between the wall insulation and the metal siding. If your siding is installed with screws, you can remove it, install the housewrap and then put the siding back on (I would recommend using longer and larger diameter screws).

If you want to attach the rigid insulation to the inside of the wall steel between the wall girts, construction adhesive could be used. You will waste a fair amount of material due to cutting, and there will be cold spots at every wall girt, so this may not be the optimum solution.

On the inside of the wall girts, rigid insulation could be attached to the wall girts with construction adhesive, nails or screws. Keep in mind, foam board insulation must be covered on the inside face with gypsum wallboard or similar non-flammable products.

Mike the Pole Barn Guru

Rigid Insulation Boards Part II: Foam Board

 Yesterday’s blog featured a discussion of the various foam board products with application for your new pole building.  Used correctly, they provide good thermal resistance. Applied incorrectly can create a huge structural problem with pole buildings, along with safety issues.

Protect all types of foam  insulation from direct sunlight. Over time, the sun’s ultraviolet rays can damage the insulation. For roofs, this is generally done by applying a coating such as tar, acrylic, silicone, or rubberized paint. You can also cover the foam with a rubber or plastic membrane, or a layer of asphalt and roofing felt. Make certain you are using compatible products. The solvents in some coatings dissolve certain plastics.

In cold weather, warm inside air containing water vapor can get past the wall finish and insulation, condensing inside the colder wall cavity. In hot, humid climates the same thing can happen, just in the reverse direction. Humid outdoor air in the summer can condense inside cool, air conditioned wall cavities. If enough of this happens and the water cannot escape, wood rot, mold, and other moisture-related problems can occur. For this reason, building codes often require installing a vapor diffuser retarder on the warmest side of the wall cavity.

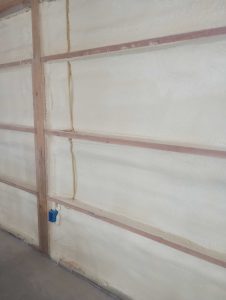
Foam board insulation is commonly placed against the steel building siding, between the girts of exterior walls. To prevent air infiltration, place rigid insulation boards tightly together and seal the seams with tape or caulk. This practice may worry some in cold climates since the foam board may act as a second vapor diffusion retarder. Studies have shown, condensation rarely occurs in these areas unless something else is seriously wrong with the wall assembly (like massive uncontrolled air leakage into the walls from the building). If the assembly is constructed correctly, the inside surface of the foam board stays warm enough to keep water vapor in its gaseous state long enough for it to escape.

When insulating a foundation you need to consider, although insects don’t eat foam board, they can easily tunnel through it. Insect burrows reduce the R-value and structural integrity of the insulation. For these reasons, some manufacturers treat their foam products with an insecticide, usually a borate compound. Many building jurisdictions also mandate treating the earth around the building with insecticides. These jurisdictions may also want an inspection area several inches wide and all around the foundation of a house kept bare of insulation board.

A better solution for below-grade walls in need of insulation is to install the foam board over the interior of the basement walls rather than on the exterior, which is more common. Interior applications prevent ground-dwelling insects from finding the foam board at all, and they eliminate the need for the bare inspection area. Insulating interior walls, however, requires careful attention to moisture control.

Most jurisdictions also require installing a fire barrier over the interior foam board. While this adds extra cost, the thermal performance of this method is superior in most cases to the more common exterior foam board application. This equates with a dollar savings in energy which can repay many times over for the additional cost of an interior application. If converting a basement into a living space, there is almost no additional cost.

Foam insulation is relatively hard to ignite, but when it is ignited, it burns readily and emits a dense smoke containing many toxic gases. The combustion characteristics of foam insulation products vary with the combustion temperatures, chemical formulation, and available air.

Because of these characteristics, foams used for construction require a covering as a fire barrier. One half-inch thick gypsum wallboard is one of the most common fire barriers. Some building codes, however, do not require an additional fire barrier for certain metal-faced, laminated foam products. Always check with local building code/fire officials and insurers for specific information on what is permitted.

While rigid insulation boards may afford a relatively high R-value, if installed improperly they can provide less than desired insulating results, structural issues or pose a fire hazard. In many instances, other methods of climate control may be more cost effective.