Another Case for DIY Post Frame
Reader BRIAN in CINCINNATI writes:
“A construction company is putting the shell of my building up 60x80x16. Just finished steel siding and roof. A number of the 6×6 poles are visually not plumb. My garage doors were being installed today when he called me with concerns of the building being off and not square. He has over an inch gap already only 8 ft up on doors of a 14 foot door. I did call the post frame company and will be sending someone out as well as a crew for attempt to fix. What would you do and can this be fixed without removing all steel liner sheets?”
 Mike the Pole Barn Guru says:
Most of our clients build DIY (Do It Yourself) and simply do not have issues such as these.
Why?
Because it is theirs, they care. They will actually read and follow instructions.
Hiring a contractor? Your work starts before you sign a contract.
- ASSUME YOUR PROJECT WILL END IN COURT
- ASSUME YOUR CONTRACTOR IS UNTRUTHFUL
- ASSUME YOUR PROJECT WILL BE MORE EXPENSIVE
- ASSUME YOUR PROJECT WILL TAKE LONGER THAN EXPECTED
Failure to accept these four statements will set you up for grave disappointment.
Standards for workmanship should be clearly specified in contract between you and your builder. For post-frame buildings this would be Construction Tolerance Standards for Post-Frame Buildings (ASAE Paper 984002) and Metal Panel and Trim Installation Tolerances (ASAE Paper 054117). Depending upon scope of work, other standards may apply such as ACI (American Concrete Institute) 318, ACI Concrete Manual and APA guidelines (American Plywood Association).
During Construction
Visit Your Site
Tend to your site often. Show up at least twice a week (if not daily). During your visit, take pictures, lots of pictures. Purchase a camera with a Date and Time Stamp. Identify areas, in picture, with some type of signage, “Master Bedroom from Door Entrance” would be an example. By your project end you should have hundreds of pictures of every phase. Get a thumb drive if needed. Be able to read your “Approved Drawings” as well as all Installation Instructions.
Site Conditions
I cannot stress this enough, it has been my experience the single biggest project quality indicator is organization. A good job site should seem organized. If your project site is disorganized, trashy, and cluttered, so is your project. This should be your indicator to take more pictures and notify the contractor this is unsatisfactory. Every sub-contractor should have a clause in their contract that they should clean up their mess. It also means your contractor either doesn’t care or is not holding their Subs accountable. If you do not want to be responsible for clean-up and hauling off trash, make certain to include this in the contract.
Under no Circumstances Provide Assistance.
An impulse to “help” or “get a job done” is natural. Remember once you touch something, or provide support in any way, you have some liability. Every trade should have all needed tools, power, and equipment for the job they are doing. They are supposedly Professionals.
Keep Meticulous Records
Keep every bill, every material delivery, and every correspondence. Always communicate in writing with contractors. If you have a phone call, back it up with at least an email summarizing your conversation and get a response. Never delete an email. You might want to set up a new account just for your project. Never, ever, take “their word” for anything. ANYTHING.
Hire an Architect to view your project at Framing.
Have a Registered Architect do a “Site Visit” once framing is complete and before interior finishes. Not only will he/she look at structural components, but this is when to catch issues potentially causing future challenges. They should give you a written report regarding any deficiencies in quality per specifications in your contract, engineered building plans and assembly instructions. This is money well spent and will potentially save you thousands over your building’s life. Give this report to your contractor and get a date by when these items will be corrected–in writing!
Do Not Pay for Anything not On-Site or Completed
Re-read this over and over.
Make payments for materials jointly to contractor AND supplier (avoids liens). Better yet – order and pay for materials yourself!
Require written lien releases from all parties who have provided materials or labor through your contractor.
When your contractor says he or she is completed, again have your architect walk through with you. Make a written “punch list” of all deficiencies discovered and provide to the contractor. Only once all of these items have been corrected and an Occupancy Permit has been provided from your Building Department, should you make final payment.
Do Not pay ahead on a promise!
After reading all of this you may be wondering what you are paying a contractor to do, as your frequent involvement is needed in order to achieve your ideal dream outcome. If this happens to be your case, it may behoove you to pocket these funds and do it yourself!
Now, on to your questions.
From Construction Tolerance Standards for Post-Frame Buildings
“6.1 Plumbness. At the time of placement, no portion of a post should deviate from a plumb line (extending upward from the base of the post) more than 1% of the post height.”
On a 16’ eave, columns could be 1-59/64” out of plumb and still be considered within tolerance. An inch in eight feet would be outside of tolerance.
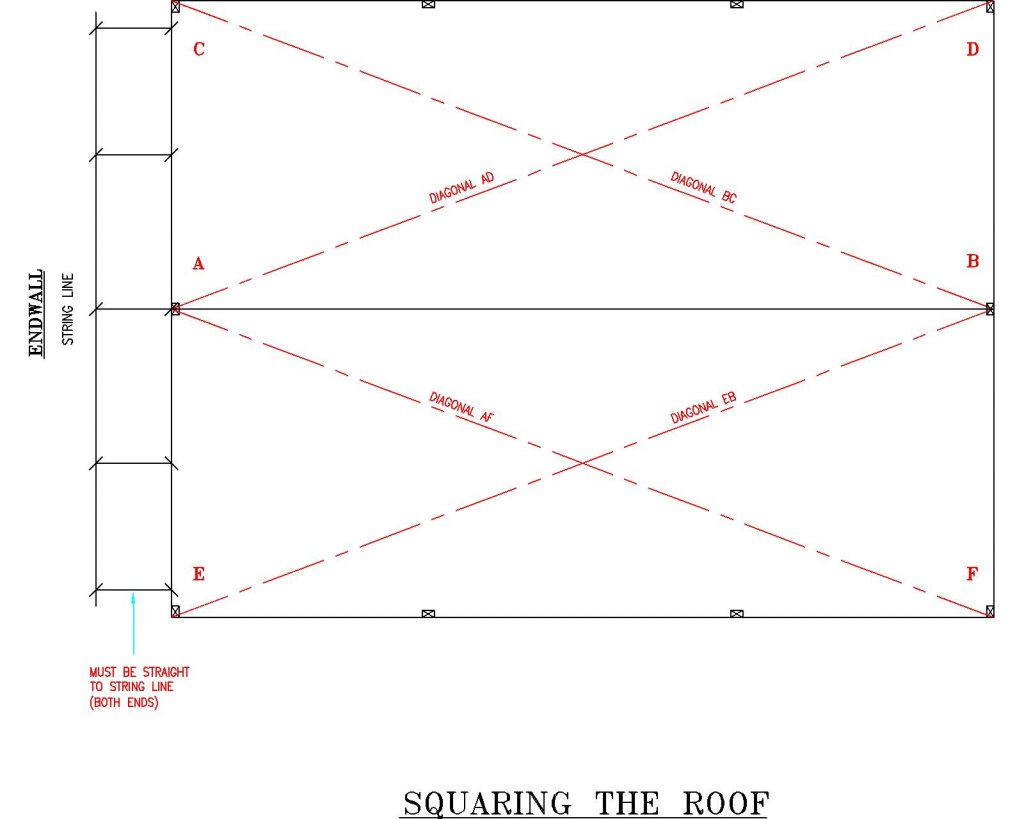
“6.5 Diagonal measurements. Corner-to-corner diagonal measurements should be taken at the finished floor and compared to determine the squareness of a rectangular area. These diagonal measurements should not deviate from each other by more than 2 inches or 0.5% of the length of the shortest side of the rectangle, whichever is greater.”
0.5% of length of shortest side would be 60 feet x 0.005 or 0.3 feet. Since this equals 3.60 inches, allowable difference in diagonal measurements would be increased from 2 to 3.6 inches. If squareness of an individual bay in same building is being checked, and post spacing is 8 feet, then rectangular area would be 8- by 60- feet, and 0.5% of length of shortest side of this rectangle would equal 8 feet x 0.005 or 0.06 feet (3/4 inch). Since this is less than 2 inches, allowable difference in diagonal measurements would be increased to 2 inches.
During construction, your overhead door openings should have had their jambs shimmed to be plumb. Interior and exterior steel panels on each side of overhead door opening should be removed, door jambs appropriately shimmed to vertical, then steel panels reordered and cut and installed to properly fit along each side of opening.
 DEAR POLE BARN GURU: I remember you had a checklist to follow when building a barndominium or pole barn but I’m not sure where I saw it. Can you email where I can find it again? Thank you! Appreciate your time. MONICA in COLOMA
  DEAR POLE BARN GURU: The area where I plan to build a pole barn required fill to bring the grade up to the driveway level. My plan is to install concrete piers with the column brackets installed on top of the pier. My question is do I need to have the concrete pier depth into the virgin ground? The fill was not compacted but has been setting for one year. Also, if the pier does need to engage with virgin ground, how deep into the virgin ground does the pier need to be? CRAIG in EAST WATERBORO
  DEAR POLE BARN GURU: My contractor failed to plumb, level and square up the wall of my 40×40 pole barn before he installed the trusses and purlins. Can this be fixed before he installs the sheathing for the standing seam metal roof? Thanks in advance, PAUL in SMITHFIELD