Tag Archives: eave struts

How to Square a Post Frame Building Roof

Many builders believe if they have a building correct in width and length at ground, diagonals at ground are equal (footprint is square) and columns are plumb, then when they get ready to run roof steel everything will be perfectly ready to go.

This might be close to true for a small footprint building with a low eave height, however in most cases making this assumption will lead to a world of grief.

Today we will steal from Hansen Pole Buildings’ Construction Manual to achieve a perfectly square roof.

Note – ease in squaring a roof is one reason I frame my roof and install roofing prior to framing any walls. Everything moves far easier.

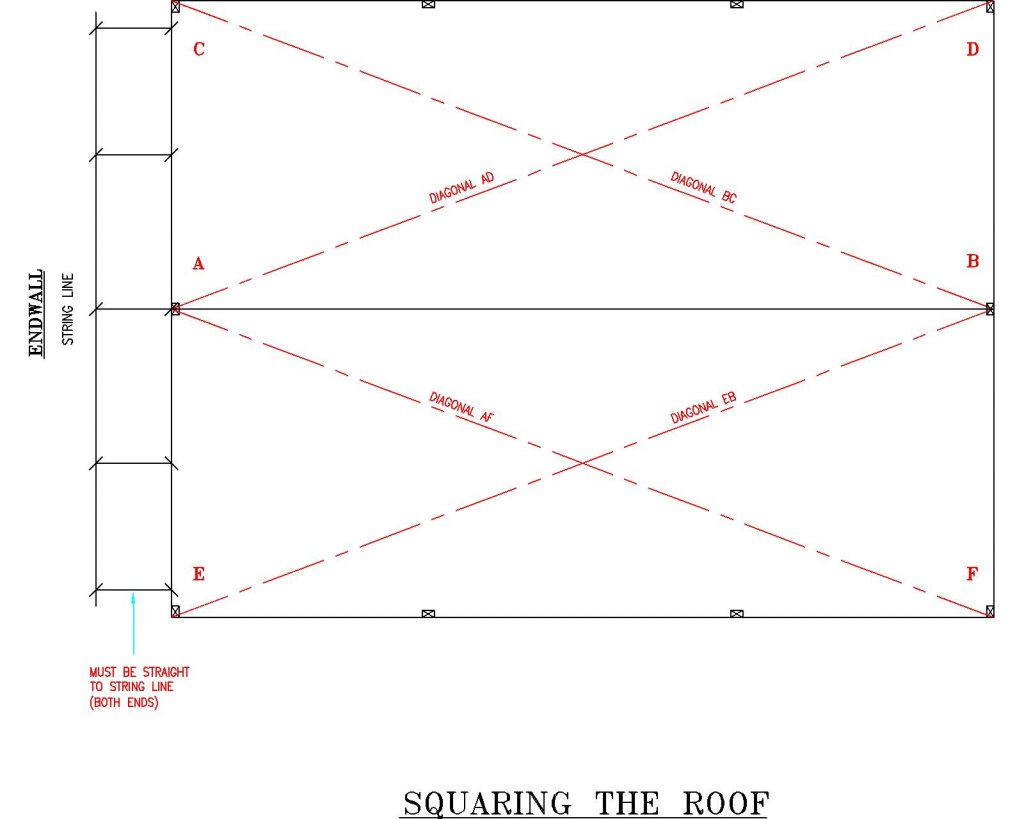
Figure 13-1: Squaring Roof

  1. Check both endwall trusses for straightness (against a string line) from side to side.


  1. Make certain endwall truss is plumb at each column. Properly set columns are either plumb or lean out slightly. To pull in, attach a cable from this column top to column base at the opposite endwall. Using a “come-along” move column top inward until plumb.


  1. Using a stringline align all eave struts (purlins) to straight. Any nonaligned column tops can be pulled into place using a “come-along” also, using the same procedure as outlined in the last paragraph. This is critical as this building line will be a noticeable one.


  1. Make certain the roof is square by checking diagonals from peak at one end to eave at the opposite corner. Refer to Figure 13-1 where diagonals AD and BC, AF and BE are equal.


Be certain to measure from the same “point” going each direction. Serious errors have been caused by lack of consistency. If uncertain, double check.


If any roof diagonals are “long”, run a cable and come-along from truss peak to opposite corner column (along purlin underside). Pull slowly until dimensions are equal. For best results, the difference in diagonals should be no greater than 1/8”. A very small “tug” can change a diagonal drastically. 

NOTE: One side only may be squared up at a time. Place roofing on squared side, then repeat the process for the opposite side.

Why Post Frame Wall Girts Overhang Posts

Client and reader SCOTT in BOULDER posed this question recently:

“Is there a specific reason why the girts have an over hang to the outside an 1 ½ (inches). Can they be set inside flush with the posts?”

Mike the Pole Barn Guru responds:

There actually are a plethora of reasons why your (and all Hansen Pole Buildings) have wall girts set so girt outside face is 1-1/2 inches beyond the columns and building line.

From a standpoint of installing roofing and siding alone – your particular building happens to be 36 feet by 36 feet. 12 sheets of installed wall or roof steel  cover roughly 36’2″. If your finished dimensions were 36′ you would end up having to rip at least six panels of steel full length.

In order to adequately transfer wind shear loads from roof to ground, an effective connection is essential between the 2×8 pressure preservative treated splash plank and columns. Most efficient structural solution is with nails through splash plank into column faces – putting splash plank on outside of columns. Holding wall girts out 1-1/2″ places their face in the same plane with outside of splash plank. If splash plank were to be placed between columns, it would likely entail having to rotate it flat on top of your concrete slab on grade and utilize anchor bolts for an adequate load transfer. This would eliminate using splash plank as a concrete form for your building’s concrete floor. It would also create a “joint” or “seam” between the concrete floor and underside of what would now be a bottom plate, entailing having to design and install some sort of permanent sealant to prevent water intrusion.

Other structural members essential to wind shear transfer include eave struts, wainscot girts and your overhead door header – again all members where resistance to loads is best achieved by attachment directly to column faces, rather than creating some far more difficult connections.

A side benefit is wiring can be done in external walls by running around columns in this 1-1/2″ space – reducing or eliminating needs to drill holes for electrical.

Considering a post frame (pole barn) building where all exterior framing is flush to the outside of columns? Make sure it has been designed and plans sealed by a RDP (Registered Design Professional – architect or engineer) to insure all connections are adequate and a proper load path has been followed from roof to ground.