Tag Archives: Simpson strong-tie

NEW Hansen Pole Buildings Connections

NEW Hansen Pole Buildings Connections

For decades wood-to-wood connections for post-frame building construction have been with nails. Usually lots of nails, or (for non-engineered construction) not nearly enough.

Hansen Pole Buildings’ engineers have always specified 10d common hot-dipped galvanized nails for connecting 1-1/2” thick wood members to other framing members. Great part for strength, yet difficult to source.

Let’s take a look at strength characteristics of popular nails.

First (from 2018 NDS Table 11.3.3) if building with green lumber (over 19% moisture content), nails with a diameter of under ¼” have a 30% reduction in lateral strength and a 75% reduction (no reduction for post-frame ring shank nails) in withdrawal values! This would include driving through a dry 2x member into a solid-sawn column. A convincing argument for use of dry framing lumber and glu-laminated columns.

Lateral loads (shear) attaching a 1-1/2 inch thick member, both members of same species (from NDS)

10D commons / 20D box / 16d sinkers SYP 128# Dfir 118#

Pole barn ring shank nails (0.177” diameter) SYP 178# Dfir 163#

Withdrawal values (2018 NDS Table 12.2C) in pounds per inch of penetration into main member

Same nails as above SYP 46# HemFir 25#

Pole barn ring shank nails (with a 0.177” diameter), regardless of length, are limited by head pull-through values. With a 3/8” head maximum value is 191# (2018 NDS Table 12.2F). With a withdrawal value of 96# per inch in SYP, when attaching a 1-1/2”, any nail length over 3-1/2” is not adding to connection serviceability.

Simpson Strong-Tie SDWS16300 screws have a values with SYP of 229# in lateral loads and a withdrawal value of 192# per inch.

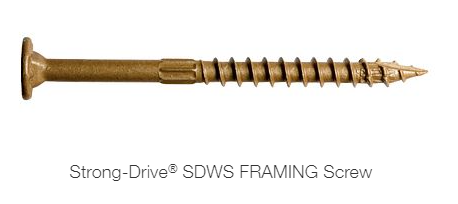
For attaching a 1-1/2” SYP member to another SYP member, SDWS screws are 179% stronger laterally loaded. For withdrawal (example being an externally mounted wall girt to a column), previously using a 10d common nail through a girt, into a Hem-Fir column would have been 25# x 1.5” x 0.25 = 9.375# of resistance. A SDWS screw into a SYP glu-lam 192# x 1.4” = 268.8#.

Hands down SDWS screws are superior and result in far fewer fasteners being needed, resulting in quicker installations.

Added benefit, have a board not quite where you want it? Much easier to back a screw out, than to pull a nail!

All NEW Hansen Pole Buildings now include SDWS16300 screws for attaching 1-1/2 inch (2x) members!

Call 1.866.200.9657 TODAY to participate in “The Ultimate Post-Frame Building Experience”.

And, don’t forget to watch for our next article

An Innovation to Attach Tops of Interior Walls

An Innovation to Attach Tops of Interior Walls

Roof and/or floor trusses should not be fixed attached to tops of non-load bearing interior walls. In a previous article, I discussed a possible solution to this challenge (please read: https://www.hansenpolebuildings.com/2016/01/attaching-interior-walls-to-trusses/).

Those brilliant engineering type folks at Simpson may just have invented a better mouse trap for these situations.
Introducing the Strong-Drive SDPW Deflector Screw from Simpson Strong-Tie — a premium structural fastening solution for connecting non-load-bearing walls to trusses and joists. With tested lateral-load ratings that meet building code requirements, the SDPW screw is value engineered for strength, installation speed and safety. Offset Driver Bits and a driver extension (available in 18” and 30” lengths, each sold separately) maximize installation speed and safety while minimizing installed cost. The SDPW’s polymer sleeve allows for sliding during deflection, preventing squeaks. The SDPW is designed for superior performance, and it’s backed by the best service and product support in the industry.

Key Features
Deep 6-lobe recess for secure driving
Polymer sleeve allows for deflection without squeaks
Interior-grade E-coat for dry service applications
Offset Driver Bit (6-lobe) drives SDPW Deflector screw to predetermined screw depth
Available in 3 1/2″, 5″ and 6″ lengths
US Patent 8,458,972 applies to Strong-Drive SDPW Solution
US Patent 9,523,383 applies to 6” SDPW Deflector fasteners
Applications
Non-load bearing wall connections to truss/joists
Product Includes
Retail packs include (1) Offset Driver Bit and (1) 3/8″ predrill bit. Mini bulk packs include (2) Offset Driver Bits and (2) 3/8″ predrill bits.

Related Links


Mind the Purlin Gap

Simpson Strong-Tie® has a blog dedicated to Structural Engineering. A recent post written by David Finkenbinder addressed gaps where a member is attached to another by use of a structural hanger.

Mind The GapHere is an excerpt from the blog:

“Have you ever seen this famous sign? You may have seen it while riding the London Underground, to draw attention to the gap between the rail station platform and the train door. The warning phrase is so popular that you may also recognize it from souvenir T-shirts or coffee mugs.

In the connector world, the phrase comes to mind when thinking of the space, or “gap” between the end of the carried member and the face of the carrying member. Industry standards for testing require that a 1/8” gap be present when constructing the test setup (in order to prohibit testing with no gap, where friction between members could contribute significantly), so this is the gap size that is typically permitted for the joist hangers listed in our catalog.

Gaps exceeding 1/8” can affect hanger performance in several ways. A larger gap creates more rotation for the connector to resist by moving the downward force further from the header. Fasteners may also have reduced or no penetration into the carried member due to the gap. Testing confirms that these factors decrease hanger allowable loads for larger gaps.”

In pole buildings where roof purlins are attached to either metal plate connected wood trusses or rafters with hangers, other issues can also result from gaps.

When screws are driven through roof steel and the points end up in a gap – leaks can result. If, as we recommend, all of the purlins have been cut to length in advance, gaps create an overall length “creep” in the roof. This can cause waves in the end truss or rafter (if no end overhangs are present) or fly rafter with an end rafter.

With some prudence, gaps can be avoided.

Make sure both ends of purlins are cut square. While lumber cut at the mill is supposed to be square at each end, there are exceptions. In almost all cases the purlins need to be trimmed to length, so each end can be cut back, if needed.

Even with perfectly square cut purlins, it is essential they are placed in the hangers so each end is tight to the carrying member. It is easiest to fasten the same end of all purlins, then use a come-along to pull the other carrying member tight.

Avoid the Gap – keep everything tight and the overall result will be satisfying both aesthetically and structurally.

Grade Stamps

Walk into your local lumber dealer – whether a big box store (aka The Home Depot® or Lowe’s®), a national lumber dealer (think ProBuild®, Stock Building Supply®, or 84 Lumber®) or the local mom and pop lumber seller and pickup any piece of dimensional lumber.

grade-stampOn it will be a grade stamp – which is a voluntary standard of marking each piece of lumber to assist the consumer in identifying the moisture content, product grade, species or species grouping, the accredited agency under who’s authority the lumber was graded, as well as a unique mill number identifier or the name of the sawmill which produced the lumber.

One of my son Brent’s first days of working with me involved placing Simpson Strong-Tie® joist hangers on rafters. The rafters were different colored wood – Brent noticed the difference between the darker, more reddish hue of the Douglas Fir rafters as opposed to the whiter color of the ones which were HemFir. I explained to him what the information on the lumber grade stamps was, including the indication of the species of lumber.

The “big giant head” for lumber grading starts with the ALSC (American Lumber Standard Committee, Inc. www.alsc.org).

The ALSC, is a non-profit organization comprised of manufacturers, distributors, users, and consumers of lumber. It serves as the standing committee for the American Softwood Lumber Standard (Voluntary Product Standard 20) and in accordance with PS 20, administers an accreditation program for the grade marking of lumber produced under the system.  This system, the American Lumber Standard (ALS) system, is an integral part of the lumber industry’s economy and is the basis for the sale and purchase of virtually all softwood lumber traded in North America.  The ALS system also provides the basis for acceptance of lumber and design values for lumber by the building codes throughout the United States.

As noted above, a function of the ALSC is to maintain the American Softwood Lumber Standard.  The ALSC in accordance with the Procedures for the Development of Voluntary Product Standards of the U.S. Department of Commerce and through a consensus process establishes sizes, green/dry relationships, inspection provisions, grade marking requirements and the policies and enforcement regulations for the accreditation program.  The ALS system as a whole is set up to give manufacturers, distributors, users and consumers a mechanism to formulate and implement the Standard under which softwood lumber is produced and specified.  Participation of each segment of the industry is an integral part of the program and provides the industry with a direct voice in the standardization and accreditation program as it evolves into the twenty-first century.

In the case of Brent’s rafters, the Douglas Fir ones were marked with the WWP® logo of the Western Wood Products Association (www.wwpa.org) which is the largest association of lumber manufacturers in the United States. The Douglas Fir ones were marked with a mill number to indicate the producer, however the others were produced by Idaho Timber (www.IdahoTimber.com).

The rafters happened to be graded as Select Structural (SelStr), which indicates a relatively smaller group of allowable defects than the more commonly seen framing material, which is normally graded as #2.

For a brief overview of allowable defects in lumber, please read more at: https://www.hansenpolebuildings.com/blog/2013/12/lumber-defects/

The species of lumber was how Brent and I originally got into the discussion of grade stamps. It was indicated by the DFir and HemFir designations on the rafters.

All of the framing lumber used on this building (as well as all Hansen Pole Buildings) is seasoned to a moisture content of no greater than 19% at time of surfacing, which was indicated by the “KD” on the grade stamps.

Lots of information contained in a little stamp – but as Brent’s older sister Allison says, “My Dad knows more worthless trivia than anyone”.

Dear Pole Barn Guru: Toe Nail Purlins or use Hangers?

Welcome to Ask the Pole Barn Guru – where you can ask questions about building topics, with answers posted on Mondays.  With many questions to answer, please be patient to watch for yours to come up on a future Monday or Saturday segment.  If you want a quick answer, please be sure to answer with a “reply-able” email address.

Email all questions to: PoleBarnGuru@HansenPoleBuildings.com

DEAR POLE BARN GURU:It looks like your double truss system uses hangers between the trusses rather than the boards running on top of the trusses.

When I see these used on decks it sometimes looks like the nails that are toe-nailed into the connectors don’t do anything as they are at the very end of the board. The board splits or chips out.

Have I just seen it done improperly or perhaps I’ve seen the wrong types of hangers or nails being used?

I’m guessing you’ve seen your fair share of improperly installed connectors so I’m looking forward to what you have to say.

Thanks NOVICE IN MILTON

DEAR NOVICE: The Hansen Pole Buildings double truss system (as well as the special requests we get for widely spaced single trusses) do utilize engineered steel connectors to attach the roof purlins to the sides of the trusses.

As an experiment, I looked today at the hundreds of hangers we have installed on a 42’ x 120’ self storage building being constructed for Eric (one of the Hansen Pole Buildings owners). All of the hangers for the project are manufactured by Simpson Strong-Tie:

https://www.hansenpolebuildings.com/blog/2013/08/simpson/

The hangers installed are their LU26, LU28 and H1 brackets.

The roof purlins being nailed into are kiln dried 2×6 and 2×8 of Douglas Fir (DFir) and SPF (Canadian Spruce-Pine-Fir). All of the nails used in the hangers are joist hanger nails (#10 x 1-1/2” long) which are designed specifically for use in engineered metal connectors.

https://www.hansenpolebuildings.com/blog/2013/01/tico-10d-common-nails/

I was unable to find a single case on Eric’s large building with hundreds of joist hangers where the nails contributed to an end split in a purlin or a portion of the roof purlin being split away.

I do have some theories as to what may be the cause of what you have seen on decks.

Theory #1 – other than a few specially designed brackets, joist hangers are designed for the nails to be installed at right angles to the wood. Toe-nailing (driving the nails in at an angle) could be responsible for splits.

Theory #2 – in your part of the country, the vast majority of lumber used for decks is pressure preservative treated Southern Yellow Pine (SYP). It could very well be the SYP lumber is more susceptible to splitting than the species of wood provided for use in the building we are currently constructing.

Simpson Strong-Tie produces millions upon millions of engineered steel connectors every year – if there existing an inordinate (or any) number of failures due to the use of their products, they would be on top of making changes in the design to prevent them.

Me – if my choice is to nail a purlin over the top of the truss (which in the great majority of cases does not calculate out to be adequate structurally) or to use an engineered connector – the connector is going to win every single time.

DEAR POLE BARN GURU: I am currently assembling a Hansen Pole Building kit package. The building has a transition in roof slope from a steeper slope in the enclosed area, to a flatter slope in the open attached side shed.

In following the instructions in your Construction Guide, I note the solid wall between the enclosed and open portions is to have the wall framed and wall steel installed prior to placement of the roof steel.

My questions are these – I’m running the J trim at the top eave girt between the enclosed wall and shed.  Do I need to flow around the shed rafters with the J trim? Will I be able to square the roof if I put the wall steel on? STUMPED

DEAR STUMPED: Yes – the J Trim goes around the rafters which project through the wall. And as long as this wall is plumb before installing the wall steel, it will not interfere with being able to square up the roof.