Unless someone reincarnates Nikola Tesla (and he is sane) chances are good energy costs are not going to decrease. Air sealing your post frame barndominium or shouse increases your comfort by reducing drafts and cycle time your heating and cooling systems are running.
Air sealing your barndominium reduces humidity increasing comfort levels. A drafty barndominium is more than just a waste of natural resources, it also means higher energy bills. Air sealing will automatically lower your energy bills due to less leakage of conditioned air.
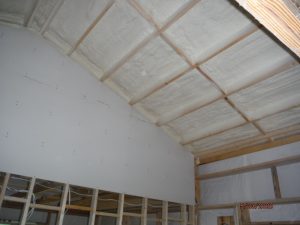 Using two inches of closed cell spray foam directly inside steel siding panels not only air seals exterior walls, as it is an effective vapor barrier, but also provides approximately a R-14 level of insulation. Effective applications also require installing form fitted inside closure strips at top and bottom of every wall steel panel – including window and door openings. Closure strips keep spray foam in your walls rather than oozing out and keeps small crawling and flying critters out.
For those who opt not to utilize closed cell spray foam, air sealing begins with a totally sealed Weather Resistant Barrier (WRB) wrapping all framing before steel siding is applied. For further reading on Weather Resistant Barriers please see: https://www.hansenpolebuildings.com/2016/01/determining-the-most-effective-building-weather-resistant-barrier-part-1/
Care should be taken to effectively use WRBs around openings for windows and doors, as well as utilizing caulking and self-adhesive sealant tape for an airtight seal. Place sill gaskets under all exterior doors. Use spray foam or caulk to fill any gaps between doors and windows and adjacent framing.
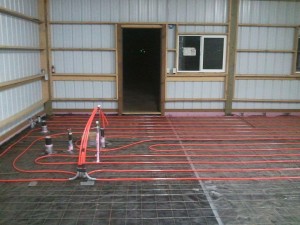 When placing under slab vapor barriers, run up inside of pressure preservative treated splash planks and sealing to top and around columns. Install seal gasket under pressure treated base plate (mud sill) and caulk inside edge to concrete slab.
With wall insulation systems other than closed cell, use a clear visqueen vapor barrier on the inside of all framing. Seal every penetration in this vapor barrier.
Before installing interior window and door trims, caulk where trim will meet frames. Make sure door sweeps are installed and the threshold is properly adjusted.
Common infiltration paths include attic access and simply insulating envelope (or shell) isn’t enough. In fact, insulation’s ability to perform is almost cut in “half” if not air sealed first.
Expandable polyurethane is used in areas too wide for caulk. If an area is wider than 1/4″ caulk can fall out of grooves. Acrylic-latex caulk is for all gaps small enough for caulk to function properly such as base plate and seam between floor and wall and wall and ceiling. Fire-rated caulk is non-combustible and for any areas where wires penetrate through base plates, walls, etc. (This is a recently implemented new national code.)
While it seems obvious gaps and crevices in a barndominium should be sealed, most builders either have not yet begun or just recently started utilizing air sealing processes. If hiring a contractor, make certain complete air sealing processes are spelled out in contractual documents – money you will save over your barndominium’s lifespan.