Barn Screws Rotting Wood
Reader (and Contractor) JOHN in BIG RAPIDS writes:
“In a pole building constructed with trusses 2′ o.c 1/2″ OSB synthetic underlayment. We are finding out that the screw is riding the OSB around the screw. I have seen the same problem in standard pole barn construction with 2 x 4. Purlins. The screw will rot the wood and come loose. It is a problem with cold storage areas and condition space. We screw standing seam metal to 1/2″ OSB and nail shingles down with a straight shank nail. What is the issue with a barn screw rotting wood?”
You have a couple of different issues happening here.
First – screws will not hold in OSB, either with through screwed or standing seam panels. With standing seam, manufacturers typically recommend plywood substrates of at least 5/8-inch thickness.
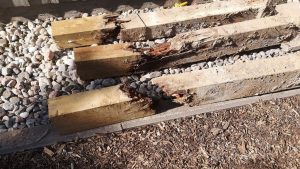 Second – screws do not rot wood. It is a function of one or more of three things – screws improperly seated (screws into high ribs rather than flats; over or under driven; or not driven perpendicular to panels). Or, screws with neoprene gaskets (most are), instead of EPDM. Neoprene is not UV resistant, so quickly becomes brittle and cracks. Standard screws are #9 or #10 diameter and these narrow shanks will cause slotting of steel panels, over time, due to cyclic wind loads. Shanks are acting like knives! We found this when we did full scale diaphragm testing of steel panels over three decades ago. This was solved by our engineer, who did our testing, designing what is now known as “Diaphragm Screws”. Produced by Leland Industries in Canada, Hansen Pole Buildings provides them exclusively for through screwed steel panels. 1-1/2″ long, they are a #12 shank, except right below head (where screw passes through panels) it is a #14 diameter. These screws also have EPDM gaskets, have a JS1000 plating (read more here: https://www.hansenpolebuildings.com/2024/01/what-does-js-1000-screw-plating-mean-to-you/) and are powder coated, rather than wet painted.
Any of these conditions will allow water to seep around screw shanks and eventually decaying surrounding wood fibers.
On an unrelated note – we have clients in search of qualified building erectors in many markets. We connect you directly with client to quote your labor, no fees to us, no markup – strictly a service. You are also welcome to quote/provide any other services direct to client (site prep, flatwork, etc., even turnkey). This will be an ongoing relationship, not necessarily a ‘we have a client for you today’, and we will be promoting your business long term at no charge. We provide America’s strongest, fully engineered post frame building including full multi-page 24” x 36” structural blueprints detailing the location and attachment of every piece. All 3000f glulam columns, highest quality lumber (most 2400f msr, no standard or stud grade), framing connected with provided Simpson structural screws, delivered onsite. If interested please click this link: https://www.hansenpolebuildings.com/builder-application/
 Screw leaks are caused by either poor installation, wrong placement (on high ribs rather than flats), or entirely wrong parts. Poor installation will show up right away – either in a good rain storm, or by checking weather tightness by running a water hose on roof. I would recommend second of these prior to any interior finishes.
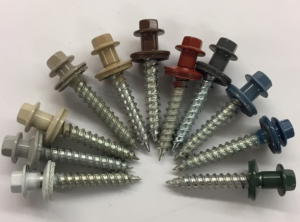 At Hansen Pole Buildings, we provide only Diaphragm screws manufactured in Canada using North America components. These screws are a #12 diameter and 1-1/2 inches in length.


