Tag Archives: gambrel roofs

Pole Barn House Roof Styles

POLE BARN HOUSE ROOF STYLES: WHICH ONE IS THE RIGHT FIT FOR YOU? 

Today’s guest blogger is John Hamlin, an industrial manufacturing writer with a passion for technology. Having a background in construction and a keen interest in engineering, John has slowly made his way into becoming a major contributor to many online publications.

The roof is one of the most crucial parts of a building. The basic function of a roof is to provide the building with protection against external elements such as sunlight, rain, snow, and any debris that may fall from the top during storms. A roof also provides privacy and insulation. 

Aside from these major purposes, a roof gives style and establishes the character and profile of your building. The unique features of a roof are attributed to the materials used, roof pitch, size, and orientation. 

There are various roof styles to choose from for different buildings like residential, commercial, agricultural, storage, etc. In this blog post, we will focus on the different roof styles available for pole barn houses. As we go through the post, we will also tackle the advantages and disadvantages of each roof style to help you choose which is the right fit for you. Read on and let us build that roof for your pole barn house! 

What are Pole Barn Houses? 

To begin with, let us first define what a pole barn house is. A few years back, a pole barn was considered an agricultural building where farmers used to store their equipment inside. Later, some farmers decided to convert their pole barns into an entire home and called them pole barn houses. These are just like any conventional residential houses, but the main difference is that pole barn houses have poles (actually sawn or glulaminated wood columns) instead of a continuous concrete foundation. Pole barn houses can be designed to include an attic, vaulted ceiling, loft, or mezzanine

Pole Barn House Roof Styles: Pros and Cons 

Choosing your roof style is one of the many ways to customize your pole barn house and make it stand out. Below are the Top 4 roof styles available for your pole barn house including their corresponding advantages and disadvantages. 

1- Gable Roofs 

Gable roofs are popularly known for their triangular shape and are the most typically used roof style in the USA. Gable roofs are alternatively called peaked or pitched roofs. 
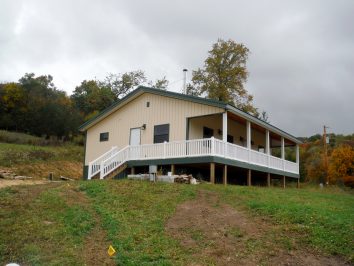
Gable Roof

Pros: Because gable roofs are pitched, they allow rain and snow to slide off. With this design, snow accumulation is reduced thereby preventing roof collapse or structural damage. Additionally, you can (with a steep enough slope) build an attic for additional storage or room in your house due to the large space that a gable roof provides. This type of roof also allows good ventilation. 

Cons: If inadequately anchored, strong winds and hurricanes can destroy gable roofs. 
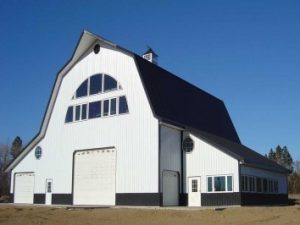
 

2- Gambrel Roofs 

Gambrel roofs, also known as barn roofs, have two sides with two slopes on each side. The two sides are typically symmetrical. The lower slope is steeper, which is almost vertical, than the upper slope. 
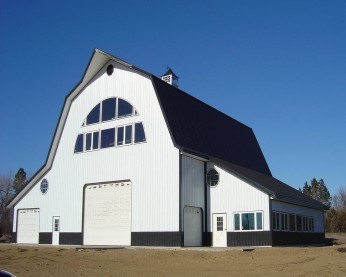
Gambrel Roof

Pros: Gambrel roofs also provide enough space for attics or lofts and offer very good drainage. 

Cons: Far more expensive than gabled roofs or full two story buildings.


3- Hip Roofs 

Hip roofs have four sides that are declining towards the walls and form a ridge at the top. 
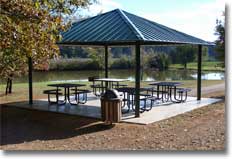
Hipped Roof

Pros: Hip roofs can be an excellent choice for windy and snowy areas.

Cons: More expensive than gabled roofs for materials and highly labor intensive to assemble. 


4- Skillion Roofs 

Skillion roofs or shed roofs have a mono slope or the entire roof plane is designed to slope in a single direction.
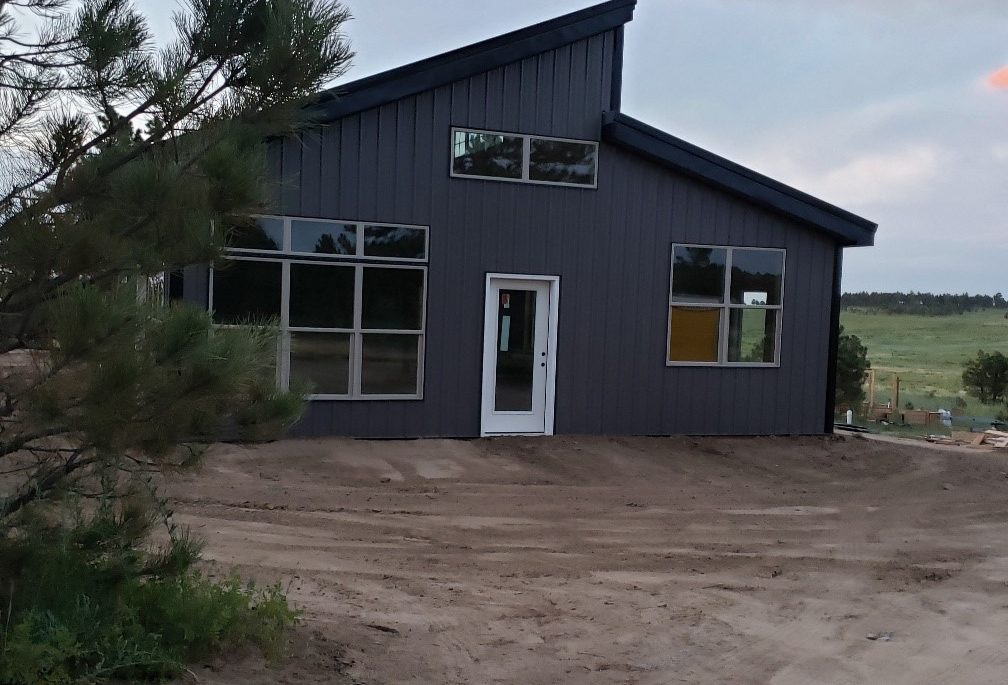
Skillion Roof

Pros: Popular for modern designs. Because of their design, skillion roofs can be 

very simple to build. 

Cons: A slight-pitched skillion roof can encounter snow loading problems. 

Ventilation can become problematic.

Hansen Pole Buildings can help you in building your roof style of choice. We offer many pole barn designs and layout ideas. If you have another design in mind, we can still help you with that as we also provide custom roof designs. At Hansen Pole Buildings, we want to provide our customers with “The Ultimate Post Frame Building Experience”. For inquiries, do not hesitate to contact us!

4 Things to Love about Gambrel Roofs

Gambrel roof pole barnThe gambrel roof is characterized by two slopes on each side, with a shallow upper slope and a steeper lower slope. This is the style of roof you’ll see on many traditional barns, but a building with a gambrel roof doesn’t just have to be used for hay storage or livestock. Gambrel roofs are a popular pole barn choice for residential and commercial pole buildings, and it’s not hard to see why. Below are 4 reasons why the gambrel roof is such an attractive pole barn option.

  • It has historical appeal. Gambrel roofs can be found on many Dutch Colonial and Georgian style homes, and even when you use this roof style on a modern building, you can give the building a historical feel. If you want a pole barn home or retail space with a classic, traditional look, you should consider choosing a gambrel roof.
  • You’ll have lots of headspace. Because of the steep lower slopes, gambrel roof pole barns allow for high ceilings. This is ideal if you plan to use your pole building for storage and want to add a second story to give yourself more floor space. It can also be great if you plan to use the pole building as a residential space; you could use the second level as a loft, attic, workspace, or guest bedroom. Some families even decide to use the first floor of their gambrel roof pole barn for storage and the second floor as a full living space, complete with kitchen, master bedroom, living room, and bath.
  • You can add custom-designed windows. The style of the gambrel roof leaves plenty of room to add windows on the end walls, and you can really put your stamp on the building with custom-designed windows. Choose classic dormer windows, opt for large half-circle windows, or go with another specialty window shape—there are plenty of options that work with the gambrel style.
  • Gambrel roofs are simple to frame. Pole buildings are popular in part because they are easy to construct, and gambrel roofs keep that construction relatively straightforward. Most gambrel roof pole barns use combination truss and rafter design, making them really no more difficult to install than a standard gable roof. And when you choose a gambrel roof pole building kit from Hansen Pole, you’ll receive detailed step-by-step instructions to make the construction process even easier.

Pole Barn Pitch Break: a How-To

How to: Pitch Break from Steeper to Flatter with Steel Roofing

pitch breakPitch breaks occur at a transition between steeper (towards peak) and flatter roof slopes (towards the eave). Exercising care, this will be a painless and leak free area.

Lots of things are going to occur at the junction between the two roofs. In order for this transition to be successful, the top of the flatter pitched roof must connect to the column at a height lower than top of the steeper sloped roof.

First, calculate the distance to lower shed roof at the pitch break. Subtract flatter roof slope from steeper roof slope; divide the result by 4 and add ¾” (the ¾” is the height of the steel ribs).

Example from 6/12 to 4/12: 6 – 4 = 2; 2 / 4 = ½” + ¾” = 1-1/4”

Once the steeper sloped rafters or trusses are in place, install flatter pitched rafter or truss, lower than the steeper sloped truss or rafter (measure at outside edge of column), by the previously calculated distance.

Following is an exception to the basic rule of framing an entire roof and installing all roofing first (assuming there is a wall between the two differing sloped areas).

Install all framing in the wall between the main steeper sloped building and the flatter roof – this includes skirt boards, all girts, as well as any door framing. Do NOT install upper most purlin in the flatter sloped area…yet.

Place wall top inverted J Channel. Top of J will be lowered to compensate for the continued slope of the upper roof.

Plumb wall, install all trims, doors and siding.

Where the flatter sloped rafters extend through the wall, install J Channel along each side and across the bottom of the rafters.

As long as this wall is properly plumbed, prior to installation of the wall steel, it will not negatively impact the ability to square up any roof planes.

Install previously omitted upper shed roof purlin. Complete all roof framing. Square the pitched roof and place insulation. Roof insulation is installed to run continuous from lower sloped roof, across the pitch change and towards building peak. Install roofing on flatter slope of roof.

After lower roof steel is installed, angle cut lower rake trim “top” end so “face” edge is several inches longer than portion on roof (The face side will be trimmed later, as needed). Place lower rake trim, with roof side tight to upper varge rafter or end truss.

Place transition flashing on roof over lower roof steel and lower rake trim. Transition flashing leading edge will be flush with lower rake trim outside face. “Bend” in flashing should be at, or close to, main building eave girt lower edge. Make a pencil mark at lower edge at both building ends, on end truss/rafter or varge rafter tops.

Partially drive nails at these marks and run string line from end-to-end of building and attach to nail heads. The stringline will make transition flashing easier to align and provide a measuring point for locating form-fitted outside closure strips.

Press Outside Closure Strips into place along the building length. Closure low edge will be ¼” up from string line. Install first transition flashing piece at building rear, allowing an overhang beyond end truss/rafter 1-3/4” or varge rafter by 3/4”.

Fasten with #12 x 1-1/4” stitch screws through transition flashing edge flange and closure strips into all roof steel high ribs. As stitch screws attach transition flashing directly to steel roofing, purlin location has no effect on transition flashing installation.

Run two caulk beads at first transition flashing piece end to seal to next overlapping piece. Lap next transition flashing a 3” minimum over first. Press seams together and so on down building. Trim last piece, if necessary, to overhang either end truss/rafter or varge rafter at building front end, identical to overhang on rear end.

Make a pencil mark at steeper slope eave girt lower edge at both building ends, on end truss/rafter or varge rafter tops. Partially drive nails at these marks and run string line from end-to-end of building and attach to nail heads. The stringline will make steeper slope roof steel easier to align and provide a measuring point for locating form-fitted inside closure strips.

Press Inside (skinny) Closure Strips into place, the building length. Closure low edge will be ¼” up from string line. Steeper slope roof steel downhill edge, will be at stringline.

Once upper roof steel is installed, place upper rake trim over upper roof steel and transition flashing. On roof, rake trim low point will contact lower rake trim. Trim faces of rake trims to a smooth transition from upper to lower (any lap should leave lower rake behind upper).

Voila! And there you have it – a leak free pitch break!