Tag Archives: cupola

Cupola Sizes, Insulation for a Ceiling, and Structural Pieces

This week the Pole Barn Guru tackles reader questions about cupola sizes, the proper way to insulate a shed ceiling, and a structural materials question.

Cupola
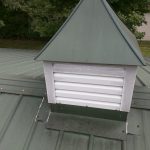
DEAR POLE BARN GURU: What base size and height is correct for a cupolas for a 32’ wide by 36’ long by 35-40’ high with a 10 over 12 pitch roof? Thank you for your answer. NANCY in SPENCER

DEAR NANCY: This may answer some of your questions: https://www.hansenpolebuildings.com/2015/09/cupola/. As to actual height of your cupola(s) – this is totally subjective based upon what you feel looks best.


DEAR POLE BARN GURU: I’m desperately trying to figure out the proper way to insulate my pole shed ceiling. The Purlins run parallel rather than peak to eves. And there are no soffits or vents to be had. I have metal roofing with fiberglass roll insulation between roofing and purlins that has the vapor barrier backing. I’m afraid to slice holes in this vapor barrier as it may cause the metal roofing to condensate. My purlins are conducting cold temps in winter and when the heat hits them, they grow mold in some places as they’re very cold – or hot in the summer. Can I install the paper back fiberglass between purlins and be okay? I’m hoping would slow moisture down. but allow it to dry as well. IDK I’m in the NW mountains of Oregon, we do get low temps and snow and the shop is mildly heated in winter. I can’t afford to redo the roof or go with blown in foam. Is there another way? Can I use fiberglass batting safely? My end goal is to have tin roofing on the ceiling, is that okay? Sorry to bother you with such a common question but I haven’t found anyone with my exact issue. Thanks so much for your time and I sincerely hope to hear from you, big fan, DAVE in GALES CREEK

DEAR DAVE: Appreciate your being a big fan – thank you!

No, you cannot/should not install paper (kraft faced) backed fiberglass insulation between your building’s roof purlins. This would create a system with two vapor barriers, trapping moisture between them. Start by looking to what is probably your source of moisture – your concrete floor. If you do not have a well-sealed vapor barrier underneath it, use a sealant on top of your concrete to reduce moisture coming up through your slab. After you have your steel ceiling in place, blow in fiberglass insulation above it, and install vents in each gable end and under your ridge cap.


DEAR POLE BARN GURU: What is the type of steel (cold roll, stainless, etc.) used and the thickness of the trusses and main poles holding the structure up. ERIC in PAHRUMP

DEAR ERIC: 40 years ago I provided a post frame building kit package for a tire dealer in Pahrump!

Most steel roofing and siding is cold roll formed. These panels most typically have SMP paint (https://www.hansenpolebuildings.com/2014/05/smp/) over a galvanized or galvalume substrate. There are Building Code minimum requirements for residential steel roofing substrates (https://www.hansenpolebuildings.com/2020/11/minimum-steel-substrate-coating/). Hansen Pole Buildings use two-ply (for interior spans) 1-1/2″ width (2x lumber) chords and webs for prefabricated roof trusses, assembled with 16, 18 or 20 gauge galvanized steel pressed in connector plates. Plate thickness is determined by truss engineers to meet tension requirements. Main roof supporting members may be either glulaminated or solid sawn timbers, depending upon eave heights, roof slope, applied wind and/or snow loads, dead weight of roof assembly and availability of materials in a given market. Actual sizing will be determined by our third-party engineers.


Bonus Pole Barn Guru Tuesday

Bonus Pole Barn Guru Tuesday- Today’s extra answers questions about cupolas, heating a monitor style building, and steep grade changes on a build site.

DEAR POLE BARN GURU: We are considering putting two cupolas on the roof. Can we run our drain waste vents through them instead of through the roof itself? BRANDON in CALVERT CITY

DEAR BRANDON: Provided they are vented cupolas, I am finding nothing in Building Codes prohibiting this. You will want to confirm this with your local Building Inspector.

A caution, however, you may experience undue condensation caused by warm moist air escaping your vent and contacting cooler metal surfaces of your cupolas. It may be beneficial to have closed cell foam insulation sprayed on interior of any metal surfaces of vents of your cupolas to create a thermal break.


DEAR POLE BARN GURU: Is the Monitor style bad for heating/cooling costs? Also, what style is best for energy costs in a metal home? If we want a loft area do you need to have a vent up top to aid in the summer heat in such cases? HEATH in LEIGHTON

Hansen Pole Buildings GuesthouseDEAR HEATH: The most economical for heating and cooling will be a square building on a single level. Your challenge with any two-story or lofted building is heat rises – so to cool to a comfortable level upstairs, it is frigid downstairs. I had this problem with our two story home in Washington, so when we built our multi-level shouse, we had individual heat pumps, heating and A/C units for each floor. Your need for venting will depend upon how you are insulating. If you are doing a finished ceiling across bottom of trusses, with blown insulation directly above, then your dead attic space being created will need to be vented (ideally with eave and ridge vents).

DEAR POLE BARN GURU: Can you design a cabin pole building to set on a lot with about a 30% slope? Thanks. STEVE in ANDREWS

DEAR STEVE: When our mountainside home near Spokane, Washington needed a new garage with 14 feet of grade change in 24 feet, we went with post frame – doing a ‘stilt’ house. Unless you are in a flood zone, this is normally far less expensive than excavating your bank to do a footing and foundation, or bringing in a plethora of truckloads of fill in order to get to a level building site. This should work well with your new cabin.

An Architect’s Guide to Drawing Your Own Barndominium Plans

An Architect’s Guide to Drawing Your Own Barndominium Plans

Architect David Ludwig (www.LudwigDesign.com) has over 50 years of construction and design experience. A frequent contributor to assisting those interested in barndominiums, but without knowledge to create their own plans, David has offered his sage advice:

1. Draw to scale. Use 1/4” graph paper. Make each square equal to 6”
2. Use double lines for walls. Make them 5” thick
3. Furnish your plans. Measure and draw all furniture on a separate sheet. Cut out the little drawings. Move them around to find the best layout.
4. Consider flow, outlook (window locations) interior views, sound through walls, privacy, focal points, cross-space and adjacent space connections (visual and walking), etc.
5. Show door swings and window locations.
6. In your mind, go and “sit” in every seat. Look around. Adjust what you see.
7. Two-story interior spaces. Consider limiting your upper floor to create a two-story space for your great room/dining/kitchen. Consider a balcony at the upper level. Consider making the stair a “feature” part of the large space.
8. Stair design. Avoid circular stairs or landings with windows. Difficult to meet code requirements. Consider a “folded” two-flight stair with a landing half way up. Consider enlarging the landing as an actual “between space” or overlook (library, crafts).
9. Common omitted items: pet areas, pantry, digital charging, trash and recycling, sports and hobby equipment, musical instruments, utility room (for furnace/AC, water heater, well equipment), cleaning closet (for vacuum, brooms, cleaning supplies)
10. TV and digital media. Think about the role TV plays in your life. It is central and everywhere? Is this what you want? Is this good for your kids? Consider sequestering all screens to a “media room” for limiting access and freeing other spaces as “screen-free”.
11. Look at building code for clearance requirements at plumbing fixtures and wood stoves.
12. Draw “exterior elevations” of the whole house. In a large-volume building like a barn, consider using 8’ headers for windows and doors. For tall walls, consider adding transom windows above.
13. Organizing openings and changes of materials. Line things up. Slight misalignment is visual clutter. Create changes of materials and colors that “tell a story” or frame or align with openings.
14. Daylight, windows, emergency escape and ventilation. Follow and exceed code requirements for minimum openings. Consider adding a “cupola” or system of skylights at the ridge to bring light/air into the center of your main spaces.
15. Solar. Consider roof slope (min 4/12) and orientation (south or southwest) for optimal solar orientation.
16. Shade. Consider overhangs and covered porches to shade your windows. Sun entering through windows can heat/cool at the right times of year. Remember, summer sun is almost vertical and can easily be shaded. Winter sun is low angle and can slip under a shade to add warmth.
17. Interior elevations. Draw separate for each room with cabinets and special finishes (kitchens, bathrooms, pantries). Look at what you want to store and where.
18. Outdoor rooms. Consider creating an outdoor kitchen/BBQ area. Covered/sun? Looking at? Think of the space around your barn as containing “outdoor rooms” with activities and furnishings. Outdoor spaces have a larger “scale” than indoor. Consider seasonal changes.
This should get you started.
Good luck!
David Ludwig, Architect

How to Install Steel Screws on a Roof

Welcome to Ask the Pole Barn Guru – where you can ask questions about building topics, with answers posted on Mondays.  With many questions to answer, please be patient to watch for yours to come up on a future Monday segment.  If you want a quick answer, please be sure to answer with a “reply-able” email address.

Email all questions to: PoleBarnGuru@HansenPoleBuildings.com

 DEAR POLE BARN GURU: How much does a cupola weight? Wondering if I would need a crane to lift it onto the roof. Thanks VANQUISHING IN VANCOUVER

DEAR VANQUISHING: The cupolas we typically provide are going to be more than manageable by hand, for most people. On my own building (which is very large), I have a 48 inch square cupola (also very large).  The universal base (which is installed first, by itself) weighs 29 pounds. In my own case, I have a cupola with glass sides, so it is slightly lighter, weighing in at 35 pounds. The louvered model weighs 60 pounds. The cupola roof, weighs 55 pounds and weathervane 13. Our most commonly supplied cupola is 24 inches square. Its universal base weighs 29 pounds, the louvered sides 18 pounds, roof 10 pounds and weathervane 5 pounds.

Mike the Pole Barn Guru

DEAR POLE BARN GURU: I’m constructing a pole barn using steel roof trusses with 2×6 roof purlins. The lumber is not very straight and my screws are missing about 10% of time. Not knowing what else to do, I have currently just left them in place. What is the right move for so many missed screws?

Thank you! GRINDING IN GATESVILLE

DEAR GRINDING: Some background for those who are not familiar with the construction of your type of building….

Although we do not utilize steel trusses for our buildings, there is nothing wrong with a steel truss which has been properly fabricated from drawings provided by a RDP (Registered Design Professional – architect or engineer).

Typically steel trusses have clips or angles welded onto them, to accept the roof purlins – which are installed on edge. If the columns are set plumb and the clips are al at the same locations from truss to truss, then a good share of the battle has been won before beginning.

To avoid roof leaks from misses there are some steps to take:

First – make sure the roof plane which is to be sheeted is square and the eave line is straight.

Second – To maintain straight screw lines and avoid roof leaks, stack roof steel in a pile, mark screw locations (we’ve found a “dry erase white board” marker works well) and pre-drill steel sheets with a lesser diameter drill bit than the screws. For best results, drill no more than four sheets at a time. Be sure to use a soft cloth to wipe off the steel shavings that develop from putting in the holes with a drill and wipe off the marker lines before installing the panels.

Third – Distance from roof framing edge to first roof steel sheet edge is to be consistent from top to bottom. If NOT and your end wall is not properly aligned, straighten before roof steel can be properly applied.

Fourth – Keep panels from stretching or compressing in width as they are installed. Panels cover 36” from major rib center on one panel side to major rib center at other side of panel. Measure each panel as installing or pre-mark building frame (or underlying insulation) every 36” to check panel width.

As roof steel panels were predrilled, if screws miss a purlin, remove the screws which missed purlins, plus screws within three or four feet of each side of miss (along the same purlin). From inside of the building, have someone push the offending purlin either “uphill” or “downhill” until screw(s) can be driven through each hole into that purlin.

If a “random miss” occurs, the repair is to have someone hold a wood block underneath hole and drive a screw through hole into block. This is the manufacturer’s only approved repair for a missed screw.

Do NOT, under any circumstance, attempt to fix a missed screw hole with caulking. It will be a temporary fix at best and you will end up with leaks over time.

If the panels were not predrilled, you could have some issues which just cannot be fixed and the only solution may be to replace the roof steel and try it all again.

Good Luck!

Mike the Pole Barn Guru