Tag Archives: truss bottom chord

A Truss Raising Challenge

A Truss Raising Challenge

STEVE in ST. MARIES writes:

“My question is about raising my trusses. I bought my building package when prices were rapidly rising, not knowing how high they would go. I was only able to afford a third of the building I wanted, but I had the engineer design it so I could attach the other two thirds of the building (the shop portion) at a later date. So the gable end is a 40′ span and the eave sidewalls are 24′. To make it a sturdy freestanding structure, the center trusses on the 24′ sides are tripled, with single trusses on each end. Also, the purlins are hangered from the center triple truss and rest on top of the endwall trusses. With the tripled truss in the center having full bearing on the posts, i don’t see a way to use a winch box in the center. FYI, when i say center I’m looking from the eave wall side. What I’m thinking is building the whole system on the ground, using winch boxes at the four corners, and using two genie crank lifts under the triple truss to handle the weight. since the posts on the gable ends are notched to the outside, I was thinking I could use partially sunk nails on the top of one gable truss to keep the purlins from sliding down the pitch even though the other end will be in the hangars on the center truss, and using nails on the bottom side of the purlins to keep the truss from leaning in or out as I lift with the winch boxes. when the whole assembly gets up where it needs to be, the one gable side and triple truss will slide into the post notches, and the other gable truss bottom chord can be pushed into place and the nails removed on the bottom of the purlins that are resting on it to get everything on layout. Is this too convoluted? Will this work? Is there a better way other than renting a forklift or boom truck, which aren’t options for me?”

I have been through St. Maries many times. It made for a great stop on motorcycle rides around Coeur d’Alene Lake. Way back (early 1900’s) my great grandparents had a store there in town (I have an awesome panoramic photo on my wall – looking North from town showing billowing smoke from 1910’s Great Fire).

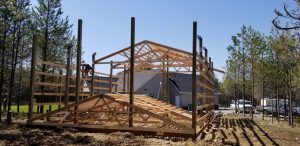
Temporarily attach short pieces of 4×6 to one side of your triple truss bearing columns opposite truss notch (using 8 inch long TimberLoks or similar) so you can winch up the center set of trusses. You can (should) attach purlins in end bays to tops of end trusses with Simpson H-1 brackets or equal and solid block on top of the truss, between purlins, to prevent rotation. On the end away from the triple truss notch, don’t attach lower few purlins, so truss ends remain flexible.

With six winch boxes, you can now crank up all of your roof at once.


Cutting Barn Trusses

Just a Little Nip Here, Tuck There

As so many of us have entered an age of Covid-19 binge television watching, I can imagine there are more than a few who have consumed calories while watching 100 episodes of Nip/Tuck (originally aired on FX from 2003-2010).

While nipping and tucking can solve many human cosmetic issues, it is done by highly skilled professional surgeons. Want to nip and tuck on a building’s structure? You wouldn’t hire a bus driver to perform plastic surgery, so don’t try to be your own structural engineer.

Reader BRIAN in ANDERSON writes:

“I have a barn, 40 foot wide, 36 feet long.  I need to increase the height of the front garage door to fit an RV, and need to modify a single truss in the front of the building to make room for a roll-up garage door (barrel door).  The trusses are engineered attic trusses, and span the 40′ without any support.  The distance between the web members that would make up the “wall” of the attic room, is just over 16′.  The door is 16′ wide.  So I need to get some more room between the web supports, and remove a section of the bottom chord.  I will be raising the middle section of the bottom chord by 26″. My plan is to modify the truss in two ways:  First create a new bottom truss to effectively turn this single truss into a coffer truss, and widen the web members.  The new bottom chord will sandwich the existing truss elements with a new 2×10 on each side, and gaps of the new chord path filled in effectively making a solid beam 3 boards wide (considering construction adhesive between the layers as overkill).  Including some drawing showing the steps I plan to take.  Probably overkill, maybe not enough, just want a reality check on the plan.  Also, trusses are 24″ on center.”

Mike the Pole Barn Guru responds:

Stop.

Never, ever cut a truss without having an engineered repair. Ideally this could be obtained from whomever manufactured your building’s trusses originally. If you are unsure, there should be a manufacturer’s permanent ink stamp on each truss bottom chord. Should you not know who fabricated them, stamps are not able to be found or manufacturer is no longer in business, hire a local Registered Professional Engineer to come examine your trusses and provide a repair drawing (if it is even possible to be done).

For extended reading on not cutting trusses: https://www.hansenpolebuildings.com/2016/07/cutting-trusses/

My Pole Barn Heats Most of Southern Michigan

My Pole Barn Heats Most of Southern Michigan

Most post frame (pole barn) buildings were not designed with an idea of efficiently and effectively being able to climate control them. Likely very little (if any) thought was put in by the salesperson other than giving his client a lowest possible price to secure a signed contract.

Reader CHRIS in SOUTHERN MICHIGAN now has become owner of one such pole barn. Chris found contact information for Hansen Pole Buildings’ Materials Wizardress Justine and wrote to her:

“Hi Justine,

I recently bought a house with a heated 30’x50′ pole barn. However, my heating cost is obscene after two months of (mild) Michigan winter. The building has soffits and a ridge vent, so I’m assuming all of my heat is just going out the roof right now.

I’d be interested in acquiring some engineering consultation regarding if I can put a ceiling in this building or not, and what the best method may be. I had thought about seeking out local structural engineers to Southeast Michigan but Hansen seems like well-regarded experts on this subject.

I found your e-mail from this article:

https://www.hansenpolebuildings.com/2018/12/will-my-post-frame-building-support-a-ceiling/

Thank you!”

Mike the Pole Barn Guru answers:

There exists an inexpensive and easy way to determine if your roof trusses will support a ceiling load as constructed, or if an engineered repair will be required. Every pre-manufactured wood truss must (by Building Code) have a permanent stamp affixed to indicate manufacturer. Locate one of these (should be along truss bottom chord) and simply contact the manufacturer. They should be able to find records for your pole barn’s truss order by an address lookup. Worst case scenario – you can send them information as to the dimensions of your building, spacing of trusses, roof slope (probably 4/12) and some digital photos of your trusses. If a repair will be necessary, the most cost usually engineering from the truss company will run $100 or less.

If, by some chance, original manufacturer has closed, contact a nearby truss company for recommendations as to an engineer who would be capable of examining your building and providing a repair, if necessary.