Putting Everything Under One Post Frame Roof
I have been an advocate of one larger roof, rather than an enclosed building with a roof only side shed for years. This allows for greater headroom in ‘shed’ area without having to deal with pitch breaks (transition from a steeper slope main roof to a flatter shed roof), making for easier assembly. In almost all instances, this will result in a less costly design solution.
This also happens to be a lesson I have tried to impart upon our Hansen Pole Buildings’ Design Team, however they have been slow to embrace this concept.
Reader RYAN in SUN RIVER writes:
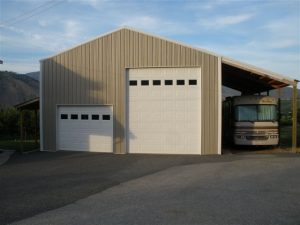 “I have plans to build a 52x48x14 this spring. The idea is 52×48 roofline 4/12 pitch. Under that roof is a 16×48 open side for rv parking and then 36×48 enclosed with concrete floor. My original thoughts are to 2×6 stick frame the wall separating the open area from the enclosed area after the pad is poured (any suggestions). 16×12 insulated door and a 4’ man door on the front gable end and a 3’ man door to get in from under the open area towards the rear.
How much would you charge to draw this up with your building techniques?
I am planning on sourcing materials local but wouldn’t mind a quote from you either.”
I do like your idea of having your enclosed portion and roof only under one gabled roof, rather than a smaller gable over enclosed portion and balance as a shed roof off one side. You gain headroom, it is easier to assemble and usually less costly.
I would frame separation wall with wall girts, rather than stick framing and having to add on horizontal framing to attach wall steel. Code also will not allow for a stud framed wall greater than 10 feet in height without it being engineered. To minimize possibilities of water from your RV area migrating into enclosed areas, your concrete should be two separate pours, with RV parking slab slightly lower at main building wall and sloping away from it.
Your choice of having a four foot wide person door is one you will not regret. For a minimal added investment you will save your knuckles repeatedly.
As for building plans, we are not a plans’ service, however your investment in a new Hansen Pole Building does come with complete third-party engineer sealed structural plans, along with verifying calculations. This alone will usually save you thousands of dollars in engineering costs, plus you have our roughly 20,000 buildings of experience to arrive at what will be your most practical and cost efficient design.
Why people think they are somehow going to get a “better deal” by sourcing materials locally is beyond my comprehension. We have buying power an average individual (or contractor even) is never going to have, plus our control over materials being provided allows our engineers to be certain what they specify on plans, gets delivered to your building site. Some materials we have produced only for our clients – you cannot buy them elsewhere.
For continued reading on this subject: https://www.hansenpolebuildings.com/2014/03/diy-pole-building/
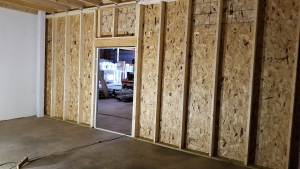 In case it isn’t overly obvious, the framing contractor used far too many studs. At the rough opening, there are two king studs, two trimmer studs supporting the header, and two jack studs supporting the sill plate. Additionally, there are two extra common studs on either side of the window, creating small cavities which are difficult to insulate. The only reason for the studs so close to the window is this is where the 16-inch on center layout fell. If the window were slid to the left or right about 4 inches, one of these extraneous studs could have been eliminated.


