Minimizing post frame ice dams
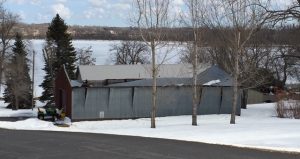
November 1996 in Northern Idaho will probably forever be known as “Ice Storm”. About six weeks prior to this event, my construction company had completed a post frame building just south of Sandpoint. When massive snow and ice storms hit, our client kept his new building warm by use of a wood stove. Heat from wood stove melted accumulated roof snow and ice. This snowmelt then proceeded to freeze along his building overhangs, forming ice dams.
Solid ice weighs roughly 57 psf (pounds per square foot). When our client’s roof ice buildup got to be over two feet thick, they caused a roof collapse – probably no surprise being as this weight was almost triple the building’s design roof load!
In cold climates getting a lot of snow, heat from inside a post frame building escaping into a traditional attic can warm the roof. Combine this with rooftop snow load insulating from cold exterior temperatures and roof deck can increase in temperature above freezing. When this happens, the bottom layer of snow can melt, and the resulting water will run down the roofline to roof’s edge.
If this occurs while average exterior temperatures are still below freezing, perimeter overhangs will likely be below freezing, and this liquid water can freeze near a roof’s perimeter – leading to icicles and possible ice dams.
 You are probably familiar with icicles, but an ice dam occurs when a ridge of ice forms near roof edges and prevents melting snow/water from draining off the roof. Ice dams will grow as more water flows down the roof, builds up behind ice and freezes, However ice will only form when roof portions are below freezing temperatures, so as snow melts, liquid water will collect behind ice. When this water finds small cracks, crevices and openings in roofing it can flow into the building, causing damage.
Ice dams can break gutters, lift roofing and can cause water to back up and leak into pole buildings. Of course when water gets into a building, real damage occurs – wet insulation, peeling paint, warped wood, stained and sagging ceilings and more.
How do we solve ice dam problems?
A short-term fix – remove snow from the roof, such as by sweeping it off or using a “roof rake”, because no snow means no melt, so there will be no eave ice buildup. And for long-term solutions there are some mechanical options, like heat strips (https://www.hansenpolebuildings.com/2013/04/hotedge/), and there are some sound building design principles helping to lower ice dam risk.
Ice dams occur because of uneven roof deck temperatures, so the key principle in lowering ice dam risk will be to maintain more consistent roof deck temperatures. This can be done by reducing heat loss from conditioned space to attic and thereby keeping heat away from roof underside.
In practice this means reducing air leakage, increasing attic insulation value and verifying good natural roof ventilation, when applicable.
There are a couple of ways use of spray foam insulation can help mitigate ice dam risk in cold climates.
Spray foam attic floor, providing an air seal across ceiling, reducing air leakage from conditioned space to attic, and we can put in as much insulation value as desired, either with all spray foam or a hybrid system incorporating spray foam with blown in insulation above. With a vented system like this, we also want to make sure we have good natural ventilation through soffits, eaves, gables, ridges, etc. This design combines all key design principles to reduce ice damming risks.
Spray foaming underside of roof deck moves thermal boundary and air barrier to underside of roof deck. It means attic space resides inside building thermal envelope and creates a sealed, unvented attic. In this design, key plane of protection becomes spray foam layer under roof deck, protecting the roof deck from interior heat and attic air. The roof deck will now be primarily exposed to exterior conditions and more likely to remain cold.
 Welcome to challenges of trying to get adequate insulation when finishing the underside of roof purlins.
 You are probably familiar with icicles, but an ice dam occurs when a ridge of ice forms near roof edges and prevents melting snow/water from draining off the roof. Ice dams will grow as more water flows down the roof, builds up behind ice and freezes, However ice will only form when roof portions are below freezing temperatures, so as snow melts, liquid water will collect behind ice. When this water finds small cracks, crevices and openings in roofing it can flow into the building, causing damage.


