Tag Archives: overhead door headers

Best Practice for Closing and Insulating 2×10 Headers

Best Practice for Closing and Insulating 2×10 Headers
Reader DAVE in VIROQUA writes:

Best practice for closing and insulating 2×10 headers. My pole barn has building wrap then closed cell spray foamed walls. Ceiling not yet installed but want to use blown in fiberglass with vapor barrier. The spray foam on walls goes up to the bottom edge of the outer header. Before the ceiling is installed and insulated what is your suggestion to close and insulate the double 2×10 header to prevent moisture issues etc.? My walls will be finished off at a later date. Building has vented soffits and ridge vent. Roof panels have drip guard on underside as well. The post framing is laminated 2×6-3ply. Thank you.”

Mike the Pole Barn Guru pens:
One of my pet peeves of what I refer to as 4 & 8 buildings (trusses every 4′, columns every 8′) is when truss carriers (headers between columns) are applied to column faces, rather than being notched in. Rarely are fasteners sufficient to be able to resist loads imposed by those once every hundred years snow storms, resulting in roofs lowered to top of vehicle levels. 

Besides connection challenges, it further reduces actual amount of usable interior space. As an example, builders/providers will set outside of exterior (barn style) girts at Building Lines, and to finish interior requires adding yet another set of face mounted wall girts. This ends up with wall framing 8-1/2″ thick. On a 24′ wide building, if 1/2″ gypsum wallboard is used, interior finished dimension ends up being only 22’6″!

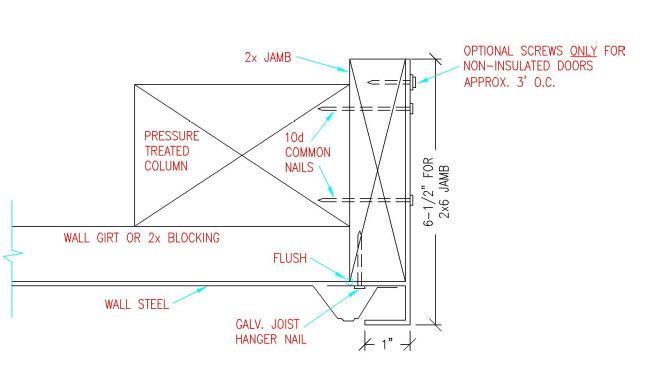
In answer to your question, you’ll want to enclose above double 2×10. This can be done by cutting strips of whatever low cost sheet good you can find (OSB, plywood, etc.) and installing them between trusses on top of truss carriers. Fill cavity between 2x10s with closed cell spray foam.

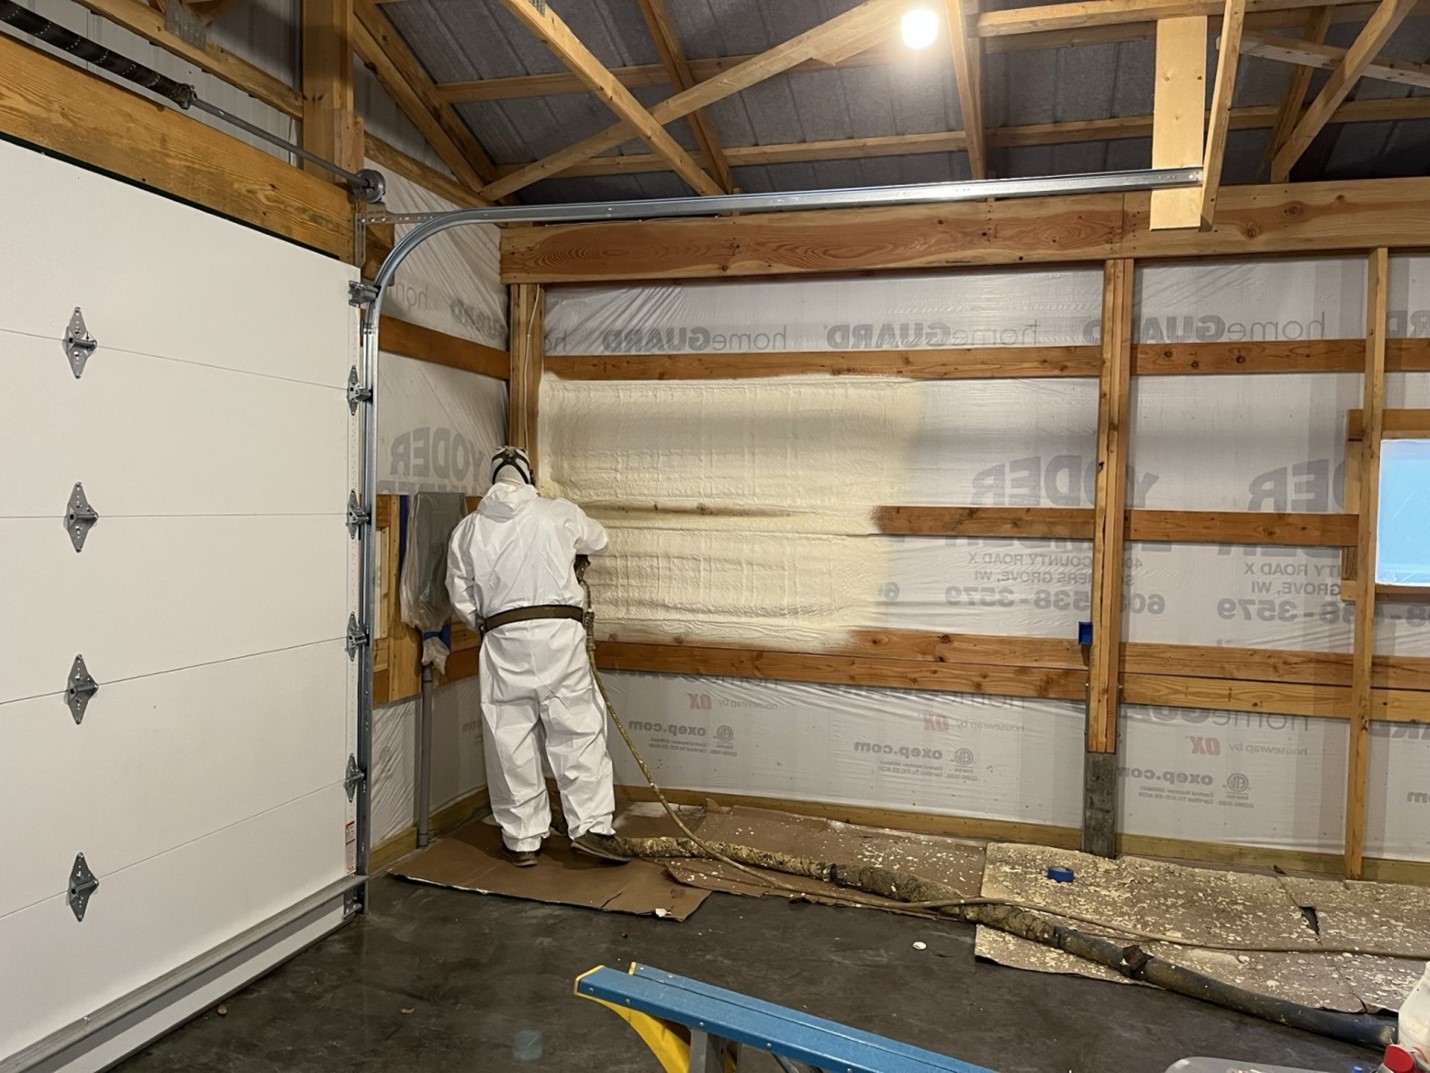
Hopefully you will not have issues with your current closed cell spray foam applied to a weather resistant barrier. Best practice is to spray directly to inside of steel (please read more here https://www.hansenpolebuildings.com/2020/04/spray-foam-insulation-3/)

Garage Door Trims Don’t Fit

Garage Door Trims Don’t Fit

Hansen Pole Buildings’ Technical Support Department answers lots of questions for our clients. Most of these questions can be answered, or could be solved, by review of the building’s engineered plans and/or reading appropriate chapter of Hansen Pole Buildings’ Construction Manual. This Construction Manual also provides a step-by-step outline of in what order to assemble a post frame building kit, so as to achieve best results.

Short Panel DoorSadly, some folks go astray (more often than not – builders whom have their own ideas) and end up with some unique challenges. Challenges we are here to help solve, even for clients who began construction two (or more) years ago.

Client SCOTT in RUFUS writes:

“I have been a long time at putting up this building due to working full time etc. I am at the point of putting on garage door trims. If I understand the orientation of these trims, I have 7 1/2″ of trim and 7″ of space to cover. It looks like I will have to cut 1/2″ down the entire length of each of these trims. Can you give me any advice or thoughts on this? See the attached pictures. Thank you, Scott”

We experienced some considerable head scratching initially, before we opened up client’s photo seen with this article, then it became clear what challenges truly existed.

Hansen Pole Buildings’ overhead door jamb trims started with a standard part manufactured by McElroy Metals known as a P-JFB We have since introduced this part to our other steel vendors, a jamb trim with an integrated J channel. J channel receives edge of steel siding and jamb trim portion sized to cover an appropriate sized jamb, in this client’s case a 2×8.

Sometimes the solution is as easy as using the right trim in the right place.

Overhead Door Jamb


P-JFB trim for a 2×6 jamb shown above.

Here was fix for this client:

We can’t say we have seen overhead doors installed before door jambs are in place (or for this matter headers not yet in placed outside of columns). In order to solve your challenge you are going to need to carefully remove vinyl weather seals from around installed doors. Next loosen all lags attaching vertical legs of overhead door tracks to allow for about 1/2″ of “slop”.

Carefully read Chapter 24 of Hansen Pole Buildings’ Construction Manual “Residential Overhead Door Openings”.

Install overhead door headers appropriately to face of building columns. Place 2×8 overhead door jambs in overhead door hole, with outside of 2×8 even with outside face of headers, wall girts and skirt boards. Install jamb trims, with excess beyond dimension of 2×8 jambs (if any) towards door. Tighten lags holding vertical door rails down, so overhead door face contacts with jamb trims. It may be necessary to replace lags with longer ones, in order to achieve a solid bite into columns. You will probably need some shims between overhead door side rail brackets and columns, in order to tighten lags without a space between brackets and column. Reinstall vinyl weather seals.