Garage Door Trims Don’t Fit
Hansen Pole Buildings’ Technical Support Department answers lots of questions for our clients. Most of these questions can be answered, or could be solved, by review of the building’s engineered plans and/or reading appropriate chapter of Hansen Pole Buildings’ Construction Manual. This Construction Manual also provides a step-by-step outline of in what order to assemble a post frame building kit, so as to achieve best results.
 Sadly, some folks go astray (more often than not – builders whom have their own ideas) and end up with some unique challenges. Challenges we are here to help solve, even for clients who began construction two (or more) years ago.
Client SCOTT in RUFUS writes:
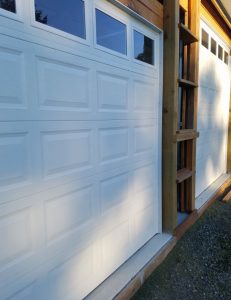
“I have been a long time at putting up this building due to working full time etc. I am at the point of putting on garage door trims. If I understand the orientation of these trims, I have 7 1/2″ of trim and 7″ of space to cover. It looks like I will have to cut 1/2″ down the entire length of each of these trims. Can you give me any advice or thoughts on this? See the attached pictures. Thank you, Scott”
We experienced some considerable head scratching initially, before we opened up client’s photo seen with this article, then it became clear what challenges truly existed.
Hansen Pole Buildings’ overhead door jamb trims started with a standard part manufactured by McElroy Metals known as a P-JFB We have since introduced this part to our other steel vendors, a jamb trim with an integrated J channel. J channel receives edge of steel siding and jamb trim portion sized to cover an appropriate sized jamb, in this client’s case a 2×8.
Sometimes the solution is as easy as using the right trim in the right place.
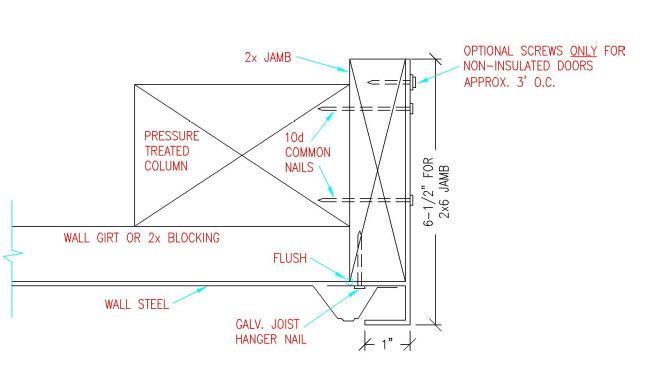
P-JFB trim for a 2×6 jamb shown above.
Here was fix for this client:
We can’t say we have seen overhead doors installed before door jambs are in place (or for this matter headers not yet in placed outside of columns). In order to solve your challenge you are going to need to carefully remove vinyl weather seals from around installed doors. Next loosen all lags attaching vertical legs of overhead door tracks to allow for about 1/2″ of “slop”.
Carefully read Chapter 24 of Hansen Pole Buildings’ Construction Manual “Residential Overhead Door Openings”.
Install overhead door headers appropriately to face of building columns. Place 2×8 overhead door jambs in overhead door hole, with outside of 2×8 even with outside face of headers, wall girts and skirt boards. Install jamb trims, with excess beyond dimension of 2×8 jambs (if any) towards door. Tighten lags holding vertical door rails down, so overhead door face contacts with jamb trims. It may be necessary to replace lags with longer ones, in order to achieve a solid bite into columns. You will probably need some shims between overhead door side rail brackets and columns, in order to tighten lags without a space between brackets and column. Reinstall vinyl weather seals.


