DEAR POLE BARN GURU: Good morning.
I have been reading the various blog entries for several days, regarding pole barn construction. I have been in contact with your design professional, but I a question that I thought might be a question that could possibly benefit others with a similar situation.
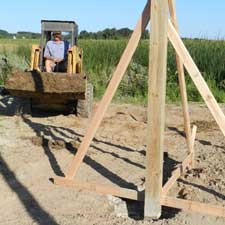
I am in the process of planning a 40X60 building for a shop for the business I have. My planned (and only available) location has about 5′ of fall on the lot which would be on the 60′ side wall of the building. I have built up a 50 X 70 pad. This has been built up and compacted with red “clay” a term we use around here, referring to the material we call “fill” around here, generally used for the purpose of building up a building pad. My original thoughts were to place a 6″ thick monolithic concrete pad with a footer, (I intend to run forklifts on it.) and erect a steel building kit.
Since the dirt pad was completed, I have since stumbled onto your site, and am looking at a pole building. So, my question relates to setting poles. How do you handle setting poles when half of the building will be over the top of built up soil base? I know it can be done, and I am not concerned overly much with adequacy of the soil compaction, which at this point, it has been sitting for about 7 or 8 months since it was compacted, but it has not been tested for compaction.
But having never done this before, since I am not 100% sure, and have yet to dig holes, (but I do want to start later this spring) I wanted to know your thoughts before I proceed.
Thank you. WESSLEY in TRINITY
DEAR WESSLEY: And a fine good morning to you!
I believe you are going to find a post frame (pole) building to be a much more viable option for your new structure than all steel and this is why….
 Although your fill has sat for 7-8 months, there is yet a chance of additional settling. Clay is also a very unstable soil to place footings upon – so if your consideration was to support a monolithic pad with a footing around the perimeter, unless the footing was at the depth of the undisturbed underlying soil there is a high degree of probability the building would settle or shift – leaving you an unhappy new building owner.
With your pole building – the columns which will be placed in the fill area should be ordered long enough so the base of the column (actually the concrete below the base of the column) will rest upon virgin soil. This will require some holes to be as deep as five feet, however most skid loader mounted augers will get this kind of depth. The columns placed in this manner should minimize the probability of issues from settling and give you a resulting structure which can be happily used for several generations.
DEAR POLE BARN GURU: I can build a 28×36 pole building with 12′ eaves on my lot. I would like double trusses spaced 12′ so I can have 3 bays. What would be the difference in truss design for one designed for roof load only compared to one that can also support a ceiling. Thank you. JIM in SALEM
DEAR JIM: At the bare basics – the trusses will have one or more of the following: higher grades of lumber used for top and or bottom chords; large lumber for top and or bottom chords; more internal truss webs; larger pressed steel connector plates.
 Now some recommendations – when you have a ceiling, ventilation is required. The best way to do it is to have enclosed vented overhangs and a vented ridge. This gives both an air intake as well as an exhaust and gives smooth airflow throughout the entire enclosed attic space. If you are planning upon insulating the ceiling, raised heel trusses are the way to go (read more on the hows and whys of raised heel trusses here: https://www.hansenpolebuildings.com/2012/07/raised-heel-trusses/).
You get one opportunity to do your new building right or wrong, I’d sure like to see it done right!
DEAR POLE BARN GURU: I bought a house with an existing 38×26 pole barn. The barn has metal roof placed over 3/4″ rigid foam (ISO) screwed to the purlins (2X4 on edge). I can’t tell what the facing material is on the ISO, but its white and doesn’t seem like paper. There is noticeable water staining on the rigid foam which I believe is due to condensation. There is a vent ridge on the barn. The metal roof is a PBR profile. For the winter I would like to insulate the cathedral ceiling better (I don’t want to drop a ceiling as I have storage shelving that prevents this). What is the best option (besides spray foam). I was considering kraft faced batts stapled to the 24″ OC purlins. I could do an R13 since the purlins are 2X4s, but also considered an R19 and let the batts bulge out a bit as I’m not going to sheath it. I would have the ridge foam to butt up against which should allow ventilation on the opposite side still (adjacent to metal roof). What do you recommend? I have wood stove for heating in the winter time and use it to take the chill off when I work out there (ie not on all the time). PATRICK in INDIANAPOLIS
DEAR PATRICK: I am going to give you the answer you probably don’t want to hear…..the water staining is most probably due to roof leaks, rather than condensation. This happens when screws are placed through foam board, which causes the screw shanks to deform, slots to form beneath the screw heads and when the deformations or slots get large enough – it leaks. The best solution for the problem is to remove the roof panels, take out the insulation boards and throw them away, then reinstall the roof panels using 1-1/2 inch long screws with a larger diameter than what was previously used.
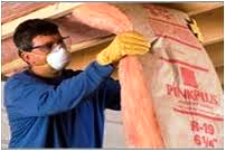 Placing any sort of batt insulation under the foam as it currently exists is just going to get you wet insulation. Trying to use R-19 insulation batts in a 3-1/2 inch cavity will net you R-13 as the insulation is only as effective as its fully expanded thickness.
Once you have removed the foam boards the solution seriously is to spray foam it. Code requires airflow from eave to ridge over the batt insulation, which is going to involve more work and cost than the foam – it would take two layers of 2×4 laid flat on top of the existing purlins, one set running up the roof and another set going the same direction as the purlins, to screw into. This will mess up any trims on the perimeter of the roof, resulting in purchasing larger coverage trims.
The original building owner’s lack of planning for future uses of the building have now become your expensive nightmare.


