Are Externally Mounted (Barn style) Wall Girts Stronger?
Reader and prospective client DON in GARDNERVILLE writes:
 “My cat got on my keyboard and sent my mail before I was finished. As I was saying I have been working with Tyson and I have some questions:
When I was on your website I watched a video that showed your wall girts with a guy standing on them in the vertical position and he stated this is why you should buy a Hansen building because we design them for more strength, but when I was talking with Tyson he said they were bookshelf, My experience as a retired general contractor says that a 2 x 6 laying on its side 10 feet long will sag in the middle, if I am screwing the metal to the sides it will not be a straight line?
He put 6000 10D nails in my quote, from looking at the drawings on the website I do not see where I would use 10D nails? All the material is 2 x material and a 10D is not long enough to hold a 2 x material. If they are for the hangers for the roof purlins or truss bracing, that is still not the proper nail for 2 x material it requires a cement coated truss nail 1 1/4″ lg x 11 gauge truss nail. So I am confused what they would be for?
Is there a list of materials that come with each load? My reason for asking this is when the poles are placed they need 2-2 x 4 each to hold them in place while the concrete is placed where is this material or am I supposed to buy it separate?
Thank you.”
Mike the Pole Barn Guru writes:
Thank you for reaching out.
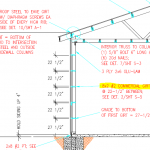
I am unaware of any video on our website showing externally mounted (wide face to wind) wall girts as being stronger. Bookshelf style girts are far stronger against wind loads. https://www.hansenpolebuildings.com/2012/03/girts/
 From Chapter 19 of our Construction Manual: “Between initial installation time and wall sheeting bookshelf girts may sag or droop. Relax, bookshelf girts can be easily pushed up or down by hand, to straight, as siding is applied. Once installed, siding is strong enough to hold bookshelf girts permanently in place.” When wall steel panels are properly pre-drilled (as advised in our Construction Manual) it provides for perfectly straight screw lines.
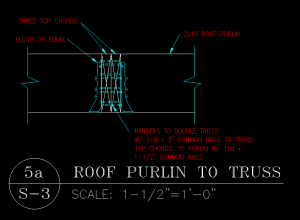
10d common nails are 3″ long x .0148 diameter and are perfect for nailing two 2x members together without blowing through. Our engineers specify these for joist hangers where the nail is going into two 2x members (such as hangers to double trusses). For joist hangers to single 2x members, call out is for 1-1/2″ x .0148 HDG nails. This nailing meets or exceeds Simpson requirements for hangers.
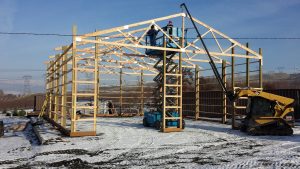
You will receive a comprehensive Materials List in your online login. Each delivery to your site will also come with its own packing list of materials. Columns and lumber packages are nearly always delivered at same time, providing a plethora of materials for temporary bracing of columns.
 Do you think that mix of 1.5” and 3” nails for the connectors would be sufficient or should I really consider just temporarily attach the hangers and replace the temporary attachment with the 3” nails? If that is the case, is there an issue driving 3” nails basically tip to tip through the hangers?
 I’m always on board (pun intended) for new, interesting and different ideas. This one certainly qualifies!


