Slabs on grade are highly popular for barndominiums, shop houses (aka shouses), post frame homes, garages and shops. Many (mine included) use radiant in slab heat, meaning there will be PEX tubes in the floor to be avoided when attaching framed interior walls.
Reader STEVEN in AKRON writes:
“My wife and I are looking to build if we get some land. I would like to build a barndominium. How do you know when putting up the walls that you are not going into the radiant heat in the floor?
I am sure I will have more questions later.”
Mike the Pole Barn Guru says:
This article may prove helpful as you begin your barndominium journey: https://www.hansenpolebuildings.com/2021/02/a-shortlist-for-smooth-barndominium-sailing/.
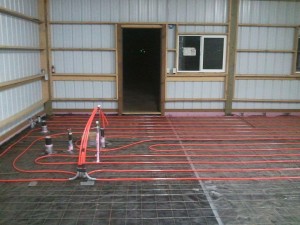 While I always recommend you closely follow layout plans with your tubes and take photos of tube placements prior to pouring, neither of these is a guarantee of missing tubes. You could rent a thermal imaging device to find your tubes, or do it in a more low-tech fashion: turn heat on high and once heated mop water over the entire floor surface. Areas drying first are tube locations. Use chalk to mark them.
Radiant heat tubing in a concrete slab needs to be closer to the slab top than bottom, normally in the upper two inches of concrete. Proper anchorage to a slab has fasteners penetrating at least an inch into concrete. If you can guarantee your pex tubing will be no closer to the top of the slab than say an inch and one-half, you could use 2-1/2″ Ramset nails.
Personally, I prefer using Tapcon screws
What you’ll need:
- Tapcon screws – Be sure to get
ones with hex heads. Don’t try to use a flat-head screwdriver to drive them! 3/16″ x 2-3/4″ screws will be getting you very close to your pex tubes, - A hammer drill
- Several concrete drill bits
- A hex head bit for drill fitting Tapcon head size
How to attach walls using Tapcon screws
- Drill pilot hole
- Drill a hole through 2×4 bottom plate center, every 16″ to 20″ inches.
- Hold the bottom plate in place by standing on it if possible.
- Use firm pressure, but don’t push too hard. Save your body, drill will do the work!
- If using 2 3/4″ screws, put a piece of tape on bit 3″ from tip. (Drill 1/4″ deeper than depth of anchor plus 1 1/2″ for bottom plate.)
- Attach screw
- For best results use a hex-head attachment on your power drill to secure screw. (Even the correct size flat-head screwdriver attachment will slip off frequently.)
- Start off slowly until you’re through the bottom plate.
- Speed up drill and drive anchor deep enough into concrete so the screw head is flush with bottom plate.
Make sure you have enough drill bits on hand. You’ll go through several as tips eventually wear out or break off. Repeat this process with each wall section.
Another method of attachment entirely avoids penetrating your concrete – construction adhesive. Make sure the slab is thoroughly clean and use a polyurethane adhesive. Polyurethane works if there is any moisture in the concrete or bottom plate and it has gap filling properties.
Please reach out to me any time with questions.
 I’m always on board (pun intended) for new, interesting and different ideas. This one certainly qualifies!


