Avoid These 4 Mistakes In Your Post Frame Building
Today’s guest blogger is Katherine Rundell, a construction writer and editor at Assignment Help and College Paper Writing Service. She is also a contributing writer at Buy Essays. As a professional writer, she coaches college students on how to write in various fields.
Yes, buyer’s remorse can happen during construction. That’s especially true for when you’re building a post frame building or pole barn, because when buying the materials and putting them to work, it can easily get caught up in the vision of having a durable and attractive pole barn for your home, business, vehicles, tools, etc.. And that’s where buyer’s remorse comes in – What if the building is built in the wrong size? What if you’ve had the wrong materials to begin with?
So, since having a post frame building is a significant investment, it’s important to keep it that way by avoiding these 4 mistakes during the construction process:
1- Making Your Barn Too Small
 “Size matters when you build a pole barn,” says Piper Porteus, an editor at Essayroo and Paper Fellows. “If you build your barn too small for its intended use, then you’ll immediately regret it, once you realize that you can’t fit your RV inside it, can’t move around your workshop tools, or aren’t able to house your livestock. Therefore, make it your job to learn what you want to put into the barn, and then construct it with those things in mind – your tools, your vehicles, your livestock, etc. Make sure that the barn will have room for anything and everything inside.”
“In roughly 20,000 post frame buildings spanning a 40 year career, I have never had a client tell me later it was just too big,” says Mike Momb, Technical Director for Hansen Pole Buildings.
On the other hand…
2- Making Your Barn Too Big
 … you can’t make your barn too big either. Although you might be able to fit a lot of things into a large barn, the downside is that it can turn more into an eye sore rather than something to be proud of in your location.
So first, when outlining your pole barn design, set some time to go to your building site, and then measure the area and dimensions required for the project. And, take into account how much space that you truly need, rather than settle for extra space that you won’t use after all.
3- Working With No Plan
 “One of the biggest mistakes that people tend to make during pole barn construction is not having a solid plan for it,” says Eva Gilray, a writer at State Of Writing and OXessays. “For first timers, this mistake is crucial, because assuming that pole barn building is easy can be costly – from the project itself, to extra expenses for the replacement of unplanned damages during construction.”
Therefore, having a good plan for the construction of a post frame building should include the following:
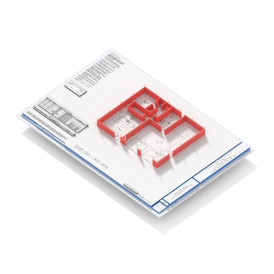
- Thoroughly detailed engineered blueprints, specific to your building, at your site. These should depict every member, as well as all connections.
- A detailed list of materials (i.e. the cut sizes and other materials) recommended for the specific style of post frame that you want to construct. Your building kit supplier should provide this.
- Step-by-step instructions to walk you through each stage of construction.
- Unlimited professional support while you build.
4- Purchasing Wrong Materials
 Finally, keep in mind what kinds of materials that you’ll need for your project. Buying the wrong materials, or getting too much or too little materials, can be a costly mistake, especially when taking up a project like this one. This is where your chosen post frame building kit supplier should guarantee they will be providing all materials necessary for assembly per engineered plans.
Post frame construction, like any other building project, takes plenty of consideration and planning. In fact, there are hundreds of options to choose from when selecting the materials for your pole barn. However, as you make your selections, be sure to not fall into the trap of spending more or less than you need to. The ultimate goal here is to build a safe, durable pole barn with great-quality quality materials.
Just keep these objectives in mind:
- Buy what you need, keeping future uses in mind.
- Don’t over or underspend.
- Rely upon properly pressure preservative treated lumber.
- Don’t wait until you order or receive your materials to think twice about how you intend to build and use a pole barn.
Conclusion
So, as you can see, having a durable pole barn depends greatly on the planning. That means that there’s no room for mistakes in construction.
Therefore, be sure to do your homework ahead of time, and buy what you need. But more importantly, have a plan ahead of time, so that you know what to do step-by-step. Plus, having a plan allows you to research the various styles of pole barns available, the sizes, and the recommended materials.
If you’re building a pole barn for the first time, then take into account these mistakes, avoid them, and good luck!

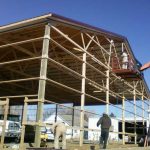
 The truss notch on the left side of the building, where we set the first truss, was 1-1/2” higher than it should have been! The fix to the fascia was easier than one might imagine. The eave purlins were removed at this point, and the 5” ledgerlocks which held the trusses to the column were removed. Using his trusty Sawsall, step-son Jake cut the notch 1-1/2” lower, the truss was dropped into place and the fascia straightened itself right out. Whew! Major crises averted.


