How to Install a Steel Roof Over Shingles
Absolutely true story, with me as part of it! My lovely bride bought a raw weed covered property along the South Dakota shore of Lake Traverse in the early 1990’s. For a home, she had a double wide manufactured home set up on the property. A few years later, she had a 32 foot square stud framed garage added. Both the home and the garage had asphalt shingle roofing.
Between extreme temperatures from 100 F plus in summer to -40 F., some potent winds and occasional hail storms, this is a brutal climate for shingles. More than a few of them had broken or blown off.
Reader DAN from MOUNDS VIEW triggered this soliloquy with his message to me:
“I was reading past questions and the subject of metal roofs was brought up, which prompts this question.
We have a cabin that I intended to have a metal roof but didn’t get one. We are now getting close to needing a re-roof and I’d like to get metal on it.
The question is, when starting with an existing asphalt shingle roof, installed over, I believe 1/2 cdx, what should be done to prepare for the metal? FWIW, it’s a 10/12 pitch.
Thanks.”
Mike’s story:
Before sharing what we did I did my usual Google search to see if I could find someone else’s good advice. Ran across some scary stuff, so I felt compelled to share.
 My wife’s roof had only a single layer of shingles. If I had more than a single layer I would scrape them off as it would potentially overload your roof trusses or rafters.
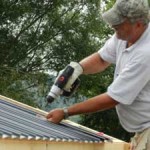
We placed 2×4 flat on top of the shingles running the long direction of the roof and 24 inches on center. Allowable spacing will vary due to snow load where the building is and load capacity of the steel. You are going to hear (actually read) me tell you I would do it differently soon. We used 40d threaded hardened nails to attach the nailers – with two nails through the nailer into the top chord of each truss. The nail length (five inches) is enough to get into the trusses comfortably with the threads helping to resist wind uplift issues.
A1V radiant reflective barrier was placed draped loosely over the nailers and the steel installed with 1-1/2” long powder coated diaphragm screws.
Here is what I would do differently next time. I’d run a 1×4 nailer up the roof on top of each roof truss., then the 2×4 nailers. This would allow for free airflow up the roof for eave to vented ridge.
For trims, use an eave trim at the low edge along the sidewalls. Install on top of 2×4 nailer at edge of overhang leaving the vertical about an inch out from the fascia. Place one inch thick venting material between the vertical leg of the eave trim and the fascia to keep insects out. Standard Rake trim and Ridge Cap can be used, with vented closure strips beneath the ridge cap.
It’s been about eight years since we reroofed my wife’s house and garage with steel and it still looks brand new.


