Tag Archives: long span trusses

Guidance on Diagonal Bracing on Long Span Trusses

Guidance on Diagonal Bracing on Long Span Trusses

A brief note from the Pole Barn Guru: Hansen Pole Buildings includes a copy of BSCI-B10 “Post Frame Truss Installation and Bracing” to our clients in our Construction Manual.

Originally Published by: Frame Building News — December 16, 2021
SBCA appreciates your input; please email us if you have any comments or corrections to this article.

This article series has aimed to make clear metal-plate connected wood trusses are incredibly efficient at spanning large distances, but can buckle out of plane if not handled and braced properly during installation. A previous article (see Frame Building News, August 2021, p. 8) explored the guidance provided in the Building Component Safety Information handbook’s B1 chapter (BCSI-B1) regarding setting, restraining, and bracing an initial set of trusses to provide a stable system to which subsequent trusses in the system can be braced. This article will look at the industry best practice guidance found in BCSI-B2 on installing temporary restraint and bracing beyond the first truss system.

Triangulation

BCSI-B2 starts out stating:
“Proper truss erection, installation, restraint and bracing requires an understanding of triangulation within and between the various planes of the truss (i.e. top chord, bottom chord and web). It is critical to note that all lateral restraints must be braced. Lateral restraint by itself is not adequate to resist buckling forces in the members to which it is attached without the rigidity provided by bracing. Bracing is typically provided by adding diagonal bracing within the same plane of the lateral restraint or by anchoring the lateral restraint to a lateral force resisting member such as a shear wall.”

Lateral restraint is vitally important, as it is the primary mechanism used to keep the trusses in plane during installation as they counteract the lateral (or shear) forces caused primarily by wind or installers as they interact with the trusses. However, the key statement in the paragraph above is, “lateral restraint by itself is not adequate to resist buckling forces,” and this becomes more of an issue the longer the truss span. 

The reason lateral restraint is not adequate is due to the way in which load is transferred through the various planes of a roof system during installation. Without exterior sheathing and permanent bracing installed, shear load will travel primarily parallel to the top chord plane (or bottom chord plane) of the truss system. What this means in practical terms is lateral restraint may appear effective in the short term at keeping individual trusses in plane during installation. But used exclusively, it is not adequate for significant or sustained shear forces because the load is traveling through the system in the same direction as the restraint. In other words, the lateral restraint will not provide sufficient resistance causing the trusses to, at best, buckle out of plane, and at worse, collapse.

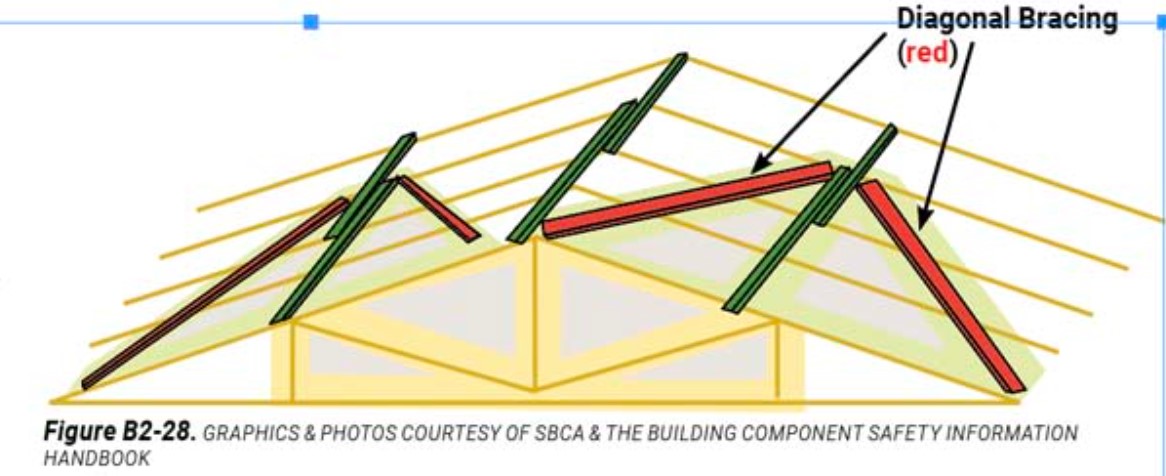
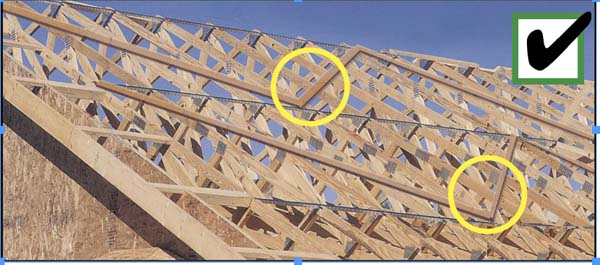
As B2 states, triangulation is the key to solving this outcome. By adding diagonal bracing to the lateral restraint (see Figure B2-28 and Photo B2-5), an installer is introducing another path the lateral shear load must travel. Instead of moving in a straight line across the top chord plane, for example, the diagonal bracing will transfer some of that load back on itself and at an angle. Much like how each individual truss uses triangulation to alternate members in compression and tension to transfer load efficiently to bearing locations, the combination of lateral restraint and diagonal bracing transfer lateral shear loads throughout a plane of the roof system.

Beyond the Top Chord

B2 also states:

“Diagonal bracing…installed perpendicular to the plane of the trusses and attached to similar web members of adjacent trusses greatly increases the stability of the truss system both during and after installation. The web diagonal braces, acting together with the top chord and bottom chord temporary lateral restraint, from triangulation perpendicular to the plane of the trusses, thus creating additional lateral stability for the trusses.”

Adding diagonal bracing in the web member plane provides considerably more stability than applying diagonal bracing on the top and/or bottom chords.  This added stability can become increasingly beneficial as the span of the trusses grows and the potential for buckling increases.  Applying web member bracing is also beneficial because it does not have to be removed when exterior sheathing is applied, allowing it to become part of the truss system’s permanent bracing (see figure B2-34). 

The same can be said of bottom chord temporary lateral restraint and diagonal bracing.  When used, it not only provides important stability to the system, but it also helps maintain proper spacing between trusses and ensures the bottom chords of the trusses in the system remain parallel over their entire length.  When applied to the top edge of the bottom chords, this lateral restraint and diagonal bracing can also become part of the truss system’s permanent bracing (see figure B2-35).

Ensure Good Connections

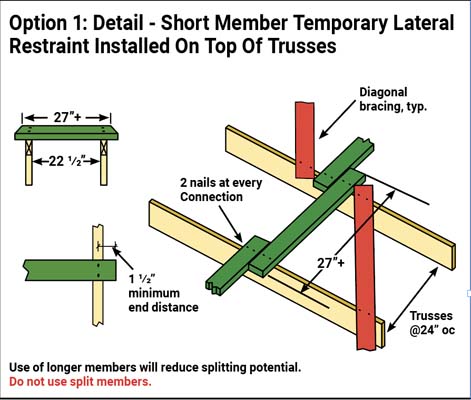
Following this guidance will greatly reduce the chance an individual truss buckles or a truss system fails. This assumes that all lateral restraints and diagonal braces are applied with adequate connections.  B2 recommends that unless otherwise specified by the building designer, all restraint and bracing material should be 2×4 stress-graded lumber, or approved proprietary metal restraint/bracing, and affixed using 2-10d, 2-12d or 2-15d nails. 

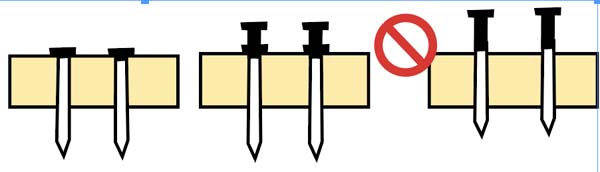
All nails should be driven flush into the restraint and bracing material (see figure B2-12, double-headed/duplex nails can be used for easier removal). Finally, a minimum of two nails should be used to attach each restraint/bracing to each truss, being sure not to split the ends of the material.  Often, it is advisable to use members slightly longer than necessary to allow a nailing pattern that does not get too close to the end of the material (see figure B2-25).

Bottom Line

The application of lateral restraint during long-span truss installation is not adequate to resist shear loads. Applying diagonal bracing to the top chord, web members, and/or bottom chords provides necessary resistance through a process called triangulation. Diagonal bracing applied in the web member plane, and to the top edge of the bottom chords, can provide significant resistance not only during installation but throughout the life of the building. All lateral restraint and diagonal bracing should be affixed using fully-embedded nails of a sufficient size and quantity to ensure they resist lateral shear loads as intended.

Long Span Truss Storage

Site Storage Guidance for Long-Span Trusses

Originally published byConstruction Magazine Network(link is external) — February 3, 2021

The following article was produced and published by the source linked to above, who is solely responsible for its content. The Pole Barn Guru blog is publishing this story to raise awareness of information publicly available online and does not verify the accuracy of the author’s claims. As a consequence, The Pole Barn Guru cannot vouch for the validity of any facts, claims or opinions made in the article.

Editor’s Note: The article below is the second in a ten-part SBCA series on long-span truss installation guidance specific to the post-frame industry, all of which will be published in Frame Building News.

By Sean Shields, With Contributions by Jim Vogt, P.E.

When handled and installed properly, metal plate-connected wood trusses are incredibly effective at spanning long distances while efficiently resisting intended design loads (gravity, snow, wind, etc.). The proper handling of trusses prior to their installation is very important, because significant damage may occur to wood members, plates, and joints when a truss bends out of plane—and this can affect their long-term performance (see Truss Techniques, Part 1(link is external) in the November 2020 issue of Frame Building News(link is external) for greater detail). 

Correct installation is also vital. We’ll explore some best practices for common installation challenges in future installments of this series, but it’s important to address two additional topics prior to installation. One is long-span truss handling equipment, which we will tackle in the next article, and the other is truss storage on the job site.

Location, Location, Location

One of the most important factors in a successful truss installation, particularly in relation to long-span trusses, is choosing the most appropriate storage and staging location. Why? First, the location where the trusses are stored on the job site impacts the extent to which the trusses need to be handled. If you will be using a crane, the trusses should be stored and staged close enough to the building being erected that they only need to be lifted once, as they are set in place.

Requiring trusses to be double-picked (or hoisted twice) compounds the chances that the trusses may become damaged or installed out of order (or in the wrong orientation). The reason for this is because trusses are typically bundled in the order in which they are meant to be installed. Lifting and restacking bundles of trusses either reverses the intended order or requires the trusses to be scattered individually, increasing the opportunity for installation errors. Not to mention that double-picking will likely also increase the amount of time it takes to install the trusses, which in turn puts pressure on the framers to make up that time in other areas (often resulting in them pressing through other important aspects of the installation process). 

If tele-handlers or other mobile equipment is used to move the trusses, the larger the distance between where the trusses are stored and staged and the new building, the more opportunities there are for damage as the equipment maneuvers over the rough terrain on the job site.

Prepare a Way

For these reasons, it is beneficial to choose a storage and staging location for the trusses early on in the site preparation process. While there may not always be a lot of flexibility or options when it comes to truss storage on the job site, it’s important to consider several factors when weighing the best possible location.

As the first section of this article points out, proximity to the installation area is likely the most important factor to prioritize. To the greatest extent possible, the trusses should also be placed in an area that does not obstruct normal traffic flow on the job site. Creating an obstacle on the job site increases the opportunity for other equipment and materials to come in contact with the trusses, potentially causing expensive damage. 

Many times, long-span trusses need to be prepped prior to installation. Ensuring there is sufficient room around each truss to mark purlin locations on the top chords and/or affix T- and L-web reinforcement can speed up the process and make life a lot easier for everyone involved in the installation process.

SBCA’s Building Component Safety Information (BCSI) handbook states in the B1 section (www.sbcindustry.com/b1(link is external)): “Trusses may be unloaded directly on the ground at the time of delivery or stored temporarily in contact with the ground after delivery. If trusses are to be stored horizontally for more than one week, place blocking of sufficient height beneath the stack of trusses on 8′ to 10′ intervals (or as required) to minimize lateral bending and to lessen moisture gain from the ground.”

While the trusses can be stored directly on the ground, minimizing lateral bending is key. This means that the site chosen for truss storage and staging needs to either be level, or blocking need to be placed on the ground ahead of time to create a level bearing area for the trusses while they are stored. Moisture gain also needs to be minimized. This means the storage area should be reasonably dry and preferably in an area that will not collect water in the event of a rainstorm.

The B1 section further states: “Trusses stored for more than one week shall be protected from the environment in a manner that provides adequate ventilation of the trusses. If tarpaulins or other protective covers are used, the ends shall be left open for ventilation. Tight-fitting coverings are not recommended, since they can trap moisture.” Excessive dirt and/or moisture gain can impact both truss installation and long-term truss performance, so it is a best practice to protect trusses from both while they are stored on the job site.

Communication Is Key

Of course, all the site preparation and planning done ahead of time goes to waste if it isn’t communicated effectively to the person delivering the trusses. In most cases, the individual delivering the trusses has never been to the job site before they show up. It may or may not be clear to them where traffic naturally flows throughout the job site. It may also be unclear where rainwater is most likely to collect, creating troublesome puddles and mud. They are also unlikely to know the equipment that will be used to handle trusses on the job site or the hoisting radius of the crane being used to set the trusses in place. Finally, they will not know how long the trusses will need to be stored prior to installation.

In short, it should not be left to the person delivering the trusses to choose where they should be stored and staged on the job site. The earlier in the process the truss storage site is chosen, the easier it is to not only flow the rest of the job site around it (e.g., not storing other building materials in the same location that will then need to be moved upon the truss delivery), but also communicate that location to the person delivering the trusses.

While a phone call ahead of delivery will likely suffice in some instances, there are several other best practices that can be employed to ensure there isn’t any confusion at the time of delivery. The easiest, when possible, is to take one or more photos of the job site and send them to the driver ahead of time. Outlining the area with a few stakes or marking spray paint on the ground can also ensure the trusses are placed as close as possible to the predetermined spot. A quick sketch of the job site, with the truss storage area clearly marked, can also be photographed and sent ahead of time.

The Bottom Line

A little forethought about the best location to store trusses on the job site can have a significant impact on not only how well their installation goes, but how well they perform over the long term. Having a solid storage plan is good. Communicating it effectively to the person delivering the trusses ahead of time makes the plan even better.