Continued from yesterday’s blog:
(1) Storage – if you ever believe anyone might ever in the future desire to climate control then provision should be made for making it easiest to make future upgrades.
At the very least a reflective radiant barrier (single cell rather than wasting the money for the extra approximately 0.5 R from double bubble), an Integral Condensation Control (https://www.hansenpolebuildings.com/2017/03/integral-condensation-control/) or sheathing with 30# felt should be placed between the roof framing and roof steel to minimize condensation.
If a concrete floor is poured (in ANY use building), it should be over a well sealed vapor barrier.
For now we will assume this building is totally cold storage. If it might ever (even in your wildest dreams) be heated and/or cooled include the following in your initial design: Walls should have a Weather Resistant Barrier (https://www.hansenpolebuildings.com/2016/01/determining-the-most-effective-building-weather-resistant-barrier-part-1/) between the framing and the siding. Taking walls one step further would be ‘commercial’ bookshelf wall girts (https://www.hansenpolebuildings.com/2011/09/commercial-girts-what-are-they/).
In the roof – have the trusses designed to support a ceiling load ideally of 10 pounds per square foot (read about ceiling loaded trusses here: (https://www.hansenpolebuildings.com/2016/03/ceiling-loaded-trusses/). Trusses should also be designed with raised heels to provide full depth of future attic insulation above the walls (https://www.hansenpolebuildings.com/2012/07/raised-heel-trusses/).
Make provision for attic ventilation, by having an air intake along the sidewall using enclosed ventilated soffits and exhaust with a vented ridge.
Any overhead doors should be ordered insulated – just a good choice in general as, besides offering a minimal thermal resistance, they are stiffer against the wind.
(2) Equine only use: Same as #1 with an emphasis upon the ventilation aspect.
(3) Workshop/garage and (4) Garage/mancave/house are going to be the same – other than whatever the client is willing to invest in R value, being the major difference.
Adding onto #1 for the walls the low end would be unfaced batt insulation with a 6ml visqueen vapor barrier on the interior. Other options (in more or less ascending price and R values) would be Mineral wool insulation as it is not affected by moisture (https://www.hansenpolebuildings.com/2013/03/roxul-insulation/), BIBs (https://www.hansenpolebuildings.com/2011/11/bibs/), closed cell spray foam in combination with batts and just the closed cell spray foam (https://www.hansenpolebuildings.com/2016/07/advantages-spray-foam-over-batt-insulation/).
For added R value and a complete thermal break, add rigid closed cell foam boards to the inside of the wall.
 Once a ceiling has been installed, blow in attic insulation.
For (4) a Frost-Protected Shallow Foundation (https://www.hansenpolebuildings.com/2016/11/frost-protected-shallow-foundations/) with sand on the inside rather than a thickened slab is an excellent and affordable design solution.
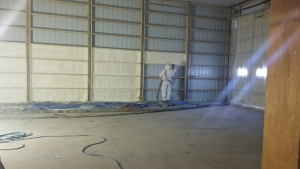
For insulation solutions which follow the roof line, the best bet is going to be the use of closed cell spray foam, as it solves the potential condensation on the underside of the roofing and does not require ventilation above.
In most cases, the steel trusses fabricated for post frame buildings are either not designed by a registered engineer, are not fabricated by certified welders or both – so it makes it difficult for me to recommend them as part of a design solution.
With scissor trusses, they can be treated the same as a flat ceiling would be, provided the bottom chord slope is not so great as to cause blown in insulation to drift downhill.


Thanks for the great post. Keep sharing the valuable information with us.
How does the climate affect these recommendations? Would you do this the same way in southern and northern climates?
Only changes with climate are the minimum R values recommended.
Hi Mike! We will be starting to build a Hansen building this spring in northern WI using 2×8 commercial girts. We’re striving for a high level of energy efficiency and want to beef up the insulation a bit more beyond even the 2×8 cavities. You mention a good way to do this is putting rigid foam on the inside of the walls. However, the folks over at greenbuildingadvisors and some others suggest rigid foam better belongs on the outside of the walls..
“If you haven’t built your walls yet — nothing is preventing you from putting the rigid foam in the right location: the exterior side of the wall (where it belongs), not the interior side of the wall.
There are many reasons why exterior rigid foam is better than interior rigid foam. Here are a few of them:
1. Exterior rigid foam does a better job of insulating rim joists and partition intersections than interior rigid foam.
2. Exterior walls have fewer penetrations than interior walls — on interior walls, there are lots of electrical boxes that complicate the air sealing work.
3. Exterior rigid foam keeps the exterior sheathing warm and dry, limiting the possibility of sheathing rot. If the rigid foam is on the inside, the sheathing will be cold in winter (and therefore damp).”
I know not all of this applies to post frame. There is no OSB sheathing to rot away in our case for example. But putting rigid foam on the inside would still seem to leave the 2x8s and the insulation exposed to some condensation in the winter, correct? What’s the approach you think we should take?
Thank you sir!
Sadly their “right” way neglects a proper connection between the steel wall siding to be able to transfer shear loads and utilize the strength of the siding. In stick frame construction, there is most often sheathing (OSB or plywood) directly outside of the studs, which is carrying the shear loads. Placing foam outside of solid sheathing will not affect the structural performance.
Keep in mind rigid foam has no structural strength. If applied between steel siding and framing, it would take massively long screws (3-1/2″ with 2″ insulation) which would deform under load when passing through the insulation.
Reason #1 Post frame buildings do not have breaks for second floors like stick frame does and partitions are all on the inside of the building envelope.
Reason #2 I agree, however anyone who is serious about super insulating will see to it the boxes get well sealed.
Reason #3 A 2″ flash coat of closed cell insulation on the inside of the steel siding will eliminate any possible condensation issues on the inside of the wall steel. With the sealed rigid foam on the inside, there is no way for moisture to get into the wall.
If I was building a barndominium/shouse/post frame home today, I would have steel siding, 2″ of closed cell spray foam (roughly R-13), 5-1/4″ of BIBs insulation (roughly R-22) and 2″ rigid board (roughly R-11). Other than where the girts are located, this is roughly an R-46 wall. There are methods to increase R value even more, however I believe they would be into the area of diminishing returns – you would never recoup the investment.
As most heat loss (over 75%) is through your roof – put your money there. Raised heel trusses will allow for full thickness of insulation from outside of wall to outside of wall. I’d blow in to an R-60 with a truss heel of around 22″.
Thanks very much for that. What you describe is likely what we will do. And we already have the 22″ raised heel baked into the cake.
On the wall assembly.. would you put the 2″ of rigid foam inside the 2×8 girt cavities and then just lay the drywall flush against the girts, or would it make more sense to put the foam in between the girts and the drywall such that the foam would form a complete thermal break between the wood and the drywall? You would obviously need longer fasteners if the latter.
Kudos to you for having raised heel trusses in the plan – so many people overlook this step and it is so simple and affordable.
The inside of my bookshelf wall girts will be approximately equal to the inside of my wall columns. I want to run the foam continuous across all of the wood so I have a complete thermal break. Along with that I would glue the foam board to the wood and glue the sheetrock to the foam – thus even eliminating the small thermal transference through a screw or nail.