Closing Top of Corner Trims

I am so enjoying Hansen Pole Buildings’ client RYAN in ELLENSBURG. Ryan has been assembling his own new post frame building and really cares about his end result. He asks good questions, open to advice and doing a very nice assembly.
Ryan recently wrote:
“I’m working on putting all the corner trim on the building, but I’m not quite sure how to install the corner trim that installs under the wind girt on the side sheds to ensure that any water flowing down the front/rear endwalls will flow over the corner trim and not be able to get behind it. Can you give me any pointers for this piece?”
Ryan’s challenge will be same as standard corner trims when applied below enclosed level return soffits (as in photo above). Top end of corner trim isn’t sealed against building walls.
To best of our knowledge all of our clients with a similar detail have ignored it. There are some options…
Easiest – fill “gap” with a Polyurethane spray foam such as Great Stuff™ (https://www.greatstuff.dupont.com/?msclkid=59bda31e7bdb1d55c71ef8b1966c30ee). Key to success, use a closed cell foam, hence polyurethane.
Next easiest – we have an expanding closed cell foam sealant in 13′ long rolls. When unrolled it expands to 1″ square. Read more information about it here: https://www.hansenpolebuildings.com/2016/03/emseal-self-expanding-sealant-tape-closures/.
Most difficult – top edge of corner trim can be cut back 3/4″ along bends for wide faces, folded back to fill space and custom cut to fit around any steel high ribs. Tab edges need to be sealed against siding with caulking. I am really good with cutting steel trims and I am unsure if I would attempt this myself.
This concluded my response to Ryan.
Up sprouted a self-challenge – if I was going to pick most difficult choice above, how would I go about doing it? Out came my graph paper, resulting in:
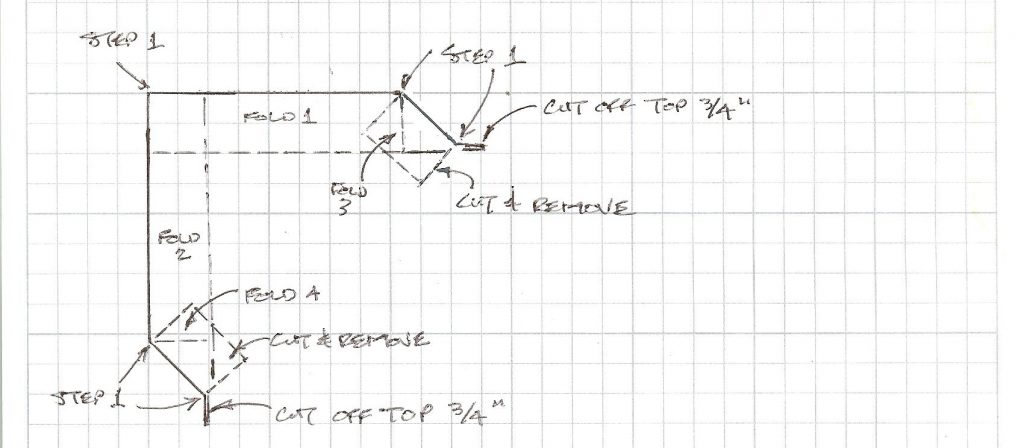
First, cut ¾” down length of corner trim along each bend. Next, fold over Tabs 1 and 2. Tab 3 and 4 are folded over next with “out of plane” triangular portion being cut from each. Cut top ¾” from each hemmed flange. Place liberal amounts of caulking between each tab overlap.


