Recommendations for Grading
Reader ISAAC in BURLINGTON writes:
“Do you have any instructions or recommendations on the grading side of things before i buy a post in ground house kit on how much of a pad to build up and how far away from house to slope it to keep water away and post rot?”
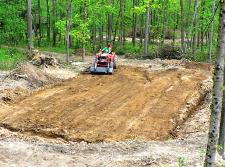 Ideally a prepared site will be 10 feet beyond building footprint in all directions. From highest point, ten feet away from building, grade should slope up to actual “pad” no less than six inches.
To allow proper drainage plan to keep building grade higher than surrounding site. On an ideal site, water drains naturally away from building. Since few sites are ideal, in most cases, grade work will be required to keep surface water away from building. Keeping finished building floor higher than surrounding site reduces flooding chances during heavy rainfall or rapid snowmelt.
In flood plains, consult first with your building department to determine their requirements. Typical recommendation is to establish grade level at finished floor top higher than flood level. This may require importing fill to raise grade. A surveyor can be hired to expertly determine these heights. In some cases, code approved flood vents may be installed, below flood level, to equalize interior and exterior pressures.
Many sites can be graded with a skid steer or backhoe. Some cases will require heavy equipment to properly grade site to allow water to drain away from building. If engaging a professional for site grading, make certain finished grade was adequately prepared before making final payment. In far too many cases supposedly “flat” sites being out of level have been experienced by disappointed owners.
At a minimum, site preparation includes:
Remove all sod and vegetation.
For ideal site preparation, remove topsoil and stockpile for later use in finish grading. In frost prone areas, remove any clay or silty soil from within future building “footprint”.
Replace subsoil removed from around building with granulated fill to help drain subsurface water from building.
Distribute all fill, large debris free (no pit run), uniformly around site in layers no deeper than six inches. Compact each layer to a minimum 90% Modified Proctor Density before adding next layer. It is recommended to invest in a Geotechnical (soils) Engineer to test to confirm correct compaction. Adequate compaction takes more than driving over fill with a dump truck, or earth moving equipment. Properly compacted fill can be treated as if it was undisturbed native soil.
If building on expansive soils (such as clay) it is recommended to increase hole depth to at least six (6) times hole diameter (ex. 9’ deep for 18” hole, 12’ deep for 24” hole). Added hole depth should be back-filled with concrete.
When any building portion sits on non-compacted fill, rest columns, as well as any concrete encasement, on or in undisturbed soil. In many cases, building inspectors will require a Geotechnical Engineer to confirm compaction adequacy on filled sites. Geotechnical Engineers can be expensive, but are even more costly when called in to do analysis “after the fact”. Your building’s E.O.R. is, as a practicality matter, unable to visit sites; therefore will be unable to perform or provide any soils or other similar reports, design retaining walls or any other work beyond building shell.
Soil compaction is defined as a method of mechanically increasing soil density. In construction, this is a significant part of your building process. If performed improperly, soil settlement could occur and result in unnecessary maintenance costs or structure failure. Almost all building site types and construction projects utilize mechanical compaction techniques.
So what actually is soil? Soil is formed in place or deposited by various natural forces – such as glaciers, wind, lakes and rivers – residual or organically. Important elements in soil compaction are soil type, soil moisture content and compaction effort required.
There are five principle reasons to compact soil: to increase load-bearing capacity, prevent soil settlement and frost damage, provide stability, reduce water seepage, swelling and contraction and reduce soil settling.
Soil can be compacted by vibration, impact, kneading or pressure. These different compaction efforts can be accomplished by main types of compaction force, static or vibratory.
Static force is simply machine dead weight, applying downward force on soil surface, compressing soil particles. Only way to change effective compaction force is by adding or subtracting machine weight. Static compaction is confined to upper soil layers and is limited to any appreciable depth. Kneading and pressure are two static compaction examples.
Vibratory force uses a mechanism, usually engine-driven, to create a downward force in addition to machine’s static weight. This vibrating mechanism is usually a rotating eccentric weight or piston/spring combination (in rammers). These compactors deliver a rapid sequence of blows (impacts) to soil surface, thereby affecting top layers as well as deeper layers. Vibration moves through material, setting particles in motion and moving them closer together for highest density possible. Based on materials being compacted, a certain force must be used to overcome cohesive nature of particular particles.
Poor, improper or no compaction can result in concrete slab cracks or frost heaves, foundation erosion and/or building settling. Proper compaction can ensure a longer structural life.
Every soil type behaves differently with respect to maximum density and optimum moisture. Therefore, each soil type has its own unique requirements and controls both in field and for testing purposes. Soil types are commonly classified by grain size, determined by passing soil through a series of sieves to screen or separate different grain sizes. Soils found in nature are almost always a combination of soil types. A well-graded soil consists of a wide range of particle sizes with smaller particles filling voids between larger particles. Result is a dense structure lending itself well to compaction. A soil’s makeup determines best compaction method to use. There are three basic soil groups: cohesive, granular and organic. Organic soils are not suitable for compaction.
Cohesive soils, such as clay or silts have smallest particles. Cohesive soils are dense and tightly bound together by molecular attraction. They are plastic when wet and can be molded, but become very hard when dry. Cohesive soils feel smooth and greasy when rubbed between fingers. Clay soils are less than ideal to construct your new post frame building upon and should be removed and replaced.
Granular soils range in particle size from .003″ to .08″ (sand) and .08″ to 1.0″ (fine to medium gravel). Granular soils are known for their water-draining properties. Sand and gravel obtain maximum density in either a fully dry or saturated state. Granular soils feel gritty when rubbed between fingers. When water and granular soils are shaken in palm of your hand, they will mix, when shaking stops, they will separate. When dry, a soil sample will crumble.
Gravel and sand can be compacted either by vibration (using a vibrating plate compactor, vibrating roller or vibrating sheepsfoot) or kneading with pressure (using a scraper, rubber tired roller, loader or grid roller). Both are good to excellent in terms of foundation support and as a subgrade. They are easy to compact and are not expansive (expansive soils tend to be prone to frost heave issues).
Response of soil to moisture is very important, as soil must carry loads year-round. Rain, for example, may transform soil into a plastic state or even into a liquid. In this state, soil has very little or no load-bearing ability.
Soil moisture content is vital to proper compaction. Moisture acts as a lubricant within soil, sliding particles together. Too little moisture means inadequate compaction – particles cannot move past each other to achieve density. Too much moisture leaves water-filled voids and subsequently weakens load-bearing ability. Highest density for most soils is at a certain water content for a given compaction effort. Drier soil is more resistant to compaction. In a water-saturated state voids between particles are partially filled with water, creating an apparent cohesion binding them together. This cohesion increases as particle size decreases (as in clay-type soils).
To determine if proper soil compaction is achieved for any specific construction application, several methods were developed. Most prominent by far is soil density.
Soil testing accomplishes the following: measures density of soil for comparing degree of compaction vs. specifications for structure to be built; measures effect of moisture on soil density vs. specifications; and provides a moisture density curve identifying optimum moisture content.
Tests to determine optimum soil moisture content are done in a laboratory. Most common is a Proctor Test, or Modified Proctor Test. A particular soil needs to have an ideal (or optimum) amount of moisture to achieve maximum density. This is important not only for durability, but will save money because less compaction effort is needed to achieve desired results.
A quick method of determining moisture is known as a “Hand Test”.
Pick up a handful of soil. Squeeze it in your hand. Open your hand. If soil is powdery and will not retain shape made by your hand, it is too dry. If it shatters when dropped, it is too dry. If soil is moldable and breaks into only a couple of pieces when dropped, it has right amount of moisture for proper compaction. If soil is plastic in your hand, leaves traces of moisture on your fingers and stays in one piece when dropped, it has too much moisture for compaction.
Proctor, or Modified Proctor Test, determines maximum density of a soil needed for a specific job site. This test first determines maximum density achievable for materials and uses this figure as a reference. Secondly, it tests effects of moisture on soil density. This soil reference value is expressed as a percentage of density. These values are determined before any compaction takes place to develop compaction specifications. Modified Proctor values are higher because they take into account higher densities needed for certain types of construction projects. Test methods are similar for both tests.
When hired, a soils engineer will probably perform either a sand cone or a nuclear density test. In sand cone, a small hole (6″ x 6″ deep) is dug in compacted material to be tested. Soil is removed and weighed, then dried and weighed again to determine its moisture content. A soil’s moisture is figured as a percentage. Hole’s specific volume is determined by filling it with calibrated dry sand from a jar and cone device. Dry weight of soil removed is divided by volume of sand needed to fill hole. This gives us density of compacted soil in pounds per cubic foot. This density is compared to maximum Proctor density obtained earlier, giving us relative density of just compacted soil.
Nuclear Density meters are a quick and fairly accurate way of determining density and moisture content. Meter uses a radioactive isotope source (Cesium 137) at soil surface (backscatter) or from a probe placed into soil (direct transmission). Isotope source gives off photons (usually Gamma rays) radiating back to meter’s detectors on unit bottom. Dense soil absorbs more radiation than loose soil and readings reflect overall density. Water content can also be read, all within a few minutes. A relative Proctor density with compaction results from this test.
Soil modulus or soil stiffness test is a field-test method is a very recent development replacing soil density testing. Soil stiffness is a ratio of force-to-displacement. Testing is done by a machine sending vibrations into soil and then measuring deflection of soil from vibrations. This is a very fast, safe method of testing soil stiffness. Soil stiffness is desired engineering property, not just dry density and water content.
Be certain to know local Building Department requirements before starting to move dirt.
In many jurisdictions, a separate grading permit may be required. In some cases a building permit must be issued prior to moving soil. Get started on right foot with permit authorities – ask first before digging!
Also, prior to doing any excavation call 811. This is a free service to mark underground utilities. Property owners and contractors can be held financially liable if they fail to locate underground utilities (like gas, electric, telephone, cable, water) and damage them in any way (besides a potential for causing severe injury or death).
Grade and compact actual building “footprint” area as level as reasonably possible prior to beginning construction.
Create an adequate work area. At a minimum clear at least ten feet beyond each building side. Building Codes (IRC R401.3 and IBC 1804.4) require non-impervious areas beyond building perimeter be graded away from building with a minimum 5% slope to drain surface water away in all directions. A 5% slope is a 6 inch drop in 10 feet.