DEAR POLE BARN GURU: How does one construct a sliding barn door? SHIRLEY IN FAIR GROVE
DEAR SHIRLEY: The best answer to your question is Chapter 27 of the Hansen Pole Buildings Construction Manual.
Here it is in three parts, Part I:
Most Common Mistakes:
- Expecting the door frame to be shipped pre-assembled.
- Installing siding before sliding door.
- Failure to install track board trim before hanging door track.
- Not cutting door verticals or laterals to length, when door height or width is not a standard.
- Installing door laterals in pre-drilled holes of verticals. (Verticals are pre-drilled for wood girts rather than steel)
- Failure to use color matched stitch screws (provided) to attach siding to frame.
Door Grid Assembly
Assemble doors in a flat area.
If needed, cut door verticals and/or laterals to length (door call out height and/or width). Each door will have enough horizontals for a 48” o.c. maximum spacing. Assemble inside door frame face first. See Figure 27-1
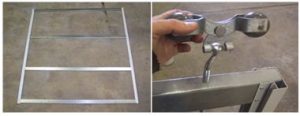
Figure 27-1
After laying out lateral members, locate and drill two (2) 9/16” diameter holes in top lateral, as follows:
For doors 4′ and less in width, trolley holes will be 1′ from each top horizontal girt end.
For doors 4’ through 10′ in width, trolley holes will be 1’6″ from each top horizontal girt end.
For doors wider than 10’, holes will be 2’6” from each end.
Center of holes will be located 3/4” from girt inside face.
Figure 27-1
With top, intermediate and bottom laterals properly fitted and spaced in verticals, secure grid at each of the four corners using one (1) #8 self-drilling, self-tapping pan head tek screw fastener. See Figure 27-2. Please read note at end of chapter regarding cutting a notch in your vertical rails for the guide rails before assembly of door.
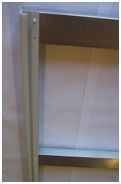
Figure 27-2
Square Door Grid
After squaring, secure grid with a second fastener at each corner locating as shown in Figure 27-3. Horizontal members may not necessarily be positioned at pre-drilled holes in verticals. Count your laterals and space evenly in verticals.
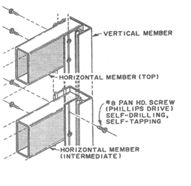
Figure 27-3
Carefully turn door grid over, recheck for squareness, and repeat fastening procedures.
Secure all intermediate laterals with four screws per joint (two per side).
Lay door grid assembly on a flat surface, with built-in flashing and vertical member trim strip up (not towards ground). Apply sheeting to door grid with color matched #12 x ¾” stitch screws at 9” o.c. (same pattern as building sidewalls).
When sheeting door, sheeting tucks between built-in flashing and vertical member trim strip.
Track Board Trim
Install track board trim (1-1/2” x 5-1/2” “L”) over 2×6 sliding door track board. Trim will cover the lower 1-1/2” side and 5-1/2” face.
Install Track Board Trim before sliding door track.
Starting from end, cut a 1-1/2” slot along trim bend.
Knife score trim inside face 1-1/2” from cut end. Bend newly created “Tab A” up to cover track board end bottom portion. Fold the 1-1/2” x 5-1/2” remaining portion back to cover “Tab A” and track board end balance. Repeat at opposite end. See Figure 27-4.
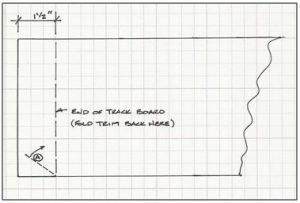
Figure 27-4
Come back tomorrow for Part II of three parts.


hi
any way you can send me email of building a sliding door for pole barn. My size is roughly 4ft wide by 7ft tall. I can see part one but not part two or part 3. if you have any pictures, that would be great. My one question is on the building outside itself. Should the door framing (that is attached to barn itself, which the door itself will butt againtst, should all 4 sides be flat or should the top where tract goes be out a bit? Thanks, joe R.
Joe ~ We will email you the relevant chapters from the Hansen Buildings’ Construction Guide. The mounting for the track itself should be on a 2×6 which is on the face of the balance of the framing. If all for sides are flat, the door will not be able to adequate slide across the adjacent siding.
I am getting ready to start building a pole barn to replace one that recently blew down 32 deep x36 wide with 3-12’ sliding barn doors. What are your thoughts on making this work Thankyou.
I’d be ordering a replacement building from Hansen Pole Buildings, as we can engineer for greater wind speeds. I also would use wind rated overhead doors, rather than sliding doors. https://www.hansenpolebuildings.com/2024/04/things-hansen-pole-buildings-does-better-than-any-other-post-frame-building-provider/