Entry doors are just not thought of very often – we walk in and out of them every day, yet don’t often consider what goes into seeing they work properly and are maintenance free. Below is a how to guide on proper entry door framing.
Here are some common entry door mistakes:
Not inspecting for damage at delivery. I’ve been guilty of this one. When my eldest son Jake and I built a garage for his father-in-law in Tennessee, we did not open the carton to see one of the jambs had been bent in shipping. We made it work, but it wasn’t an ideal situation.
Making sure the installation screws and door knob were received at delivery. Years ago I dealt with an entry door supplier who frequently shipped doors without the screws. Big disappointment come time to install.
Improper storage. Laying the door carton down flat and leaving it in the weather is not healthy.
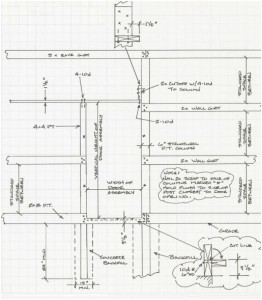
Not cutting the notch into the pressure preservative treated skirt board (aka splash plank).
Not installing the door so the outside of the jamb is 1-1/2 inch outside of the wall columns.
And failure to install so as to miss overhead door rails.
Ready to do some entry door framing? Well this is the last opportunity to move entry door(s) location. Before making final door placement determination, consider weather effects. If building is in snow country and the intent is to install door on sidewall, a wise choice may be to invest in “snow brakes” or other similar devices. These can be used to either keep snow from sliding off from roof in front of door or to divert sliding snowfall away from door. Hansen Buildings can offer several alternatives for any given situation. As an alternative, relocate entry door to building peaked endwall or beneath a “side shed” (if building has this feature). It is also usually best – again in snow country – to swing door to open in to building rather than out.
Remove entry door assembly from carton. Measure entire assembly overall width (from frame outside edge to frame outside edge). Typical actual unit sizes for Plyco assemblies supplied by Hansen Buildings are (width by height):
3’ width = 38-5/8” x 80-5/8”
4’ width = 48-5/8” x 80-5/8”
6’ width = 74-7/8” x 81-7/8”
Verify placement (location on building) and door swing (in or out, hinged on right or left). Locate any “in swinging” door to avoid potential contact with overhead door rails.
 Install entry door column, leaving adequate space between it and closest structural building column, to allow door assembly to be comfortably placed between. It is typically prudent to make this space 1/4″ to 1/2″ wider than the actual frame, to compensate for any irregularities in either column.
Entry doors (or framed openings for a entry doors) are furnished (as well as priced) with one (1) 4×4 pressure treated column, per door. The other door side is planned to mount to a main building columns, which will give the best finished result. If a mounting location other than this be desired, acquire another post.
Nail skirt board and girts to door column securely. Skirt board is to be notched out to a 3-1/2” height above skirt board bottom between the two columns. The cut edges of the skirt board should be liberally coated with Copper Napthenate solution. The skirt board portion removed for door is to be laid flat behind skirt board.
Trim off entry door column even with entry door top.
The girt above entry door is often turned narrow face (1-1/2” dimension) to wind and installed level between structural building columns across entry door top and entry door column. This girt is to be located with outside edge flush with standard girt outside edges. This is typically not an “extra” girt. It is usually created by nearest girt relocation.
Some post frame building kit package providers do not furnish extra columns for their entry doors, and merely frame a hole in using one or more vertical 2x6s. Having entry doors placed between two pressure preservative treated columns provides the most stable option.


