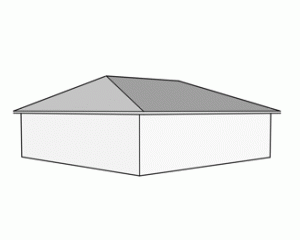
Back in the late 1970’s I was jack-of-most trades at what was then Coeur d’Alene Truss. In those days, most all roof lines were gables – peak of the roof in the center and the weather runs off two sides. One day a builder client came in and wanted a set of trusses for a full hipped roof. Not only did my boss question me (because they had never done a full-hipped roof with all trusses before), but the folks at our sister plant in Spokane agreed with him and told us it would never work.
Well – it did, and I participated in the design of many full hip roof truss systems – especially after I became manager for Lucas Plywood and Lumber’s truss facility in Salem, Oregon.
What exactly is a full hipped roof anyhow?
 A full hip roof has no gables (or peaked ends). The weather runs off from every side of the building, which necessitates the need for more gutters than a gabled roof.
Full hipped roofs became very trendy over the past few decades as architects and building designers found prefabricated roof trusses made an otherwise challenging framing job relatively simple.
But all of these roofs had trusses which were spaced every two feet…not widely spaced like typical pole buildings.
By using truss carriers (headers running from column-to-column) trusses could still be placed every two feet, just like stud wall construction.
However, they do not have to be.
In areas past the slope of the hips (where the ridgeline runs straight), two ply peaked trusses can be placed to align with the wall columns. Trusses in the hip areas will have a flat top (again aligning with the wall columns). The last eight to 12 feet of roof can be framed with either rafters or single slope (monopitch) trusses aligning again with the columns and attaching at the high end to the nearest flat top “girder” style truss with means of engineered metal connectors.
Roof purlins are placed on edge between the trusses to support either steel roofing, or shingles installed over sheathing (oriented strand board – OSB or plywood).
The full hip roof gives an architectural style which allows the pole building to tie in with other full hipped buildings on the same or nearby properties. Due to the added complexity of the truss system, it will be both more costly in materials, as well as taking more labor time.
Other disadvantages are potentially less space inside the attic area for insulation, as well as leaving minimal or no area for loft or bonus room areas within the attic. Ventilation can also pose a challenge as there are no gables to vent, and little or no (in the case of perfectly square buildings) ridges to vent.
Want a look to match the full hipped roof of a house? Or just want to one up the neighbor’s gabled pole barn? Then look no further than having a hipped roof pole building!
Thinking ahead on “how do I vent that hipped roof if I want to use steel roofing?” Me to! Come back tomorrow to see what I found…


