Reader BILLY in WESTVILLE writes: “How do I get the f and I trim to meet from the end wall to the side wall together?”
I am going to have to put my mind reading cap on for this one, as I have little idea what you are asking.
By playing Sherlock Holmes, I will intuit this is a building with enclosed overhangs on all four sides. If so the solution is to use level returns on the sidewalls, ending the sidewall soffit at the endwall. This allows the “cap” at the endwall side of the overhang to be covered with steel sheathing as a continuation of the endwall siding.
In this case, there would be a blending of the “L” fascia trim along the sides with the “L” trim which covers the underside of the varge (or fly) rafter capping the end of the roof purlin framing.
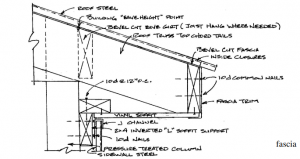 As the fly rafter is at a slope, it will be taller than the fascia where they intersect. The top edge of the fascia should be beveled to match the roof slope, so as to not create a hump in the roof. Using a 4/12 roof slope as an example, the outside face of a 2×6 fascia board would be five inches. This calls for a 1-1/2” x 5-1/2” L trim in order to cover the soffit. With a 4/12 slope, the vertical distance across a 2×6 on the fly rafter would be 5-13/16”.
To compensate for the differences in dimensions, the bottom side of the fly rafter, where it connects to the fascia, should be trimmed off parallel to the ground.
The fascia trim should be run to the end of the fascia board. The trim which covers the lower side of the fly rafter, can be cut along the bend (it is also an L), and folded to fit the cut.
This happens to be one of the tricks outlined extensively in the Hansen Pole Buildings Construction Manual, which is provided with every post frame building kit investment. The Manual can even be purchased at a nominal cost, which applies in full to your order of a post frame building.


