Setting 80 Foot Span Wood Trusses
Here is the question asked by CHAD in EVANSVILLE:
 “What is the best way to hang an 80′ wooden truss? The company I work for is building 80×120 pole barn for one of our customers. The trusses are kicking our butt.”
Before you even think about getting started, you will want to read this article: https://www.hansenpolebuildings.com/2013/12/wide-span-trusses/.
My first adventure in setting 80 span metal connector plated wood roof trusses was on a horse riding arena for Percy Freeman in Oregon. You can read about the misadventures here: https://www.hansenpolebuildings.com/2014/03/wide-span-trusses-2/, as it was quite a saga!
I have learned a lot since Mr. Freeman’s building and would approach the solution much differently today than 30 years ago.
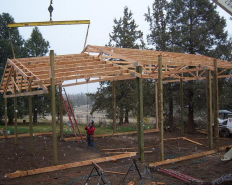
In your case, I would imagine you are placing the 80 foot trusses either every two or four feet on top of truss carriers. You will want to fully concrete encase the embedded corner and endwall columns, so there is an adequately stable foundation. Firmly brace the endwall columns, to prevent (as much as possible) and sway in the lengthwise direction of the building.
I’d look at bringing a large crane in, so at least 12 feet of roof could be fully assembled on the ground (or at least to the point of being ready to insulate and steel the roof. Install all required permanent bracing along the bottom chords and webs of the trusses. I would also X brace in line with each endwall column, from bottom chord of the endwall truss to top chord of the truss at 12 feet and from the bottom chord of the truss at 12 feet back to the top chord of the end truss. Confirm all trusses are plumb before attachment of the X bracing. If the individual member of the X braces cannot be nailed directly to truss vertical webbing, they need to be connected together where they cross. If this is the case, to prevent buckling in the narrow direction, install one member with the narrow face towards the ground, the other with the wide face towards the ground.
Next install bracing across the upper side truss bottom chords in a zigzag fashion, beginning at the corners of the building. These will be left permanently. Repeat this across the tops of the purlins, however these will be removed prior to installation of the roof insulation and steel roofing.
Raise the entire section into place and install the first few panels of roof steel. This section will give a steady anchorage point for the installation of subsequent trusses, either in sections or individually. Make sure to brace off each truss or section of trusses as they are installed.
The Registered Design Professional contracted for the design and inspection of the temporary and permanent bracing systems may desire additional bracing beyond the above. However I would look upon this as a minimum for successful and safe installation.


