How to Frame a Roof Corner With a Dropped Top Chord End Truss
Josh and I are becoming better acquainted with each other. Josh happened to not have invested in a Hansen Pole Buildings’ engineered post frame kit package and as such – didn’t have a source of Technical Support which could guide him through the process (nor the Hansen Pole Buildings’ Construction Manual). Because we truly care about all buildings post frame, we help everyone – we believe in paying it forward.
JOSH writes: “I have another question for you. I have drop top gable trusses (not really sure what the name is)? What is the proper way to frame the corner overhangs since the last purlin and eave girt will not extend over the truss? I don’t want the snow to sag the corner. These trusses were built by Trusstek in Bonners Ferry. Thanks so much.”
Mike the Poe Barn Guru Responds:
I can tell by your framing you have been reading my articles and perhaps eyeballing the sample plans and details on the Hansen Pole Buildings website. I really like your having doubled the interior trusses and nailed them face-to-face, rather than placing blocking between them. By joist hanging the purlins into the double trusses, you will be able to pre-drill the roof steel. While this may sound time consuming, it truly makes for a quick roof install, all of the roof screws will be in beautiful, straight rows and you won’t have any shiners which would result in roof leaks down the road.
One thing I probably would not have recommended is using a drop top chord truss on the endwalls. Not for the framing challenge you have encountered, but because I would want the raised heels on the interior trusses to allow for full insulation depth in the attic to the outside edge of the walls. By using a raised heel, the bottom chords of all trusses can be placed at the same height, making it easy to attach ceiling joists without added framing members.
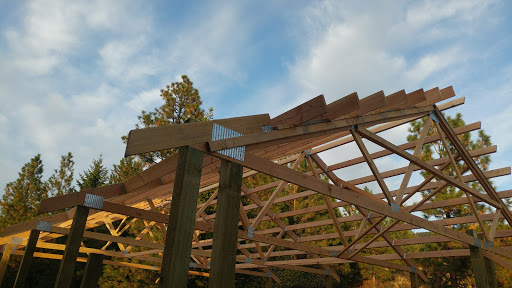
To address your question – when you install the varge rafter across the ends of the overhanging purlins, it will extend out far enough to be able to attach the fascia board to the back side of it. You will want to nail through the fascia into the overhanging “tail” of the end truss. Confirm with the engineer of record who designed your building, but I would typically recommend the use of four 10d common hot dipped galvanized nails through the fascia into the end truss tail, as well as through the varge rafter into the fascia and overhanging purlins. Using a loner nail will usually result in splitting the wood you are nailing in to and a smaller diameter reduces greatly the lateral shear value of the nails.
Let me know if you have any other questions. Hansen Buildings is here to help!


Where on my plans does it show how to attach the end truss bottom chord to the end wall columns? I have the straps for the corners..but not the center end wall columns.
From Chapter 11 of the Hansen Pole Buildings’ Construction Manual:
“Nail trusses to columns according to plan. Good practice is to nail end trusses to each endwall column, as specified on endwall truss to column detail, but in any case, use 6-10d nails minimum.”