This is day number five in talking about building plans, so if you have not read the blogs, you may find them well worth your time.
Today I am looking at sidewall elevations. Right off the bat I’m going to have you click here to take a look at a sample:
https://www.hansenpolebuildings.com/sample-plans.htm
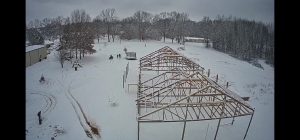
Be sure to scroll down to the page on Sidewalls. Sidewall framing is really pretty straightforward: it’s a skirt board and girts running horizontally to support siding, OSB underlayment for siding, or steel panels. Of course you can have doors in a sidewall, and sometimes this can pose some challenges.
Putting a door in a sidewall means it needs to fit within the bay. So for those of you familiar with posts on 8’ centers, how do you fit a 10’ or 12’ door between the posts? Yes, you can put in a structural header for the trusses to sit on top, but why make it harder than it has to be?
We create what my wife likes to call “variable bays”. This means all bays on the sidewalls of a building may not be the same width. Obviously they do need to be the same spacing from front to back on both sidewalls for the trusses to attach to them, but they could be spaced at: 10’, 12’, 14’, 12’, and 10’ from front to back. Or they could be 12’, 6’, 12’, 6’, and 10’. It all depends on a multitude of factors: door size, overhangs, building height, snow, wind, seismic and other design criteria. Although endwalls normally take the brunt of the “push/pull” type forces, the sidewalls also carry great significance since the trusses are attached to these sidewall columns.
This means if you have a 12’ wide door, you can put it in a 14’ bay and not have to worry about a huge “structural” header. And I really don’t like using headers any more than I really have to. This means a pair of trusses is now dependent upon this header to carry the roof load, instead of being able to notch those trusses into the posts and transfer the load smoothly into the ground. As I’ve discussed in the past – connections are potential failure points for a building. If this header fails or is poorly installed, ouch – down goes your building. What are the chances of this happening if the trusses are all notched into the posts and weight is on the posts?
Another feature you can probably appreciate on a sidewall drawing is the framing for enclosed overhangs. It’s just two boards nailed together in the shape of an L and installed to attach the level return soffit panels to it, and the fascia. Not shown on the plans, but in the Construction Guide, will be the trims to hold all of this nicely in place and makes for a finished look to your building.
The eavelight support, another “L” backing, is also shown on your plans if you’ve ordered this feature. When you get right down to it, other than gable vents and cupolas (which come with their own directions) all features if purchased (lofts, stairs, eavelights, wainscot, overhangs) are drawn on your custom drafted plans.
Entry door, sliding and overhead door framings are shown on the plans, including the track board and jambs.
This pretty much covers a sidewall drawing, and by now, your building is framed up and ready for siding!
Next up: putting on the siding!