The Importance of Temporary Truss Bracing
Back in my early days in the prefabricated metal connector plated truss industry, one of my clients was the congregations of a church along Highway 95 in Hayden, Idaho. The project was for an entirely new building, with the work being done by primarily volunteer help, under the supervision of a carpenter with more decades of experience under his belt than even my Father or my five Uncles.
The design called for a large central clearspan comprised of low slope trusses with a raised heel. (For more reading on raised heel trusses: https://www.hansenpolebuildings.com/blog/2012/07/raised-heel-trusses/)
Surrounding this on three sides were areas with monoslope (sloping in one direction away from the main span) trusses, which were placed first.
Once the walls for the central portion were framed, the supervisor called for delivery of the main span. As the trusses were very large, they paid extra for our crane truck to individually place the trusses (good idea). All of this was accomplished on a chilly windless day in mid-January, without a hitch. Our crane truck had hardly completed the 15 minute drive from the building site back to our manufacturing plant, when we got “the call”…..the roof had collapsed!!
I high-tailed it out to the church, to find the experienced carpenter shaking his head. The rear of this set of trusses had been braced against the previously framed roof behind, with temporary truss bracing. Before putting permanent bracing in place, the contractor had removed the temporary bracing. He said he knew it was in trouble the moment he pulled out the last nail, and in the blink of an eye, it was scrambled trusses on the ground!
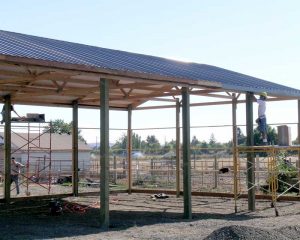
From the pole building photos attached from a recent project (not the church), it is impossible for me to determine if the trusses and their attached purlins were in place or being placed when things went bad. What I can tell is this – there is no bracing of any sort to be found in this assembly which would have kept it from racking or toppling. The temporary truss bracing is AWOL.
What would have helped to prevent this pain?
 An X Brace, or braces, between the top chord of one pair of trusses and the bottom chord of the other pair would have prevented toppling (the larger the span, the greater the need for more than a single X). Also, temporarily nailing some of the wall girts to the tops of the roof purlins in diagonal fashion would have prevented the assembly from racking.
The Wood Truss Council of America (WTCA) www.WoodTruss.com and the Truss Plate Institute (TPI) www.tpinst.org have prepared a summary sheet BCSI-B10 “Post Frame Truss Installation and Bracing”, which is included in the Hansen Pole Buildings’ Installation Manual, and should be provided to anyone who is assembling a pole building using prefabricated wood roof trusses.
Trusses are very, very strong when properly installed and braced in the vertical direction for which they were designed. By using care and caution, during handling and installation, they will perform admirably for generations.