What do you mean they are not 2 feet apart?
Back in the day (early 1990’s) I was on the National Frame Builders Association (NFBA) Board of Directors. One of my fellow board members from the Midwest wanted to take a peek at how pole barns were constructed in the West, so I invited him out for a tour.
After spending a day looking at several of our building projects, his comment to me was, “The inspectors in our area would never let a pole building be constructed with roof trusses placed every 12 feet”.
Twenty years later, I beg to differ. Hansen Buildings has buildings in each of the 50 states and all of them have roof trusses on what my board member friend would describe as being “widely spaced”.
Modern truss design is highly computerized. Enter the span of the truss, bay spacing and load conditions and the engineering programs will design a truss which will meet the design criteria. The lumber and steel plates the trusses are constructed from, have no idea how far apart they are going to be placed. They are inanimate! Yet, somewhere in the deep, dark reaches of history, lies the theory wood trusses must be spaced no more than 24” on center, or maybe 48”, or perhaps even eight or ten feet? The reality is, there is no magic number.
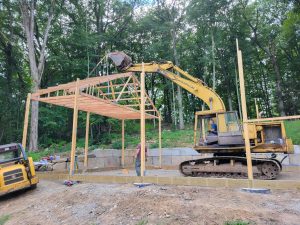
While D. Howard Doane is credited with being the innovator of the modern pole barn, it was his Agricultural Service farm manager, Bernon Perkins, who is credited with refining the evolution of the modern pole building to a long-lasting structure. It was Perkins who pioneered roof purlins being placed on edge. With this design change, roof trusses could be placed 12 feet apart, making it possible for roofs to support the loads to which they would be subjected.
I’ve had roof truss manufacturers try to convince me it is impossible to place wood trusses at spacings of over every 4 feet. Their defense is, “Our engineers will not allow us to”. The manufacturers of the steel roof truss plates (also referred to as gussets or Gang-nails), provide the engineering design for pre-fabricated wood trusses. Their programs will allow for trusses to be placed on 12 foot or even 16 foot centers, and their engineers will place their engineer’s seal on the drawings to verify.
The practicality, cost effectiveness and ease of construction of pole buildings is based upon efficient use of the fewest amount of materials, to do the most work, within safe engineering design. Hundreds of thousands of pole barns are in use today with trusses spaced every 12 feet, or even more. They stand as a tribute to the ingenuity of modern pole building design.


Everything is very open with a clear explanation of issues. Your website is very useful. Thanks for sharing.
Sometimes things just require a lot of effort, time, or patience.
It’s hard to find knowledgeable people on this topic, but you sound like you know what you are talking about! Thanks
Everything is very open and very clear explanation of issues. was truly information. Your website is very useful. Thanks for sharing.
Thank you for another essential article. I wish I had your passion for writing!
I would like to read the articles about “Not just Grandpa”s Barn anymore. I am planning to build a pole barn for hay storage and would like to know your recommendation for truss design, spacing,size material for perlins, post etc. A 4 and 12 pitch is what I think would be sufficent.
Thanks
Raymond ~
Thank you, it is hoped the articles are both entertaining and informative. The best answers to your questions come from knowing the specifics of your particular project. What dimensions (width, length and height) work best with your available space, loading equipment and volume of hay to be stored? Will the building be loaded from an end or a side? Where will the building be located geographically? Areas with high wind and/or snow loads are going to impact the design solution. Please feel free to contact a Hansen Buildings designer toll free at (866)200-9657, who can offer you further specific assistance with a practical and affordable design solution.
Best Regards ~ Mike the Pole Barn Guru
Very helpful web page you have provided to all of us needing to know DIY ers. We live in South Eastern Washington State and are the second owners of a home we bought a few years ago. It came with a 24′ x 36′ pole barn with a corrugated steel roof and a ½” thick plastic insulation blanket on the underside of the metal at ceiling. It is to hot in the summer and to cold in the winter to enjoy, (conveting it into a Mancave). I have added R21 paper backed fiberglass insulation in between the rafters. The 2” x 6” rafters are spaced 24” on center the length of the barn. There are two double trusses @ 7” apart and spaced at 12 foot centers in the middle. I want to cover the rafters and trusses with ½” thick sheetrock, then paint to hide the added insulation and wiring. My question is will the roof support the added load and will I be creating a major problem with mill due and condensation, since there will be no airspace between the metal and sheetrock? Your help would greatly be appreciated.
Emmett ~
Thank you very much for your kind words.
Lots of considerations – first (and most important) chances are very good your roof system is not designed to support the weight of drywall. The 2×6 roof purlins, may be able to support the weight from a structural aspect, however they will overly deflect and would likely cause cracks to form at the joints in the drywall. On its own 1/2″ drywall will sag between the roof purlins, it would take at least a 5/8″ thickness.
Given all of the above, what are your choices? If the insulation has been neatly installed, I’d consider spraying the paper facing and all of the trusses and truss bracing black. This is what more and more of the commercial applications are doing. For looks, wiring could be installed in conduit – to give more of the upscale industrial look.
Polebarnguru, I am in the preliminary stages of planning a pole barn house. It will be located in eastern PA upon a wooded, gently-to-moderately sloping lot that is moderately rocky. I am planning a frost protected shallow foundation with radiant heated floors and stamped concrete finish. No piers, posts will be anchored to the slab. The house will be 2 full floors (no loft) and 2000 sq. ft +/-. What I want to know is, what is the most cost effective footprint and post spacing to use for this building? I would like to use 30×36. Typical roof pitch, maybe 8/12. I would love to hear your input.
Chuck ~
You proposed 30′ x 36′ footprint will be very efficient. Columns set every 12′ along the length is the most cost effective, unless you have much wider spans and very heavy roof snow loads – or extreme wind loads.
While the most typical, common and cost effective roof slope will be 4/12, I personally like the looks of steeper roof slopes with steel roofing.
Other considerations – 18″ overhangs will be the most bang for your buck and will keep you from having to rip roof panels lengthwise. Also, make sure to use wet set column brackets. We can provide ones which are designed to take the bending loads imposed by the columns.
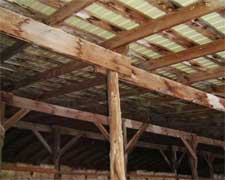
I’m originally from the UK and grew up in the building industry so its always amazed me why the USA is so fixated on 2′ skinny trusses. Traditional king or queen post trusses with purlins notched into the trusses supporting much smaller rafters on the purlins and all nailed to ridge boards have been around for over 300 years and are still going strong. Many of them support much higher loads than will ever be experienced in the US such as huge stone slate roofs (think sheets of limestone about 1″ thick and as wide as 30″ and as long as 48″ or more!) or Welsh slate anchored to skinny laths with oak pegs or copper nails.
Thanks for the site and the information.
We agree with you George and thanks for your input. It is generally the thought that more materials must mean a stronger design rather than thinking what if the size of the components are adjusted based upon the design which allows for few components to install and connections where buildings are most likely to fail.
This good to know, I am planning on building a pole barn for residential use in California and I will reference these issues with the architect when we sit down. As you know very tough to build anything in California with their strict environmental laws.
I just got done doing a home inspection on a building that was a pole barn design. It was a 2 story bunkhouse. One bunkhouse on each level. The upper level had a balcony at each end with steps leading down. It was a very unique home. It got me to thinking about building my own home on a pole barn design!
I noticed my client login states that it is closed because my project is completed. That is news to me! I am wondering how this was decided. I actually delayed my project by a year because of my lack of satisfaction with the size of the posts that were in the kit I purchased. I really wanted 6×6 posts and am stuck with the 4×6 posts included in the kit. I was actually going to sell the kit at a great loss and start over with a different design due to anger about the design. I just started putting up the building this September. I can’t even explain the level of anger and dis-satisfaction with this building. I wanted a heavy duty pole building and this is in my opinion barely adequate. After my last correspondence, I did not even get a response from your company. In the 90’s I put up a Momb building purchased when they were located in Oregon and it was very easy construction and built very strong. I was very satisfied and still enjoy this building. The Hansen building is very labor intensive, I don’t feel that is anywhere near the quality as my other building. Really unsatisfied customer. No one at your company appears to give a darn!. Sincerely.
Contrary to your statement – the entire team here at Hansen Pole Buildings absolutely gives a darn and we go out of our way to work with every client who works with us, rather than just being adversarial.
Your client login is being reactivated this morning. When we have not had feedback and interaction from a client for over six months, the login is automatically closed. Never, during the process of you ordering your building, did you state you wanted a specific column size. You were given every opportunity to have them changed, prior to lumber delivery, yet you opted not to. We can only resolve issues which are specifically brought forth to us, and when we offer solutions and do not receive feedback, it is difficult for us to satisfy you.
Building Codes have changed dramatically since the building you purchased in the 1990’s – designs for wind and snow have become far more stringent and things we could do then, can no longer be done. You will find your new building incorporates many features which your previous building did not – steel base trim to prevent critters from entering the high ribs of the wall steel panels, trims at top of walls, steel trim to cover all fascias and varges, closed cell foam eave closures for roof steel, vented ridge closures, steel trims for overhead door jambs as opposed to raw wood, weather seals around overhead doors, an insulated commercial steel entry door in steel jambs instead of a “trailer house” door, Lifetime warranty steel roofing and siding, superior powder coated diaphragm screws, full sized 24″ x 36″ 7 page blueprints specifically for your building – rather than a few 11″ x 17″ sheets, a 500 page Construction Manual instead of no instructions at all, unlimited FREE Technical Support by Email.
If you would not mind taking a few minutes to address specifics as to why you feel the building is very labor intensive and nowhere near the quality of your other building, it would be greatly appreciated. We can only improve upon things with constructive feedback.
The last we heard from you was in March 2018 and this was the response, from me:
We do absolutely listen to every client’s concerns and take them to heart. In this case, the order for the building was approved by you on February 9, 2017, plans were sent to you for review and accepted six days later.
On March 7 our Technical support Department received this email from you:
“When I originally talked with Mike I wanted a heavy duty building, It seems
no one there was listening, I have my plans and the roof trusses show 2×4
construction and side posts 3.5 x 5.5, I am very concerned that this is a
very weak design. I know I already approved the plans but I will have to
spend bout 4000.00 more to locally tp purchase 6×6 posts and 2×6 trusses. I
guess I can sell the ones I receive. You people must think I live near
Seattle, not, I live on the eastern slope of the Cascade mountains, your 2×4
double truss design appears obviously not strong enough to take the snow
loads in my area. I am very concerned.”
To which the following response was given by me:
“We take our client’s concerns to heart, it is part of why every Hansen Pole Building is structurally designed by a registered professional engineer.
In review of your building plans, I see it has been designed to meet or exceed a roof snow load of 45 psf (pounds per square foot) as well as an ultimate wind speed of 100 mph (miles per hour). The calculations for each and every member and connection on your building have been thoroughly reviewed by a Registered Design Professional (the engineer who seals your plans). I would venture a guess your Building Department has approved the plans as meeting the structural requirements.
The prefabricated roof truss designs for your building utilize 2×6 1650msr (or stronger) lumber for the top and bottom chords. When you go to your local lumberyard to purchase a 2×6 graded as #2 (the standard for framing throughout the industry). It has a bending strength of from 1105 to 1170 psi (pounds per square inch), depending upon the species of lumber. The 1650 msr being used for your truss top and bottom chords is at least 41% greater in bending strength. The interior members of the trusses (the webs) are indeed 2×4, as they would be in virtually any truss design. In truss configurations, the webs carry minimal loads for both compression and tension and are loaded to only 75% of their capacity on the interior double trusses. If your trusses have not yet been fabricated, it is possible we could upgrade to 2×6 webs, however the load carrying capacity of the trusses would not be increased by this change – you would basically just be spending money to spend money.
On to the column sizes. I’ve written extensively in the past on why a 4×6 (3-1/2″ x 5-1/2” actual) sized column will outperform a 6×6 column in most cases. If you would kindly take just a few moments to read about it here: http://www.hansenpolebuildings.com/2014/08/lumber-bending/.
Things I do know – your building, built according to the engineered plans, will support the loads given, not only is it an engineered building, but we also provide a limited lifetime warranty to back it up!
I did a few trial calculations, increasing your roof snow load to up to 180 psf (four times what you invested in). Even at this load, 4×6 columns still work! The column is not “the weak link”.
Provided your lumber package is not ready to be shipped and your trusses have yet to be fabricated, it might yet be possible to increase the design roof snow loads, and/or the design wind speed beyond what the Code requirements are. In doing so, this again checks every member to insure you have no weak links.
If you desired to increase both by 25% (Ground snow load to 75, roof snow load to 56.25 and Vult to 112 mph) you would be looking at an up charge of $1580 and would receive new sealed plans and truss drawings to confirm these loads. An increase of 50% (Pg = 90, Pf = 67.5, Vult = 122.5) would be $2765. Either of these would, of course, be depending upon the status of your building in the production processes.
We will await hearing back from you as to your wishes.”
Not until April 21 (after all materials had been delivered) did we hear back from you with basically the same concerns as voiced earlier. We offered the opportunity to increase the design loads and provided a couple of examples, however you made the choice to accept materials as designed by the engineer of record.
Your advice to take engineered plans to another engineer for review might sound good, but the reality is you would have paid for something you already paid for and it would not have made a change in the building as designed. My encouragement always to any client who has concerns about any climactic load – wind, snow or seismic, is to opt for the small investment to support a design load greater than the Code requirements.
The building trusses are up and the purlins are set, I still cannot express the level of dissatisfaction I have concerning this building design. 20% of the 8′ perlins are unusable due to the low quality of the wood. These were supplied in the kit from PARR lumber. I would not use some of the wood materials provided to build a dog house. I do not have a choice at this point and will complete this storage building with additional cost to purchase actual usable lumber. . I again express my anger concerning no one at your company listening when I initially expressed that I wanted a HEAVY DUTY building. There is absolutely no comparison to my previous built building that was so over built that I am sure it will out last me, but this new building doesn’t even come close to the quality of the old building. You describe that I am adversarial? Not true, I have never complained about a product , vehicle or any other item I purchased. I am just expressing my opinion that this building kit and materials were not up to any standard that I would consider acceptable. On the lighter side, I am grateful your company does not build aircraft parts, I would be dead by now!
The TERMS and CONDITIONS of your purchase (which you approved) include this language:
“INSPECTION/INVENTORY: Purchaser must inspect and inventory, at Purchaser’s sole expense, all items delivered (including doors and accompanying hardware, each piece of lumber, siding or roofing, trims, etc., whether arriving individually, in sealed containers or unitized) and report, within 48 hours, any and all “hidden damage”, missing or damaged goods, claimed nonconformity, defects or differences between the goods and materials described in the Agreement, or an approved Change Order, and as received by Purchaser. The ONLY method of reporting is through Seller’s online account page, as Emailed or telephone reports cannot be accepted. All damage/unusable reports must include digital photos.”
The terms and conditions further advise materials so reported will be replaced AT NO CHARGE.
On March 2, 3, 22 and 23 as well as April 4 of 2017 you received an email from Justine who is your Project Coordinator. This email included the attachment of Chapter 3 of the Hansen Pole Buildings Construction Manual. The attachment reminds you to report any defective lumber received within 48 hours after delivery in order to have it replaced AT NO CHARGE. 18 months after delivery it is unreasonable to expect our supplier to be held accountable when, despite multiple notifications, you failed to follow through with your responsibility.
We again appreciate your concern about what you feel is a structural under design, despite the building being designed by a Registered Professional Engineer and the load carrying capacity of the columns you are so concerned about being many times what you ordered. You were provided an opportunity to have the columns switched to larger dimension (albeit not as strong) and failed to respond to take advantage of the offer.
I have concerns about the stipulation of 48 hrs to notify by email of any board(s) that don’t appear to be upto standard quality.
Is there a kit being sold that is up completely in 48hrs, after the materials arrival?
I do hope these concerns are the exception and not the rule. I truly look to have your group put together a pole shed/house for myself!
There has been lots of very good info on your website and this blog! I am looking forward to working with your group, after consuming the information for my questions later!
Thank you!
This was never an issue until a limited few clients would unband their units of lumber, scatter pieces all around their jobsite, leaving them to bask in the sun and/or be rained and snowed on for months and then wonder why they could not have them replaced 🙁
We want our clients to inspect and inventory as quickly as possible after delivery so in the unlikely event of a damage or shortage it can be dealt with expediently and construction not be delayed.
I have $60k in lumber and materials been sitting in storage for the very reasons you have stated. ( since 2015)
I don’t doubt the engineering in a perfect world, but in the real world redundancy is something that should be factored in, my building has multiple spans of 15’ or more, and although double ( ganged) trusses, with the amount of fasteners for the hangers for purlins, then the fact of being a finished ceiling, with insulation, fans, lighting, electrical all being hung… never trust a trust, so this is 100% trusting a truss, and although losing 2 trusses isn’t common, with the amount of holes being put into them that would leave a 30’ spacing… I’ll have somewhere between 2 and 5 million in equipment typically ( and that’s not even including if I have even one of my corvettes that valued over 100k) in the building… I need redundancy… not to mention 3 times I told them no side wall lights as the interior will be finished so no light transmission will get though, yet I have all kinds of plastic worthless panels and probably short steel… they don’t listen, they think they know it all… and as I said I’m am sure on paper the engineering is sound… I also know that you can get away with a lot of things in life that are way below accepted standards…
Airplanes have 4 computer systems, they have the main computer, and a back up to that if it fails, then a second identical as the first, with its own backup to that one… why? Because things happen, and it’s not a perfect world….
If I were to do it all over again, I would have paid more attention to the roof design, as who in their right mind would trust a truss without any redundancy… an engineer with way too much confidence in natural wood products… FYI there are knots in the bottom cords of my trusses….
Before compters would allow engineers to use the least amount of materials and shave any redundancy from design, our roads lasted much longer as well…
The roof system is engineered assuming nothing can ever happen to a truss, the warnings of making sure the trusses are ganged and not blocked makes it evident, and the weight savings has the 4×6 poles over a 6×6 so that adding a header then trusses to give redundancy would make those not capable of carrying the loads…
I know as soon as they see my name the response will be “oh this guy”…
There’s no fix, except to replace all the poles with 6×6 or bigger, and redesigning with a header for at least 48” OC trusses, this gives 3 times min redundancy as anyone in the real world knows nothing is guaranteed not to fail!
Mr. Grabowski ~ The values used in engineered design with wood are 40% of Pult (Ultimate failure load), so there is a huge safety factor. This is why engineered wood frame buildings, constructed to match plans, just do not fail within design loads.
Your 40′ x 60′ building has no roof supporting columns that are not true glulams (which you fail to mention in your comments). Indeed sidewall columns are 5 ply 2×8 glulams!
As for sidewall light panels, you did approve both the invoice with them on it, as well as the plans showing them prior to your building materials being produced and shipped. While we know lots of things – we are not mind readers and do have to rely to a certain degree on our clients input to approve or disapprove written documents.
I have learned, through many years of owning and running my own businesses, that no matter how hard you try and how hard you document your procedures – you can’t make everyone happy. I had a lady once express her extreme anger that we had printed her business card incorrectly. I showed her the proof that was signed by her – it showed the mistake, yet she had approved it! Her response was, “Well, I wasn’t wearing my glasses that day.” Perhaps she should have read the instructions on the proof before signing her approval. (Yes, we reprinted her card at no cost to her.)
Nonetheless, you have thousands of very happy, satisfied customers who have purchased your buildings. You have gone above and beyond to help this gentleman. Those of us reading these comments can tell that you care about your product and about your customers. We can also see that this gentlemen is “one of THOSE” who will never be satisfied – even if you personally held his hand and made decisions for him.
Write it off and don’t lose any more sleep over it. Your reputation will continue to grow your business.
Thank you for your very kind words. I can tell you are the type of business person I would happily refer clients to.
Thank you for the article, I knew I wasn’t crazy….. As a DIYer I am still unsure on spacing. The truss maker is telling me that you can’t go 8 or 10ft. and is recommending 3ft spacing on center, yet I see professionals routinely building with 5 and 10ft centers. I want to have the simplest design while still being safe. It is difficult to go against what the professional truss makers are telling us however there is definitely some discontinuity. What would you recommend for someone like me?
40×65 building
40 ft span
5/12 pitch
Metal roof, no decking or snow load
Thank you for your article.
I would recommend you call 1(866)200-9657 and speak with one of our Building Designers. We can provide a fully engineered building for you and take your concerns out of the hands of people who have absolutely no idea what they are talking about.
I am building a pole barn with 40 ft truss spaced 15 of is it possible or is the distance to far between truss snow load and wind are very minimal do I need to build them out of 2×6
Yes it is possible to space engineered prefabricated wood roof trusses at 15 foot on center. 2×6 roof purlins will not span the 15′ distance and do not attempt to build your own trusses.
I am building a cabin 16′ X 42′. I want to put a metal roof on it. I want spray foam insulation then will come back with sheet metal for my ceiling. I plan to lay 2X4s on top of the trusses to attach my metal. Three on each side. How far apart can I space my trusses.?
Typically I would have put double trusses every 14′ to divide the 42′ evenly and aligned the trusses with the sidewall columns. I would them use 2x purlins joist hung on edge between the trusses to support the roof steel. If you are dead set on 2×4 for purlins over the top of the trusses, then your truss spacing will be dictated by how far the purlins will span given applied snow loads. Your building’s engineer can best make this determination.
Top of truss 2×6 (SPF)
Bottom of truss 2×8. (Fir)
2×4 webbing.
Measurements:
32 long. 12 high.
Building 32’x48′. 8 foot on center pressure treated post. Triple top plate. With Y support.
Question: can I put trusses 4 foot on center?
They will be decked with 1/2″ ext. Plywood.
Than strap with 2″x4″ to hold metal roofing.
The prefabricated truss manufacturer will provide engineer sealed drawings to confirm adequacy for the required loadings and spacing. Seemingly it would be more practical to use a double truss every 12′ with purlins on edge between trusses.
Dual pitch trusses, just as the
name suggests, have two different pitches on each side of the truss. This truss can be used when the builder designer desires a steep pitch facing one direction of the building and a narrower pitch on the opposite side. These trusses can be used when rain or snow runoff is an issue on one side of a building or a solar panel system requires more space on one side of a roof.
Forgot to mention what type of truss I would like to use on previous message.