Tag Archives: unfaced batt insulation

Finding Which Way is Up

Finding Which Way Is Up

Avid reader DAVE in BLUFFDALE writes:

As I told Trey, I’ve been reading and reading and reading your blog posts until I don’t know which way is up!  Don’t get me wrong, you’ve done an amazing job with your blog posts, but it can be a bit overwhelming.  I think part of the problem I’ve had is that your posts span a wide time period and some technologies and techniques have changed over time, so it’s hard, sometimes, to figure out what the latest recommendations are.  Here’s some customer feedback regarding this:  Unless a post has comments under it, it’s impossible to tell when it was written.  The comments are date stamped, but the blog posts are not…take that for what it’s worth, your posts ARE an incredible resource!

Anyway, our building will be 30x60x10 and we don’t (currently) have any plans for heating/cooling the workshop, other than fans & space heaters as needed.  My big concern here in our area of Utah is the summer heat.  

After reading a number of your posts on reflective barriers, I get the impression that you are not (anymore) a big fan.  The other thing I haven’t been able to figure out is how you would put a reflective barrier between the steel roof panels and the purlins and be able to have an air space for the reflected heat to dissipate in.  Is there a way to do this, or is it just not worth it?

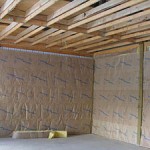
My current thought is that we would just use Drip-Stop on the roof panels and put unfaced fiberglass bats between the purlins and hold it in using 6 mil plastic.  I talked with Trey about having an increased heel height on the trusses to allow proper eave to ridge venting in this scenario.

We would do the same for walls…unfaced bats with 6 mil cover.

And, per your recommendation, a good plastic sheet under the slab.  

Which just made me think of another thing…we are planning to put a partial basement under the last 20′ of the building for some cold storage.  I figure we’ll be putting some kind of tar waterproofing product on the basement walls, but should we also put a plastic barrier under the basement floor?  We’ll have a wood joist floor over the basement, so moisture could come up from down there…thoughts?

TIA for any insights you can provide to help us nail down our order!”

Thank you for your kind words. You are correct about changing technologies and techniques and my 2000+ blog articles cover a dozen years of progress.

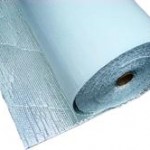
We’ve provided literally millions of square feet of reflective barriers however they basically function as little more than a condensation control, provided they are properly installed. There is just no realistic way to achieve totally sealed dead air spaces to take advantage of their ability to reflect.

Integral Condensation Controls (Drip Stop) are very effective for condensation control, are affordable, and do not have installation challenges associated with other alternatives. (For extended reading on Integral Condensation Control please see: https://www.hansenpolebuildings.com/2020/09/integral-condensation-control-2/) Placing batts between roof purlins is not your best choice, as Codes require a minimum one-inch of continuous air flow above batts from eave to ridge – impossible to achieve in this scenario. Raised heel trusses, with blown in fiberglass above a ceiling, and properly vented eave and ridge is your best design solution. In your climate zone, I would recommend at least R-49 with 18″ heels.

For walls – I would use a Weather Resistant Barrier (Tyvek or similar) with R-20 or greater batt insulation. I am really liking Mineral Wool batts as they are unaffected by moisture. https://www.hansenpolebuildings.com/2013/03/roxul-insulation/

You should have a vapor barrier under any slab inside of a building, so yes to below your basement floor. Your basement walls should be insulated down to top of slab floor with either R-15 continuous insulation boards or R-19 batts.

Post Frame Barndominium Exterior Wall

Post Frame Barndominium Exterior Wall Questions

Reader IAN in RIDGWAY writes:

“I am looking for help understanding a couple of exterior wall questions.  

  1. My county is enforcing the 2018 IECC for energy efficiency. In my region this requires R-20 cavity + R-5 exterior wall assembly.  From everything I’ve read, this means a continuous layer of 1″ rigid between the framing members and the metal siding.  Is this an accurate understanding in your mind?  Does the 1″ of rigid between framing and siding affect the integrity of the structure at all?  Are the fasteners that are shipped with your kits long enough to accommodate the 1″?
  1. We will be living in our pole building, which means we will need to meet minimum code standards for receptacles at the exterior walls.  I am under the impression that the poles must remain whole and are not designed to have a hole drilled through each for ease of pulling wire.  Am I correct here?  What is the suggested solution? Conduit everywhere below my slab?”

Mike the Pole Barn Guru responds:


Nice to see jurisdictions enforcing IECC (International Energy Conservation Code) requirements, as it will result in more energy efficient structures. In Ouray County, you are in Climate Zone 6B. This requires ceiling R-49, wood frame walls of R-20 plus R-5 (or R-13 plus R-10) where second value is continuous insulation and slab edges to have R-10 four feet deep.

According to Martin Holladay (Green Building Advisor editor) your continuous insulation is just as effective when installed on the interior of your wall framing. This is very important when it comes to fully engineered post frame construction. Properly engineered, post frame construction relies upon shear strength of steel skin to transfer wind loads through building planes to ground (https://www.hansenpolebuildings.com/2011/12/lateral-wind-loads/). Having rigid insulation between framing and siding would reduce or negate your siding’s shear strength and result in a less than satisfactory outcome. My recommendation would be to use a Weather Resistant Barrier on the outside of the framing, directly inside of steel siding. Fill insulation cavity with unfaced batts (preferably stone wool such a Roxul as it is not affected by moisture https://www.hansenpolebuildings.com/2013/03/roxul-insulation/) or BIBs (https://www.hansenpolebuildings.com/2011/11/bibs/), then a well sealed rigid insulation board between framing and interior finish. Done this way, your wall will ‘dry’ to the exterior, making your home’s HVAC system less responsible for reducing interior humidity levels.

Your wire pulling is far easier than you may have initially envisioned. 

Very little drilling, if any, will be needed for holes in order to run electrical wires. Wall framing (girts) extend or are placed so as to leave a 1-1/2 inch space between outside of wall columns and siding.

Think of a hole being drilled through as being an “open knot”. Lumber grading rules refer to these as being “Unsound or Loose Knots and Holes” due to any cause. Most structural framing – like wall girts and roof purlins or posts and timbers are graded as Number 2.

For practical purposes, a hole up to just less than ¼ of board face being drilled through will be within grade in #2 lumber. Example: 3-1/2” face of a 2×4 a hole up to 7/8” may be drilled through, as often as every two feet. Allowable hole sizes are reduced and spacing increased for higher grades of lumber. 

Any holes drilled through pressure preservative treated lumber or columns, especially near         grade, should be treated with a Copper Naphthenate solution. Copper Naphthenate is available as a brush-on (Cuprinol No. 10 Copper-Green® Wood Preserver          https://www.homedepot.com/p/Copper-Green-1-gal-Wood-Preservative-176223/300502829)

or spray-on(https://www.homedepot.com/p/Copper-Green-Wood-Preservative-14-fl-oz-  

       Aerosol-CopperSpr/100191444)

A Real Life Climate Controlled Post Frame Wall

Reader BRANDON in WICHITA writes:

“Hello Mike!  I am in the engineering field and we are just about to put up a personal climate controlled post frame building.  I have followed many of the teachings of Dr. Lstiburek on wall and roof assemblies.  I also enjoy your very detailed write ups.  I am conflicted in our assembly a bit.  Most builders here install a thin (1/8″) foam product with Aluminum foil towards the outside to act as a vapor and radiant barrier between the metal sheathing and wood frame.  That seems well and good if no additional layers are added to the wall/roof assemblies.  However, many quickly learn about the false and ridiculous R value claims of these products and add more insulation later.  Usually glass batts.  This largely concerns me because there is always another air/vapor barrier faced on the batts that would be in the interior, which creates a double vapor barrier.  

Due to this, and realizing it is nearly impossible to totally eliminate ‘some’ condensate from forming on the underside of the sheathing, we were going to use Typar house wrap on the walls AND roof between the sheathing and purlins/girts.  The product has a perm rating of about 11.  What we are targeting is an ‘air’ barrier, that is liquid proof, but still has ‘some’ permeability since some vapor would eventually get in the cavity and we need a way for it to escape.  Our assembly would follow up this building wrap with unfaced glass batts to roof/walls, then covered with the same reinforced white facing they typically use that is a vapor/air barrier and has an aluminum facing towards the outside.  

One issue faced here is the big question about climate!  Our state, as with many, have both hot/humid summers AND cold dry winters.  

I am not an advocate of Typar but selected it due to it’s toughness during install, and very low perm rating.  Not to be confused with big box store ‘generic’ wraps which are just perforated plastic! 

I have a test piece sitting with water on it right now on a paper towel and after hours, it still has not penetrated the product.  Our intention with its use is to create an air barrier on the outside as all the metal seams and corrugations can create wind washing through the glass batts, and to shed water droplets.

Your thoughts would be greatly appreciated!  We have the columns currently up so a timely response would great!”

Thank you for being a loyal reader. Your views on usage of Radiant Reflective Barriers for wall applications are spot on. Other than if people are 100% certain they will never, ever add insulation to their walls (and who can be certain about future building users/owners?) it is just an incorrect product to be used. A good, well-sealed Weather Resistant Barrier would be appropriate to use, followed by filling your insulation cavity with unfaced batts. For interior face, there is really no benefit to going to the expense of an aluminum faced product. A well-sealed 6mil clear visqueen will do everything you need it to do.

For more information on this subject, please read my Ultimate Guide to Post Frame Building Insulation https://www.hansenpolebuildings.com/2019/11/post-frame-building-insulation/.

Avoiding Condensation When Insulating an Existing Pole Barn

Avoiding Condensation When Insulating Existing Pole Barn

The last thing people want to have to deal with would be condensation dripping in their pole barn. When an originally unheated cold storage building becomes repurposed to be climate controlled, possible condensation poses some new challenges.

If you are reading this article and plans are to construct an unheated building, I implore you to consider taking steps so it could be repurposed to be heated and/or cooled later. Please browse through some of my previous articles regarding this subject, such as: https://www.hansenpolebuildings.com/2018/06/pole-barn-insulation-oh-so-confusing/.

Reader JOSEPH in ALPINE writes:

“We have a pre-existing pole barn that we want to turn into a insulated building. Knowing that condensation would be a problem, I’m looking for a professional to consult with so it is done correctly. Is this something you do and what are your rates?


The building is 15×15, on a pad. There is no attic- 1/4” plywood is nailed to the ceiling 2x4s. We’d like to keep this height since it affords space for a loft. There is a single central roof vent. I read your response to one customer about using unbatted insulation on the walls and punching holes in the plastic to allow venting. But how does one allow for venting when there is no attic space? Our main house (1937 farm home, remodeled to modern code in 2003) is a metal roof with the upstairs rooms opened up, no attic, no roof vents. How can one replicate what is done in the house with this pole barn?

Thanks.”

Mike the Pole Barn Guru writes:

I am deeply flattered to have someone offer to hire me for a consultation. Here is my response to Joseph:

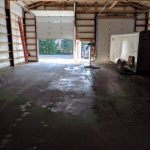
I am a bit geographically inconvenient to be able to come and see your building. However, based upon experience and what I would do if it was my own building, I will give you some free advice. You are welcome to use it, or discard it as best you see fit.

As you do not know if a vapor barrier exists beneath your existing concrete slab, I would use a high quality surface sealant over it. Your major water source for potential condensation will be through this slab. I’d close off roof vent, and have inside surface of siding and roofing closed cell spray foamed. Your local installers can give you recommendations for thickness, however I would not go with less than two inches thickness. If possible or practical, unfaced fiberglass insulation may be added to the inside to increase R value. However, it might be most practical to just pay a little extra for thicker spray foam.


Insulating a Post Frame Home Crawl Space

One of our clients has been erecting a post frame home in Colorado Springs, which is over a crawl space. Here is our discussion in regards to insulating the crawl space.

“While I have your ear, I had asked you a question earlier about getting the code required R30 in the 2×6 floor joists of my raised floor. I looked into your suggestion of spray foam and I got some quotes from local companies and I was shocked! One company quoted me $16,000 to do 3″ in the floor and walls with some performance charts showing that the 3″ would satisfy the code (I’m a bit skeptical). I got another general quote of $1.10/board foot and that it would take 5″ (i.e. $5.50 / sq ft)  or $12,650 just for the floor. The second company did suggest though that El Paso county allowed the R30 around the crawl space perimeter and no insulation in the floor… which leads me to my question…

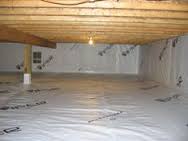
What would be your thoughts of a non-vented crawl space using something like 15 mil plastic on the ground and up the sides the 18″ to the floor and the R30 spray foam from the ground to the floor level?  I could get that done for around $2500. I’m still haven’t completely decided if I will used dense pack cellulose or BIBs for the walls but I’m pretty sure I don’t have the budget for spray foam in the walls.”

Mike the Pole Barn Guru Responds:

When I moved to Oregon from Eastern Washington in 1979, I was amazed at how different the construction techniques were from what I had grown up with. Eastern Washington was the land of full basements, whereas Western Oregon was predominately crawl spaces. The typical crawl space would have 6 mil black visqueen draped down the sides of the foundation and covering the ground, with R-19 unfaced batts used to insulate directly beneath the floors.

A variant of this was to use the crawl space as an air plenum, eliminating the need for heat ducts, and placing the unfaced insulation against the foundation.

This variant is basically a very slight spin away from what you propose to do.

Performance charts always frighten me as they general require some hocus pocus involving dead air space. Closed cell spray foam is R-7 per inch, so a claim of three inches in a system making R-30 sounds bogus unless the balance of the cavity is going to be filled with something like unfaced fiberglass batts. There is no question about closed cell spray foam being expensive, even the work I had done when we added the elevator shaft on the back of our home ran $2.80 per square foot for four inches thick.

Personally, I have no issues with what you propose to do and would probably take it a step further and utilize the principles of Frost Protected Shallow Foundation insulation below the base of my wall steel. https://www.hansenpolebuildings.com/2016/11/frost-protected-shallow-foundations/.

How Insulation Works

I so enjoy clients who truly care about the outcomes of their post frame buildings. In this case, I’ve been back and forth with reader Eric and today we are discussing how insulation in walls works.

Eric writes:

“Mike,

Thanks again for the input. I read those articles you mentioned on the BIBs and the white liner panels. The liner panels are very common and popular around here but the article had very good points and gave me more to think about. As for the insulation, I was not familiar with the BIBs system and was impressed. I have done some more reading and reached out to a few contractors for quotes on the BIBs system. I do prefer to do things myself whenever possible however, so the option of installing fiberglass myself is still on the table. This is where I still have a question. You mentioned to fill the entire wall cavity with unfaced fiberglass and then cover with Visqueen. Is there an issue if the cavity is not completely filled and an air space is created between the fiberglass and the Tyvek® behind the metal sheeting? I ask because my walls are roughly 5 1/2” deep and obviously R13 is only 3 1/2” thick and R19 is 6 1/2” thick. If I go with R13 (cheaper) I end up with an air space. If I go with R19, I end up compressing it and losing r value anyway. Also, I have diagonal bracing in the corners which will also make it near impossible to tightly fill with fiberglass batts. I would love to go with the BIBs system but am waiting to see if it is within budget. If I can save considerable money insulating myself with batts I would most likely do so but need to be sure I am not causing problems down the road. Sorry for being so long winded and thank you very much for all your help and information.”

Mike the Pole Barn Guru responds: How Insulation Works

Fiberglass itself has little resistance to heat flow. The actual insulator is the air trapped in the tiny spaces between glass fibers. The tiny air voids slow conductive heat movement, while the glass fibers reduce radiant losses and impede air movement to block convective heat flow.

Don’t be fooled by so-called dead air spaces. Small air voids slow heat flow, but large voids don’t. A dead air space is one in which air does not move — once a gap gets larger than 3/4 inch, convection kicks in and overrides the insulating effect. Even though they contain air, uninsulated framing cavities have little or no R-value.

Making contact.

This understanding should govern the way batts are installed in the field. They should make good contact with wall and ceiling and nestle snugly against the sub-floor at the base within wall cavities. If the batts don’t touch the inside face of the drywall and the housewrap, convection coupled with air leakage will seriously undermine their thermal performance. Use only unfaced batts in exterior walls, because we’ve found inset stapled kraft-faced batts tend to create gaps between the insulation and the drywall. (Using unfaced batts also prevents the drywallers from complaining about the presence of stapling flanges on the surface of the framing.)

In other words, even though shoving batts into a wall girt cavity may seem like a no-brainer, doing it right takes some care. If a batt is simply jammed into place, its edges tend to drag along the sides of the girts on either side, which often prevents the rear corners of the batt from coming into contact with the exterior sheathing.

Moral of the Story

If your budget does not include closed cell spray foam insulation, then BIBs is a great solution and is effective.