Tag Archives: truss drawings

How to Read Truss Design Drawings

How to Read Truss Design Drawings

This invaluable information is provided compliments of Structural Building Components Association (SBCA). Should you be considering purchasing trusses on your own, it will be to your benefit to familiarize yourself.

Trusses are incredibly efficient structural framing solutions and, consequently, are used in most of today’s light-frame wood construction projects. Many different professions encounter trusses, whether they are builders, framers, code officials, architects, engineers, or involved in another building trade. One of the most comprehensive documents to help understand how a specific truss is designed to perform (and be installed correctly) is its Truss Design Drawing (TDD).

TDDs are generated by the proprietary design software used by a component manufacturer (CM), so the exact layout of a TDD may vary slightly between software providers, but the same information is included regardless. To help individuals read and understand TDDs, SBCA has created a library of brief yet comprehensive videos called, “How to Read Truss Design Drawings.” The goal of this video series is to explore the various aspects of TDDs and give context to explain why the information is important.

Things to Know When Adding onto an Existing Pole Building

Things I Need to Know When Adding on to a Post Frame Building

home-addition-150x150Real life scenario – one of our clients is adding onto the end of a clearspan 24 foot wide by 36 foot long by 10 foot eave post frame building. The add-on makes the structure another 24 feet longer, same height and roof slope.

Piece of cake – right?

I’d written an article about this very subject previously, so the Hansen Pole Buildings’ Designer had the advantage of being well educated in this area: https://www.hansenpolebuildings.com/2015/08/building-endwall/.

There were some known challenges in this addition. The client needed a 12 foot tall overhead door in the new endwall. Luckily the existing roof slope was 7/12 and by using interior columns and rafters, instead of clearspan trusses, the door could be placed in the center of the endwall.

Problem solved…..

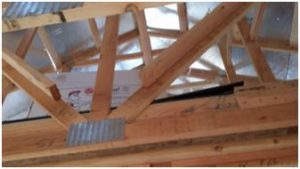
However, the existing building has an 18 inch overhang beyond the endwall, which was not communicated originally. The challenge was resolved by attaching the roof purlins in the bay closest to the old building to the old fly rafter.

However a larger challenge appeared – the client wanted to remove the endwall columns from his old building. The client knew this, the Building Designer knew it, however it was not communicated up the chain to those who were having to do the structural design for the building.

What might have been helpful, would have been getting our hands onto the truss designs from the existing building. However, no truss drawings could be found.This made it impossible to determine if the existing endwall trusses were designed as a clearspan, or if they were reliant upon the existing columns for bearing.

In the end – the solution was to span the end of the existing building with a large LVL (https://www.hansenpolebuildings.com/2013/01/lvl/).

So – things I want you to tell me about your existing pole building….

If you have the building plans and/or truss drawings, please share them with us.

Any paperwork you have from the original purchase (we want to as closely match what you have as possible).

Send us photos of the outside and inside of the building. Make sure they are clearly identified, so we know which wall the photo is showing.

Will you be making any changes to the end of the existing building? Will siding stay on the building, or will some or all of it be removed? Do you plan on moving or eliminating any columns?

Provide the measure of the eave height of the building (https://www.hansenpolebuildings.com/2015/02/eave-height-2/). Make sure to do this right, as this will be crucial in getting the best possible result.

Measure the distance from the bottom of the pressure preservative treated splash plank, up to the bottom of the base trim.

If the end of the existing building does not have a prefabricated roof truss on it, the roof slope needs to be verified.

Be prepared to have to answer more questions – the more we know about your existing building, the happier you will be in the end.

Truss Bracing- A Framer’s Perspective

Truss Bracing
My friend Christopher Gould is a Registered Professional Engineer and President of Gould Design, Inc (https://www.goulddesigninc.com/). He recently authored a blog article on truss bracing, of which I will steal (borrow) profusely from him.

Truss bracing is additional, field installed, bracing which is specified by the design software to reinforce specific webs needing extra support to meet the loading and design requirements of the job.

What we are referring to are web braces which are typically displayed as the symbol shown below:

truss-web-bracing

A system of trusses may also require additional “bracing” specified by the EOR (Engineer of Record) such as gable bracing like this:

gable-truss-bracing

These details are typically found in the structural plans, and as a framer are the easiest details to find and install, since they are related to nailing requirements and necessary hardware and clips which should be installed on order to satisfy shear transfer and drag loads. These are also the easiest pieces of reference for the building inspector to identify.

Bright, shiny clips and straps have a way of standing out against wood on a job site. Much more so than additional wood on top of the many directions of webs in a truss system like this:

truss-plate

These pesky braces tend to be the most misunderstood and overlooked part of installing a truss system when it comes to completing a job, especially if the crew doing the work and the building inspector don’t know what they are looking for. When the trusses are delivered they leave behind a packet of paper which can be hundreds of pages with a layout on top. The layout is often peeled off and used for proper placement of the various trusses, but the rest of the packet showing the truss profiles and required web bracing is tossed aside and possibly not looked at again.

Many times flipping a web or upgrading the web lumber can eliminate many of the braces which are specified through system default design without the designer spending much time on it.

This last step is part of what Hansen Pole Buildings’ beloved Purchasing Department Manager (and newlywed) Justine does. When she gets a preliminary truss drawing in from our truss manufacturer, she reviews the required web bracing and consults with the truss designers to see if there is a solution which will reduce or eliminate the need for web bracing. While this may add a few dollars to the cost of the trusses, it can well result in a wash for cost by reduction of bracing – and make it easier for you to construct your new pole building!

When the average person or builder invests in a set of roof trusses, often the dictate for selection is low price of the trusses, without looking at the added costs of bracing which another fabricator might have very well taken into account.

Just one more reason to invest in a post frame building kit package from the people who deliver “The Ultimate Post Frame Experience”™.