Tag Archives: stitch screws

Attic Ventilation, Shearwall Stitch Screws, and Adding Sheathing

This week the Pole Barn Guru addresses reader questions about ventilation needed for a new attic with metal ceiling and blown-in insulation, a confirmation for endwall needing stitch screws for shear, and if adding sheathing to an existing pole building would add value.

DEAR POLE BARN GURU: I bought a house with a pole barn that is unfinished inside. The metal walls were not wrapped and the only insulation in the barn whatsoever is double bubble on the underside of the barn roof. I am going to have a metal ceiling put in and then blown fiberglass insulation for an R30 value in what will then be the attic. There is currently no ridge vent nor gable vents either so I am concerned about air flow in the attic once the metal ceiling and blown insulation are complete. The eaves have perforated soffit so I’m hoping even after the blown insulation is done that will provide an air flow into the attic. So am I correct to think that I need to have gable vents put at each end or a ridge vent so that there is positive air flow through the attic? Thanks! BILL in STEVENSVILLE

DEAR BILL: Your thinking is absolutely correct – you need an adequate ventilation exhaust point. Ideally, this would be at your ridge. Gable vents, while meeting code requirements, actually only provide good ventilation immediately closest to vent locations.

This article covers requirements for attic ventilation: https://www.hansenpolebuildings.com/2023/06/274512/

In Queen Anne’s County – you are in Climate Zone 4A. 2021’s IECC (International Energy Conservation Code) specifies R-60 for ceilings in your climate zone. As so much of your cost of blown insulation is having installers show up, you may want to consider going with a greater R value than originally planned. Energy costs are not ever going to go down (nor cost of insulating).


DEAR POLE BARN GURU: I have a rear end wall that is labeled shear wall that says I need an inch and a quarter number 12. Stitch screw 9 and 3/8 on center. Is that every 9 and 3/8 on center vertically on each overlap? DAMINA in TONOPAH

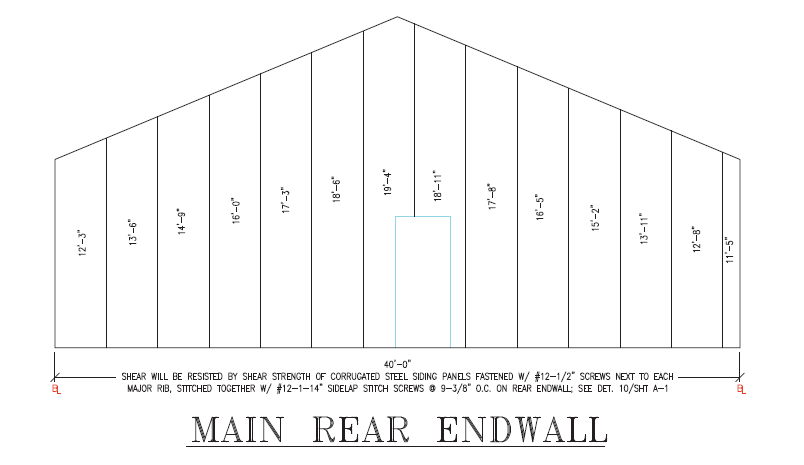
DEAR DAMIAN: You are correct. Panels stitched together have roughly twice as much shear capacity as do unstitched panels.


DEAR POLE BARN GURU: Question for you Guru! I bought a property with a small pole building/shed. Is there any value in adding sheathing? If so, how do you retroactively figure out if the roof will handle the additional load? JESSE

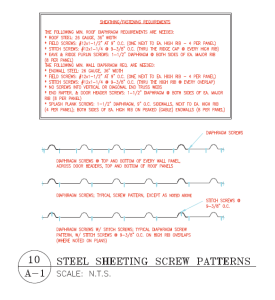
DEAR JESSE: If the roof steel is properly fastened (1-1/2″ screws in flats along one side of each high rib in field, #12 or #14 x 1-1/2″ screws both sides of each high rib at eave and ridge) chances are it will perform admirably without any sheathing. Think of steel roofing and siding as acting like very strong, very thin OSB or plywood.


Tear Down and Move, Stitching Roof Steel, Foundation Size

Today’s Pole Barn Guru answers questions about the chance Hansen Buildings will “tear down pole barns and move them for people, too?…”, stitching the overlap on steel roofing, and what happens to foundations when adding a second floor to a “Barndo.” 

DEAR POLE BARN GURU: Do you tear down pole barns and move them for people, too? It’s a 30’ x 40’ metal pole barn, which we want to reassemble at our new home. Can you help? DARYL

DEAR DARYL: As we are not contractors in any state, no we do not tear down and/or move pole barns or any other type of construction.

Do this because you have some sort of emotional attachment to your pole barn, not because it makes economic or practical sense.

A Registered Professional Engineer should first be engaged to advise what upgrades will need to be made so building meets current Building Codes. Most pole barns have concreted in columns, so same engineer can design a foundation system for your new location. Among choices would be concrete piers with brackets (https://www.hansenpolebuildings.com/2019/05/sturdi-wall-plus-concrete-brackets/).

It will cost as much to disassemble as to reassemble, plus costs of moving and replacement of damaged materials.

Some house movers are capable of moving post frame buildings, it may be less expensive than tearing down and rebuilding.


DEAR POLE BARN GURU: Steel roofing. I’m looking at the drill pattern I am wondering why the overlap steel does not have the screw closer to the overlap rib. Are any stitch screws used at the overlap rib joint? No stitch screws came with kit. KURT in SAINT HELENS

screwsDEAR KURT: Steel roofing and siding panels are designed so overlapping ribs have a slight over bend to them. If you place two panels on a flat concrete slab, properly overlapped, you can see how overlapping rib appears to “ride up” slightly on side away from panel edge. When screw is placed alongside overlapping rib, it causes panel to lay flat and give a smooth overlap. This allows for panels to be installed without stitch screws in overlap, in most instances.


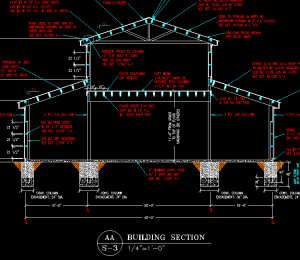
DEAR POLE BARN GURU: Hi I’m interested in a “Barndo” style home. I would like to ask you a question. If I would like a second story, does the foundation need to be beefed up; for lack of better term? TROY in DALLAS
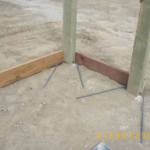
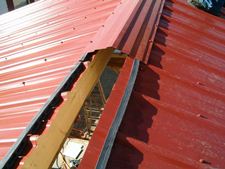
DEAR TROY: Footing diameters will need to be increased proportionately to adequately distribute second floor weight (dead load), plus its “live” load (occupants, furnishings, etc.). It isn’t life’s end by any means, We live in a shouse (shop/house) two stories throughout plus a partial third floor in a portion. All needed footings will be spelled out in the third-party engineered structural plans we (www.HansenPoleBuildings.com) provide with your building.


Steel Ridge Cap to Roofing Overlap

Hopefully no one wants to create a roof with leaks. Reader MIKE in HARBOR CREEK wants to make sure he is doing things correctly. He writes:

“How much overlap do you have to have with roofing and ridge cap? Is 2.5″ enough and then you use metal to metal screw you do not have to penetrate the purlins?
Ty”

I cannot vouch for how other building providers assemble their buildings, so I will go with how we do it.

To calculate a building’s roof steel length we take one-half of the building’s span (or horizontal measure from peak/ridge to the outside of columns) and multiply this times a factor for roof slope. 

For slope factor – multiply slope by itself and add 144. Take the square root (use a calculator) of this number and divide by 12.

Example to calculate slope factor for 3.67/12:  [3.67 X 3.67] + 144 = 157.47. Square root of 157.47 = 12.549. Divided by 12 = 1.0457.

For a 40 foot width gabled building with a 4/12 slope this length would be 21.082 feet (call it 21’1”).

Outside of columns at eave we have a 2x of some sort as an eave strut, with a width of 1-1/2 inches and roof steel must overhang this by 2-1/4 to 2-1/2 inches. Using 21’1” for our roof steel length, this means the top edge of roof steel will now be four inches from the peak/ridge.

Standard steel ridge caps are generally very close to 14 inches in overall width, giving somewhere around three inches of overlap on each side. Placed in this overlap will be either a form fitted outside closure strip or a vented closure (https://www.hansenpolebuildings.com/2015/11/ridge-cap-foam-closure-strips/). Either of these products properly installed will prevent weather (rain and/or snow) from being driven beneath the ridge cap into your building. You can read a little more on correct placements of closures here: https://www.hansenpolebuildings.com/2015/11/outside-closure-and-vented-closure-installation/.

By using metal-to-metal stitch screws to attach the ridge cap to high ribs of roof steel, there is no need to have to miraculously hit any ridge purlins with screws. Here is a brief tale involving a builder who went off on his own tangent https://www.hansenpolebuildings.com/2011/12/stitch-screws/.

In summary Mike, provided you have a 2-1/2 inch overlap, have used proper ridge closures and stitch screws your life will be good and you will have a happy end result!

Stitch Screws!

Seeing as it’s Friday, I’ll give you a “shorty” today.  At the beginning of this year my bride and I visited a horse barn facility in Florida we sold fall of 2010.  This was a huge building and although our programs calculate just over a 5% overage cushion for screws, we really went heavy on this one.  Let’s just say this client was “not so patient” and of course building in the fall of 2010, he was in an all fired hurry. We just didn’t want him calling with workers standing on the job to say he needed a pail of screws “over-nighted”.

And as best laid plans – this is exactly what he did.  He claimed his builder “didn’t have enough roof screws”.  The first thing I do is to go back through calculations and then shipping, to be sure he got sent the right number.  Yep, they jived.  I wondered what he did with all the roof screws, but went ahead and shipped him more anyway.  It wasn’t until my wife and I visited his facility and took a closer look, we figured out where the shortage went.  What we found also explained why he claimed his ridge cap “wasn’t wide enough”, so he had to add extra framing to his roof.  His builder had errantly tried to screw the ridge cap to the ridge purlins, with the regular roofing screws! On top of that, the spacing of the purlins was wide enough, so he had to add a 2×4 on the “uphill” side of every ridge purlin, in order to have the wrong screws go into where they did not belong to begin with! Confused? Obviously they were.

On our building plans is a screw layout describing exactly what type of screws are used to do what – and where.  Our Construction Guide also gives very specific instructions as to how and where to use the stitch screws. Stitch screws are used to attach the ridge cap to the steel roofing.  Evidently the builder had used the roof sheeting screws to put the ridge cap onto the building – screwing into the ridge purlins (well, almost into them).  Now this explained his “issues”!  You may ask, “What’s wrong with trying to do it this way?”  Nothing structurally, but trying to depend on accuracy (or dumb luck) in trying to hit the ridge purlins while holding the ridge cap in place is a feat I would not want to attempt.

Another reason for using stitch screws is aesthetics.  You better hope those ridge purlins are exactly perfectly straight and hitting them with screws lined up equidistant from the edge on the ridge cap so you have straight screw lines.  My head hurts just thinking about trying to make this work and look decent!  OK, so I am really fussy, but there is nothing worse to me than having a beautiful building with screw lines looking as if someone stopped off for a six pack just prior to starting work for the day! This builder could have easily called, but instead he used more material and made a whole lot of work out of something designed to be not only very effective and attractive, but also….EASY.

OK, what do stitch screws do?  Simply, they are #12 diameter, ¾” to 1-1/4” in length with ¼” hex head painted screw (powder coated if they come from our Hansen Buildings kits) used to stitch “metal to metal”.  This means corner and rake trims and the ridge cap where they overlap wall steel.  They have an EPDM washer for a water tight seal.  Yes, they are meant for attaching steel to steel, and no, you don’t need “something wood underneath” to screw them into.

In a nutshell, this is all you need to know about stitch screws: use them to attach metal to metal, no wood underneath necessary.

Column Hairpins, Going Bigger, and Cutting Corners

Today the Pole Barn Guru discusses Rebar hairpins, a bigger build, and cutting corners on the construction process.

DEAR POLE BARN GURU: Hello, regarding the column to concrete hairpins. I’ve talked to a couple different contractors and they both have cringed when I discussed tying the pad to the columns. They say around here everyone uses a floating pad to avoid concrete cracking. Is there another option to meet the design requirement? Thanks, HANS in PLYMOUTH

DEAR HANS: If the contractors are cringing from hairpins it is from one or more of the following reasons:

a) They have not placed the bottom of the hole below the frost line,
b) They have not adequately placed a concrete collar around the base of the column,
c) The site has not been adequately prepared to minimize ground water below the slab,
d) The site has not been properly prepared to accept the concrete slab.

In order to meet the design requirements of the engineer of record, the hairpins are a necessity.

P.S. Every slab is going to crack, it is properly controlling the cracks which makes for a good pour. By using zip strips, expansion joints or saw cuts no more than every 12 feet for a nominal four inch thick floor, cracking can be localized to these points.

DEAR POLE BARN GURU: As I was warned, my barn has proven to be too small. Can I order an extension or a second building and just extend my current 30×32 Hansen pole barn an additional 20 feet? Thanks TJ in SPOTSYLVANIA

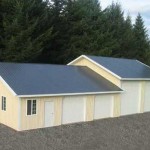
DEAR TJ: I know this is difficult to believe, but you are the first person to ever have this problem. No, not really, it is a common occurrence and I have been guilty of it personally. Whatever one constructs, it seems the possessions increase to fill the available space plus 10%.

We can have designed for you an addition to increase your building length. Your Hansen Pole Buildings’ Designer will be in contact with you before the weekend.

DEAR POLE BARN GURU: My builder did not use the tape to seam my insulation. Short of removing the entire roof, can I tape seams from bottom and be ok? Is the taped seams purpose to stop heat and cold air from clashing to create moisture or is it to catch moisture that is going to accumulate no matter what?

2nd question. The book or plans said for the ridge cap to use 1/4 screws. We do not have any and they would be too short anyways because of the foam that goes under the ridge cap. What is the proper size screw to use. TALMADGE in WARRIOR

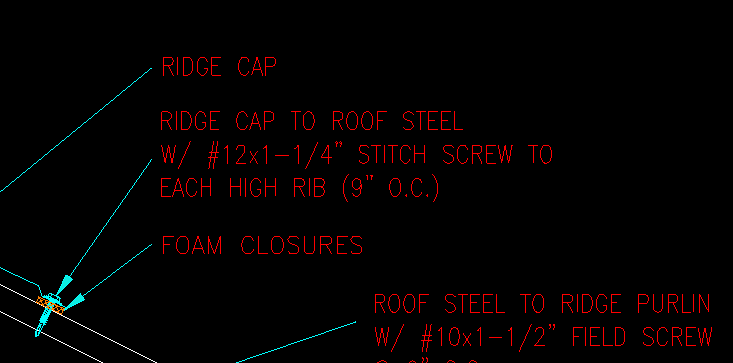
DEAR TALMADGE: It is aggravating when builders are in such a hurry they neglect to do simple thing such as using the adhesive, which is on the reflective radiant barrier tab already, to seal the barrier seams. All it would have taken was to peel off the pull strip! You can tape the seams from the bottom, which is going to be a lot of work and which your builder should offer to do for you at no charge. In order for the reflective radiant barrier to function properly, it needs to create an air tight barrier between warm moist air inside of your building and the cooler roof steel.

1-1/4 inch long stitch screws were furnished to attach the ridge cap, as well as corner and rake trims. They should be plenty long enough.


Why it is Essential to Supervise Professional Installers

Why It Is Essential to Supervise Professional Installers

In an ideal dream world, one would be able to hire a professional installer and know the job would be done right, without the need for hands on supervision.

RYAN in ELLENSBURG recently contracted out the roof steel installation of his new Hansen Pole Building kit package and this was his report:

“My roofer finally showed up yesterday and I wasn’t able to supervise the installation, so several mistakes were made but the one I’m most uncertain of is that the ridge cap was installed with diaphragm screws instead of stitch screws. He also left off all of the closures so the ridge cap has to come off anyway. My question is whether or not it can be reinstalled with stitch screws because of the difference in screw profile.”

Mike the Pole Barn Guru says:

It is a shame to have invested in a professional for installation and not be able to leave them alone and expect the job to be done correctly. The diameter of the diaphragm screws is larger than a #12 stitch screw (which was provided to attach the ridge cap). In the event the roofer placed the diaphragm screws so as they were driven into the solid wood of the ridge purlins, then you could do the same once again. Otherwise you are probably going to need to invest in some #14 diameter stitch screws.

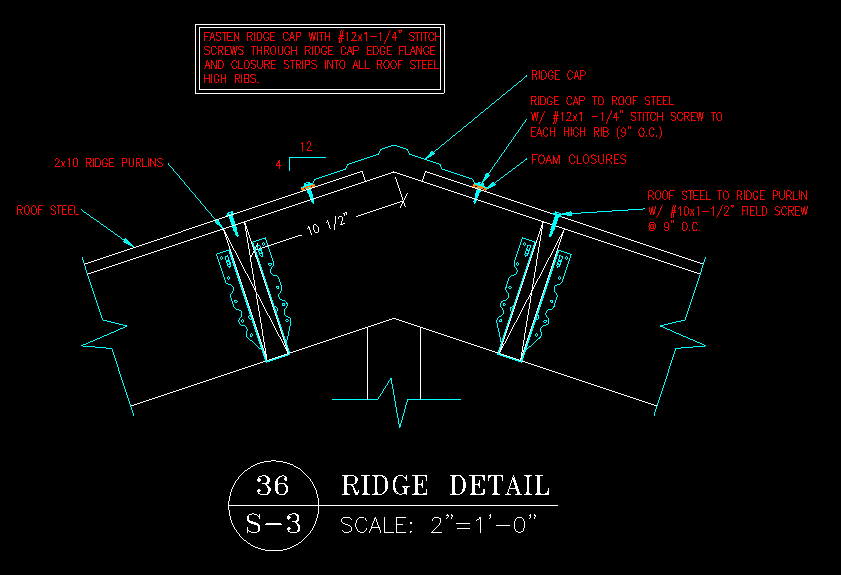
Well, it turns out it was worse than originally imagined, as Ryan wrote back:

“Yes, I agree. That’s just the beginning of the list of issues with the installation. On top of that none of the insulation seams were taped together, screws that missed the purlins were just left in place with no wood block placed behind them so they will leak at some point, the insulation was placed over the peak of the roof so the ridge cap that is supposed to be vented can’t flow any air, and none of the closures (vented closures and eave closures) were installed. It’s really disappointing because he did the roof on my house 3 years ago and I thought he’d done a good job on that, now it makes me wonder what corners were cut on that job, too.”

Mike the Pole Barn Guru:

There are ways to avoid being sadly disappointed by a contractor:

(1) Do it yourself. Hansen Pole Buildings are designed with the Do-It-Yourselfer in mind. The step-by-step construction manual covers every aspect of assembly. If you can and will read the instructions, chances are you will have a better finished product than what any builder will construct for you.

(2) Still want to hire a “professional”? Require a performance bond. (read more here: https://www.hansenpolebuildings.com/2012/07/contractor-bonding/).

(3) If you hire a contractor, familiarize yourself with the Hansen Pole Buildings’ Construction Manual and be onsite during construction to make certain the contractor does the work correctly.


Getting Screwed: The Powder Coated Screws Saga

Getting Screwed, a Powder Coated Screw Story

Thank you to our Guest Blogger today-from our Boss –   Eric Graff  – owner of Hansen Buildings

Hansen Buildings is very proud that we are one of very few pole building kit suppliers offering our customers powder coated screws. There is nothing more unsightly to me than a new pole building that has just completed construction and a large portion of the paint is missing from the screw heads. I know what most of you are thinking, how different can our screws be from our competitors fasteners? Extremely different actually, some competitors don’t even use screws to fasten their steel, they use nails! As someone who works daily out of another manufacturers building that has the steel siding and roofing nailed, never consider this option.

Pole building screws vary in every way possible. You will see many different paint systems, different lengths, diameters, head sizes and designs, screw designs, washers and coatings that it will make your head spin. Keep in mind that although screws are a small part of an entire structure they are one of the most important pieces in the buildings’ overall design.

This summer I happened to visit one of our clients’ buildings who also happens to be a friend. He needed a couple of wainscot panels replaced that were scratched. I brought with me the three panels I was going to replace for him and a handful of screws. While removing the existing panels I noticed some flaking off the heads of the screws. This confused me as our powder coated screws should show very little or no signs of paint coming off during installation. In fact our supplier offers a warranty against this when you use their approved lobular drive bits:

https://www.hansenpolebuildings.com/blog/2012/08/lobular-powder-coated-screws/

I finished replacing the panels and took the problem screws back with me.

Paint Chipping Off ScrewAs soon as I got back to our warehouse I grabbed a different color of screw and a couple different stitch screws for fastening trims to see how they fared. Unfortunately it was the same results regardless of type of screw or color. My first thought was, “where are all the customer complaints on this”? To me this was a major malfunction. I called our supplier and explained what I was seeing and sent photos to go along with our experience. They confirmed after some back and forth that there was indeed something very wrong with the paint on these particular screws.

I then thought back to a visit to the NFBA (National Frame Builders Association) Expo that we attended in St. Louis, MO in the spring of 2012. I remember visiting one booth in particular that was trying to sell us on their screws. I stood there and listened attentively with the Pole Barn Guru standing next to me who I could see was ready to ask some very pointed questions. The first question to leave his lips was, “Do you powder coat your screws”? The answer was a clear NO and a look of… “why does that even matter?”. After further discussion this supplier tried to explain to us that standard paint is just as good. When asked if all the paint will stay on after installation we were told, “Industry standard requires that a maximum of 25% of the paint can come off during installation to meet grade”. I could tell Mike The Pole Barn Guru was saying to himself, “Are you kidding me? 25% of the paint coming off new screws on our building would look hideous”. This confirmed to me why powder coated screws, when working as promised, are a much better product and worth the added cost.

Getting back to my screw situation required months of testing with the supplier before the issue was found. The cause ended up being the zinc plating on the steel below the paint that was not allowing the paint to properly adhere to the screw. We have since gone to a new plating to resolve all issues.

I learned a few things on this screw journey. Our screw supplier tests each run of screws in a laboratory controlled setting. The drills that test each screw run only at one speed, one pressure, at a perfectly straight angle by running a screw through 29g steel into a framing member. Yes I know, this is a far cry from the actual end user who uses these with a variety of drills and within many different environments.

Screw Rules:

  • Always use a drill that has a variable clutch feature so that you can adjust the level of torque before it stops driving the screw.
  • Do not over drive the screws. They should seat firmly without squishing the washer out like a muffin top.
  • Under drive the screw and you will have building leaks.
  • Keep the angle of your drill as close to perpendicular to whatever you are driving into as possible so as not to slip and cause bloody knuckles or scratches on your panels.
  • Never use a pneumatic drill.
  • You will have an easier time driving and avoiding mistakes by pre-drilling your steel.
  • Drive speed matters. The faster you drive the screw through steel the less impact it will have on the face of the screw.
  • If using our screws, purchase the lobular bits as they must be used to maintain the warranty.
  • Make sure to use the right screw in the right location. Hansen Buildings provides stitch (for installing trims only) and diaphragm screws (for installing roof and siding panels).

Stick to these rules and you are well on your way to constructing the best building possible. Screws are one of the most important parts to the complete design of your building. Hansen Buildings takes great care to provide the best possible building along with a keen eye for any product defects. We could be just another building kit supplier, but we chose long ago not to be. Every component in our building has been chosen with quality and experience in mind to provide the best value building kit on the market.

Stitch Screws: What do they do?

Seeing as it’s Friday, I’ll give you a “shorty” today.  At the beginning of this year my bride and I visited a horse barn facility in Florida we sold fall of 2010.  This was a huge building and although our programs calculate just over a 5% overage cushion for screws, we really went heavy on this one.  Let’s just say this client was “not so patient” and of course building in the fall of 2010, he was in an all fired hurry. We just didn’t want him calling with workers standing on the job to say he needed a pail of screws “over-nighted”.

And as best laid plans – this is exactly what he did.  He claimed his builder “didn’t have enough roof screws”.  The first thing I do is to go back through calculations and then shipping, to be sure he got sent the right number.  Yep, they jived.  I wondered what he did with all the roof screws, but went ahead and shipped him more anyway.  It wasn’t until my wife and I visited his facility and took a closer look, we figured out where the shortage went.  What we found also explained why he claimed his ridge cap “wasn’t wide enough”, so he had to add extra framing to his roof.  His builder had errantly tried to screw the ridge cap to the ridge purlins, with the regular roofing screws! On top of that, the spacing of the purlins was wide enough, so he had to add a 2×4 on the “uphill” side of every ridge purlin, in order to have the wrong screws go into where they did not belong to begin with! Confused? Obviously they were.

On our building plans is a screw layout describing exactly what type of screws are used to do what – and where.  Our Construction Guide also gives very specific instructions as to how and where to use the stitch screws. Stitch screws are used to attach the ridge cap to the steel roofing.  Evidently the builder had used the roof sheeting screws to put the ridge cap onto the building – screwing into the ridge purlins (well, almost into them).  Now this explained his “issues”!  You may ask, “What’s wrong with trying to do it this way?”  Nothing structurally, but trying to depend on accuracy (or dumb luck) in trying to hit the ridge purlins while holding the ridge cap in place is a feat I would not want to attempt.

Another reason for using stitch screws is aesthetics.  You better hope those ridge purlins are exactly perfectly straight and hitting them with screws lined up equidistant from the edge on the ridge cap so you have straight screw lines.  My head hurts just thinking about trying to make this work and look decent!  OK, so I am really fussy, but there is nothing worse to me than having a beautiful building with screw lines looking as if someone stopped off for a six pack just prior to starting work for the day! This builder could have easily called, but instead he used more material and made a whole lot of work out of something designed to be not only very effective and attractive, but also….EASY.

OK, what do stitch screws do?  Simply, they are #12 diameter, ¾” to 1-1/4” in length with ¼” hex head painted screw (powder coated if they come from our Hansen Buildings kits) used to stitch “metal to metal”.  This means corner and rake trims and the ridge cap where they overlap wall steel.  They have an EPDM washer for a water tight seal.  Yes, they are meant for attaching steel to steel, and no, you don’t need “something wood underneath” to screw them into.

In a nutshell, this is all you need to know about stitch screws: use them to attach metal to metal, no wood underneath necessary.  See you all Monday!