Tag Archives: Shed roof

Skillion Roofs

Skillion Roof Question

Reader WELLS in AIKEN writes:

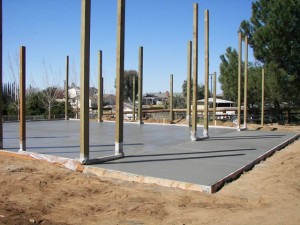
“I am building a 20′ x 24′ pole barn studio with a skillion roof. What size roof rafter to span the 20′ without any sagging? 2 x 8 or 2 x 10 or a more engineered rafter. I do not want any supporting poles on the interior of the studio.”

Mike the Pole Barn Guru says: 

Skillion roofs have a single sloped flat surface. Other names for this style include lean-to, mono-pitched or mono-slope, or shed roof. They are popular for minimal and contemporary-style buildings.

A skillion roof can be inexpensive and easy to build. While you’ll often see these roofs on minimal architecture, they’re also a top pick for outbuildings. They provide optimal water drainage but aren’t ideal for areas with high winds.

If you’re considering a skillion roof for your post frame home, garage, or shed, here’s what you should know:

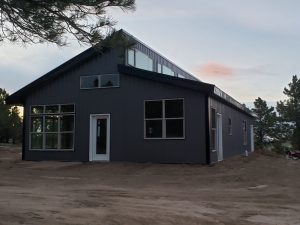
Designers use skillion roofs on minimal-style barndominium homes. They’re also popular for home additions, sheds, and garages due to their easy construction and high pitch. 

Skillion roofs are structurally strong. Their steepness provides optimal water drainage, and skillion roofs with a high-pitch work well for snowy climates.

These roofs are not a good choice for areas experiencing frequent high winds. Since they only have one slope, they’re more likely to sustain wind damage than a hip or gable roof, for example. In post-frame construction, long columns on high sidewalls can become quite large.

Skillion roofs are ideal for any building owner looking for a contemporary, cost-efficient, or easy-to-build solution. But along with their strong set of pros are a couple of disadvantages. 

Here’s a look at the pros and cons of a skillion roof.

Pros of a skillion roof:

Easy to build – A skillion roof features one flat, sloped surface, making this roof amongst easiest to build.

Affordable – Fewer intricacies and simple building plans result in a less expensive roof.

Modern aesthetic – Skillion roofs have a modern aesthetic, perfect for contemporary and minimal style buildings.

Good choice for building additions – A skillion roof is ideal for additions or extensions, provided drifting and slide off loads are properly considered in snow country.

Optimal water drainage – A skillion roof with a steeper slope have excellent water drainage.

Ideal for Snow – Roofs with a high pitch are ideal for snowy climates since steep angles allow melting snow to run or slide off.

Cons of a skillion roof:

Not ideal for high winds – Due to steep pitch and singular surface, skillion roofs are prone to wind damage and unsuitable for hurricane-prone areas.

Less attic space – Pitch majorly reduces amount of attic space. This can be con if you need extra storage space, a partial second floor, loft or mezzanine.

Wide clearspans can be problematic – Once beyond span capabilities of common dimensional framing lumber, engineered wood (such as LVLs or glu-laminated beams) can become cost prohibitive. Prefabricated wood roof trusses require significant depths at low end (depending upon span), resulting in decreased headroom or taller wall heights.

More expensive roofing – Most common 29 gauge through screwed steel roofing warranties are void on slopes of less than 3/12 (three inches of rise per foot of horizontal travel). For lower slope steel roofs, concealed fastener steel panels over sheathing or 26 gauge or thicker PBR panels become design solutions of choice.

In answer to your question, IRC (International Residential Code) Section 802 has rafter span tables for common load combinations. Table R802.4.1(2) with a dead load of 10 psf (pounds per square foot) probably best matches your situation. You could utilize 2×10 #2 Southern Pine rafters at 16 inches on center or 2×12 #2 Southern Pine at 19.2 inches on center, from this Table.

Putting Everything Under One Post Frame Roof

Putting Everything Under One Post Frame Roof

I have been an advocate of one larger roof, rather than an enclosed building with a roof only side shed for years. This allows for greater headroom in ‘shed’ area without having to deal with pitch breaks (transition from a steeper slope main roof to a flatter shed roof), making for easier assembly. In almost all instances, this will result in a less costly design solution.

This also happens to be a lesson I have tried to impart upon our Hansen Pole Buildings’ Design Team, however they have been slow to embrace this concept.

Reader RYAN in SUN RIVER writes:

Hansen Pole RV Storage
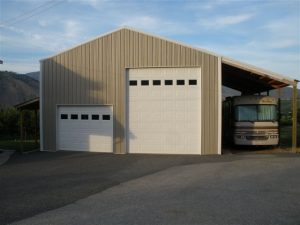
“I have plans to build a 52x48x14 this spring.  The idea is 52×48 roofline 4/12 pitch. Under that roof is a 16×48 open side for rv parking and then 36×48 enclosed with concrete floor.  My original thoughts are to 2×6 stick frame the wall separating the open area from the enclosed area after the pad is poured (any suggestions). 16×12 insulated door and a 4’ man door on the front gable end and a 3’ man door to get in from under the open area towards the rear.

How much would you charge to draw this up with your building techniques?  

I am planning on sourcing materials local but wouldn’t mind a quote from you either.”

I do like your idea of having your enclosed portion and roof only under one gabled roof, rather than a smaller gable over enclosed portion and balance as a shed roof off one side. You gain headroom, it is easier to assemble and usually less costly.

I would frame separation wall with wall girts, rather than stick framing and having to add on horizontal framing to attach wall steel. Code also will not allow for a stud framed wall greater than 10 feet in height without it being engineered. To minimize possibilities of water from your RV area migrating into enclosed areas, your concrete should be two separate pours, with RV parking slab slightly lower at main building wall and sloping away from it.

Your choice of having a four foot wide person door is one you will not regret. For a minimal added investment you will save your knuckles repeatedly. 

As for building plans, we are not a plans’ service, however your investment in a new Hansen Pole Building does come with complete third-party engineer sealed structural plans, along with verifying calculations. This alone will usually save you thousands of dollars in engineering costs, plus you have our roughly 20,000 buildings of experience to arrive at what will be your most practical and cost efficient design.

Why people think they are somehow going to get a “better deal” by sourcing materials locally is beyond my comprehension. We have buying power an average individual (or contractor even) is never going to have, plus our control over materials being provided allows our engineers to be certain what they specify on plans, gets delivered to your building site. Some materials we have produced only for our clients – you cannot buy them elsewhere. 

For continued reading on this subject: https://www.hansenpolebuildings.com/2014/03/diy-pole-building/

Pole Sizes, Adding On a Shed Roof, and Ridge Vents

DEAR POLE BARN GURU: We live in Pacific county in Washington state and wondering what size of truss pole we would be looking at needing for a 60 ft truss. We are in a wind exposure “C” and trusses will be on 12′ centers. The building we are planning will be 60’w x 48’d with 15′ eve height. Any help will be appreciated.

Thank you,CRAIG in RAYMOND

Concrete slab in a pole barnDEAR CRAIG: There are a plethora of factors which will go into determination of what size columns will work for your or anyone else’s new post frame
building. These include (but are not limited to):

Soil bearing capacity
Embedment depth
If columns will be tied into a concrete slab
Spacing of wall girts
Is building fully enclosed, partially enclosed or a roof only
Slope of roof
If building has a ceiling
Roofing material

When you order your new post frame building package, all of these variables will be factored into the design of not only the columns, but all of the components and your building plans as well as the supporting calculations will be sealed by the engineer of record.


DEAR POLE BARN GURU: I want to attach a shed roof along the side of my 40 foot pole barn. The span is 12 feet and I plan on the outside of the roof being on 10 ft. high 4×4’s and raising it to a height of 12 ft. on the pole barn. There are 5 6×6’s to line up the 4×4’s to. I was wondering the most cost effective way to attach the metal for the shed roof. I plan on enclosing the sides when funds permit, but for now help with what type of construction, be it wooden trusses or just 2×6 or 2×8 rafters.

Thanks in advance for all your assistance. BEN in TONEY

DEAR BEN: The most cost effective method (as well as structurally correct) will be to discuss your project with a Hansen Pole Buildings’ Designer. With your investment in a new post frame building will come plans which correctly size and locate all members as well as detailing all of the connections.

With this said….

The 4×4 columns you propose using will not be adequate to carry even the most minimal of loads which will be imposed by Code.

Your shed will be designed with a single rafter on each end, and rafters on each side of the interior columns. Depending upon the load conditions at your site, expect to see 2×10 or more probably 2×12 rafters. Purlins on edge will be joist hung between the rafters and the roof steel will attach to the purlins with screws.

DEAR POLE BARN GURU: I paid for continuous roof venting and I got plain 14 in ridge cap can you look in to this? JOE in CLEARWATER

vented-closure-strip


DEAR JOE: The steel ridge cap itself does not change for a vented ridge – the foam closure strips beneath the ridge cap provide the ventilation. According to our records, you were shipped the correct vented closures. Please advise if by some chance you did not receive them.