Tag Archives: roof leaks

Leaking Steel Roofing

Leaking Steel Roofing

Properly installed, there is truthfully no reason for a through screwed steel roof to leak. The key being “properly installed”.

Here is a report from a less than totally satisfied with his builder’s installation client:

“Sorry to report I have numerous leaks in the steel roof of my Hansen pole building.  In examining the roof, the workmanship of the screw application left a lot to be desired.  I have read your suggested fix in the manual and done some research on roof repairs etc.  Most suggestions are the same as specified in your manual using a larger and longer size screw method.  

I removed a couple screws where the leaking was taking place and discovered the screw had been rescrewed more than once on the initial install which reamed out the wood in the purlin and made the hole in the steel extra large (my little finger would fit in it).   My Fix method:  First a block was fastened to the existing purlin to give more wood as the screw tip  had broken out on the side of the purlin indicating the screw was not inserted  perpendicular to the roof and purlin.  Then I attempted to fill the hole and placed a second little larger neoprene washer (so the original washer was on the top and the larger one was on the bottom and reinserted the screw.  My thinking was the smaller washer on the top would exert enough pressure on the bottom washer which would cover the hole and provide the needed water seal.  This did not work and I think a larger size head on the screw would have been better.  In your opinion would a 14 or 16 x 2″ solve the problem?

Would appreciate any ideas on repairing the leaks.”

Mike the Pole Barn Guru Writes:

For any hole larger than 1/4″ the steel panel needs to be replaced, there is just no getting around it and no practical fix. For smaller holes, a #14 x 2″ screw will probably provide a fix. If it appears the hole in the purlin is large due to any one of a plethora of reasons, a small diameter wooden dowel or wooden matchstick driven into the hole prior to inserting the new screw will certainly aid in getting a good seal.


Screwed Up! A Poor Installation.

The photo you are witnessing happens to be an example of a poor installation job done by a “professional” builder. I use the term professional here in quotes, because anyone who is being paid a sum of money (or perhaps receiving a horse in trade) in exchange for providing a service could be deemed as a professional.

Professional can be rather like “quality” – just as quality comes in good and bad, so do professionals.

This particular screw happens to be just one of thousands on a very expansive roof – an 88 foot clearspan width by 120 foot long horse riding arena. It turns out the roof has more than a few roof leaks, which (if there are many screws installed like this one) is not sadly overly surprising.

Apparently the partially installed screw method was quite popular for this particular installer, as witnessed in this photo:

It seems whomever was working the eave edge of the roof wasn’t quite certain as to what a seated screw should look like.

While we are looking at this second photo, take heed at the first rib of steel closest to the middle of the page. The overlap is clearly not tight against the underlap.

My suspicion is the builder did not predrill the roof panels (as instructed in the Hansen Pole Buildings’ Construction Manual), given the propensity for screws elsewhere on the roof to have been driven in at an angle, as well as places where two screws sit about two inches apart from each other, with one of them sporting a fresh coat of caulking (not an approved fix for a missed screw).

The engineered building plans and the installation instructions also call for screws to be placed on each side of every high rib at the eave and ridge. These areas have the greatest sheer loads to carry and a shortage of screws at these locations will eventually cause slotting under the screw heads, followed by even more leaks.

Strangely (or maybe not) we rarely have a DIYer experience a roof leak……think about it.

What is the Correct Overhang Distance?

Welcome to Ask the Pole Barn Guru – where you can ask questions about building topics, with answers posted on Mondays.  With many questions to answer, please be patient to watch for yours to come up on a future Monday segment.  If you want a quick answer, please be sure to answer with a “reply-able” email address.

Email all questions to: PoleBarnGuru@HansenPoleBuildings.com

DEAR POLE BARN GURU: I am still building my pole barn. I have recently finished the roof metal and ridge cap. While looking at the construction manual for installing the soffit and roof trims I noticed a conflict of information.

On page 119 figure 16-4 shows an overhang of 2 1/4” to 2 1/2”

On page 365 figure 55-20 shows an overhang of 1 1/2” to 1 3/4”

Which is the correct overhang distance? AARON IN VIRGINIA

DEAR AARON: Actually BOTH of them are correct, and here is why. On Page 119, the overhang is from the outside edge of the eave girt BEFORE the steel siding is applied (no sidewall eave overhang situation). The steel siding is 3/4″ thick, which leaves 1-1/2″ to 1-3/4″ of overhang past the siding after it is installed. On Page 365, the overhang is beyond a fascia board (buildings with eave overhangs). The net resultant of each is the same and perfect for gutters, if they are installed.

Mike the Pole Barn Guru

DEAR POLE BARN GURU: Hi, We purchased a Pole Barn kit from you several years ago.  When installing the roof my husband (the non-builder man) would miss the wood that he was supposed to screw the roofing screw into.  With that said we have screw holes in the roof which are really leaking.   We really need to try to plug the screw holes somehow!

What would you suggest to use to plug the holes in my metal blue roof? SHIRL

DEAR SHIRL: There is a good chance this is easier solved than imagined.

Step #1 Clearly identify where the leaks are – puddles on the floor are a good clue, as are “shiners” (screws which have obviously missed a purlin).

In most cases the “misses” will be several screws along a particular roof purlin where the purlin bowed up towards the ridge or down towards the eave past the pre-drilled holes in the roof steel. If this is the case, one person needs to carefully get up on the roof and utilizing adequate safety precautions, remove the screws from that particular purlin. From the inside, another person needs to push the purlin uphill or downhill far enough so as the screws will now hit it.

In the case of just a random miss – remove the screw, have one person hold a block of wood securely beneath the hole and run the screw back through the hole.

Screws which were not driven in straight or with the EPDM washers adequately compressed can also be a source of leaks, which can be remedied by removing reinstalling the offending screws.

In no case should caulking or other sealants be applied to a screw hole, as they will not afford a permanent fix.

Mike the Pole Barn Guru

DEAR POLE BARN GURU: Howdy,

Noticed a magazine report on treated poles and questioned our treater on their .23 treatment vs. the .60 you mentioned and they said it is equivalent, the only difference is the chemical used. Curious on your take, and if you feel these are ok to go in the ground?

JOEL from MIDLAKES METAL SALES

DEAL JOEL: As best I can tell from the data presented, any of the treatment combinations which meet the UC-4B treating requirements should be totally adequate for structural in ground use (burying them in the ground).

For more reading on MCA pressure preservative treating: https://www.hansenpolebuildings.com/2013/08/mca-micronized-copper-technology/

Here is an article I wrote for Rural Builder magazine on pressure treating, as well: https://www.hansenpolebuildings.com/2014/05/building-code-3/

Mike the Pole Barn Guru

Steel Roof Leaks

Welcome to Ask the Pole Barn Guru – where you can ask questions about building topics, with answers posted on Mondays.  With many questions to answer, please be patient to watch for yours to come up on a future Monday segment.  If you want a quick answer, please be sure to answer with a “reply-able” email address.

Email all questions to: PoleBarnGuru@HansenPoleBuildings.com

DEAR POLE BARN GURU: I have a 20 year old pole barn that I replaced the screws with washers…My steel roof leaks in the area half way between the top and the edge of the roof. the water runs across the two by four inside and I am not sure where the leak really is.Thanks MILES IN PRINCETON

 DEAR MILES: I can tell you how to find where the steel roof leaks….it involves two people, a ladder and a hose. One person stands inside of the building and makes lots of noise when the water starts to leak. The other ventures cautiously, utilizing proper safety procedures and equipment, onto the roof with hose in hand.

 Begin with running the hose above the spot where water has been showing up on the inside of the building. Give it at least a minute – no water, chances are the leak is not there. Go up the roof to the next row of screws and repeat. Eventually you will find the spot where the water is coming in.

 Now – how to fix it. When replacing old roof screws always go with both larger diameter shanks as well as longer parts. Putting the same size screw into a deteriorating hole is not going to be a solution to the problem. Remove the suspect screws and replace them appropriately, this should be a resolution to the problem, unless there is an actual hole somewhere in one or more of the steel panels.

 Mike the Pole Barn Guru

DEAR POLE BARN GURU: Do you have any type of financing available ???

KEITH IN COWLESVILLE

 DEAR KEITH: We have numerous options available for financing, and in many cases – your entire post frame building improvement (not just the building kit package) may be able to be financed. Monthly payments will very due to credit worthiness.  You can begin the free process at: https://www.hansenpolebuildings.com/financing/ 

Mike the Pole Barn Guru

DEAR POLE BARN GURU: Is it possible to have the top half of the gambrel roof just a bit longer so there is less of a peak and a somewhat flatter? LOST IN SPACE DEAR LOST: The beauty of a gambrel style roof is the pitch break locations (height above and horizontal distance from the eave) can be placed anywhere one’s heart desires and eye fancies.

There is a proportion for gambrel roofs which most people generally consider to be the most pleasing: https://www.hansenpolebuildings.com/2012/06/gambrel/ 

Mike the Pole Barn Guru

DEAR POLE BARN GURU: Thank you for adding me on Facebook. I live in northern Illinois. I’m looking into adding a new building on my farm. I’m thinking 72’x130’x19′. A lot of people in my area use FBI buildings and I have a sales rep coming out in a couple of weeks. I’ve read a lot of your post and it gave me a couple of questions to add to my existing list of questions. What is the biggest mistake you see people in my shoes make and do you have any links to any similar buildings? Thanks again. STEVE

DEAR STEVE: I love Facebook, it is amazing how many clients chat with me on it – or just check in to read my daily blog posts. The number one mistake I see people make is thinking the only way to get a building like this is to hire a general contractor. Don’t get me wrong, FBI (https://www.fbibuildings.com/) does a great job, I’ve known the Bahlers for decades and one of my former employees worked for FBI.

But, at the end of the day, it comes down to getting the most for your investment. If you do not have the time or manpower to build it yourself, look into buying a package and hiring an erector to assemble it. Chances are you will save 25% or more right there. At the least, get a quote from us on your materials – it will keep anyone else honest. Oh – and always buy an engineered building.

Mike the Pole Barn Guru

How to Install Steel Screws on a Roof

Welcome to Ask the Pole Barn Guru – where you can ask questions about building topics, with answers posted on Mondays.  With many questions to answer, please be patient to watch for yours to come up on a future Monday segment.  If you want a quick answer, please be sure to answer with a “reply-able” email address.

Email all questions to: PoleBarnGuru@HansenPoleBuildings.com

 DEAR POLE BARN GURU: How much does a cupola weight? Wondering if I would need a crane to lift it onto the roof. Thanks VANQUISHING IN VANCOUVER

DEAR VANQUISHING: The cupolas we typically provide are going to be more than manageable by hand, for most people. On my own building (which is very large), I have a 48 inch square cupola (also very large).  The universal base (which is installed first, by itself) weighs 29 pounds. In my own case, I have a cupola with glass sides, so it is slightly lighter, weighing in at 35 pounds. The louvered model weighs 60 pounds. The cupola roof, weighs 55 pounds and weathervane 13. Our most commonly supplied cupola is 24 inches square. Its universal base weighs 29 pounds, the louvered sides 18 pounds, roof 10 pounds and weathervane 5 pounds.

Mike the Pole Barn Guru

DEAR POLE BARN GURU: I’m constructing a pole barn using steel roof trusses with 2×6 roof purlins. The lumber is not very straight and my screws are missing about 10% of time. Not knowing what else to do, I have currently just left them in place. What is the right move for so many missed screws?

Thank you! GRINDING IN GATESVILLE

DEAR GRINDING: Some background for those who are not familiar with the construction of your type of building….

Although we do not utilize steel trusses for our buildings, there is nothing wrong with a steel truss which has been properly fabricated from drawings provided by a RDP (Registered Design Professional – architect or engineer).

Typically steel trusses have clips or angles welded onto them, to accept the roof purlins – which are installed on edge. If the columns are set plumb and the clips are al at the same locations from truss to truss, then a good share of the battle has been won before beginning.

To avoid roof leaks from misses there are some steps to take:

First – make sure the roof plane which is to be sheeted is square and the eave line is straight.

Second – To maintain straight screw lines and avoid roof leaks, stack roof steel in a pile, mark screw locations (we’ve found a “dry erase white board” marker works well) and pre-drill steel sheets with a lesser diameter drill bit than the screws. For best results, drill no more than four sheets at a time. Be sure to use a soft cloth to wipe off the steel shavings that develop from putting in the holes with a drill and wipe off the marker lines before installing the panels.

Third – Distance from roof framing edge to first roof steel sheet edge is to be consistent from top to bottom. If NOT and your end wall is not properly aligned, straighten before roof steel can be properly applied.

Fourth – Keep panels from stretching or compressing in width as they are installed. Panels cover 36” from major rib center on one panel side to major rib center at other side of panel. Measure each panel as installing or pre-mark building frame (or underlying insulation) every 36” to check panel width.

As roof steel panels were predrilled, if screws miss a purlin, remove the screws which missed purlins, plus screws within three or four feet of each side of miss (along the same purlin). From inside of the building, have someone push the offending purlin either “uphill” or “downhill” until screw(s) can be driven through each hole into that purlin.

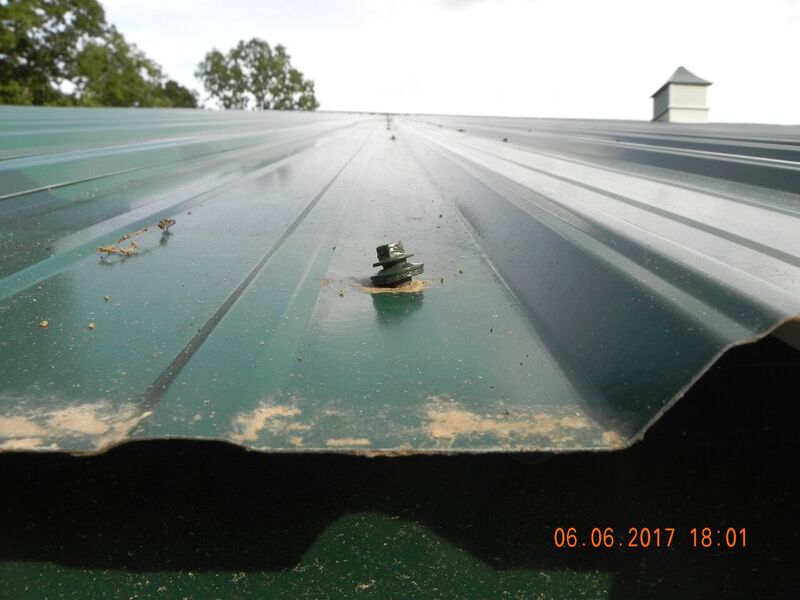
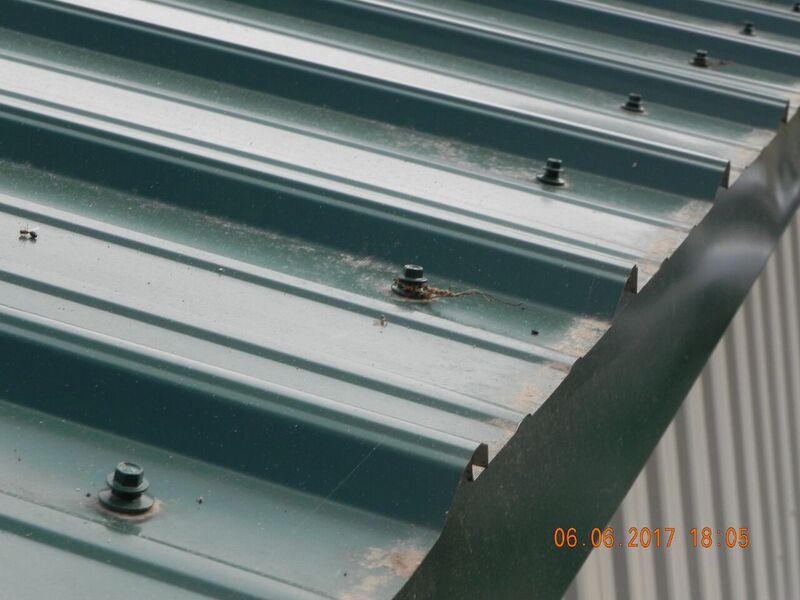
If a “random miss” occurs, the repair is to have someone hold a wood block underneath hole and drive a screw through hole into block. This is the manufacturer’s only approved repair for a missed screw.

Do NOT, under any circumstance, attempt to fix a missed screw hole with caulking. It will be a temporary fix at best and you will end up with leaks over time.

If the panels were not predrilled, you could have some issues which just cannot be fixed and the only solution may be to replace the roof steel and try it all again.

Good Luck!

Mike the Pole Barn Guru

Dear Pole Barn Guru: How to Clean a Steel Roof?

How to Clean a Steel Roof

Welcome to our newest feature: Ask the Pole Barn Guru – where you can ask questions about building topics, with answers posted on Mondays.  With many questions to answer, please be patient to watch for yours to come up on a future Monday segment. 

Email all questions to: PoleBarnGuru@HansenPoleBuildings.com

The first question today is from a client who purchased a building “a few years back” from Hansen Pole Buildings…


DEAR POLE BARN GURU ~ It’s been a long time.  I must say that the building has worked out very well.   No problems at all, just a single leak at one screw on the roof that I will repair this weekend.  I assume that removing and replacing the screw will work.  Should I put some sealant on the screw? My other question is that I have moss starting to develop on the roof and it has become a bit dirty over the years.  What is the best way how to clean a steel roof?

Thanks,

Jeff

DEAR JEFF ~        

Usually a leak occurs because the screw has not been driven straight into the purlin, it is not fully “seated”, or it has caught just the side of a purlin. It is best to first try to determine which of these is your particular case. If there is no wood deterioration below the screw hole, the same screw can normally be reused. You may want to place some sealant in the screw hole, not on top of the roof steel, or on top of the screw itself. If wood deterioration has occurred, you are best to replace the screw with one of a larger diameter.

To maintain original building panel finish, the only regular maintenance necessary to clean a steel roof is an annual washing. Remove airborne dirt and weather-related streaks with a garden hose or pressure washer and a bucket of sudsy water.  If rinsed frequently, a garden hose may be all which will be needed to use.

Light panels may be washed with either mild detergent-type cleaners or by steam and high pressure spray systems. Apply cleaners with sponge or soft brush and rinse thoroughly in cold water to eliminate cleaning agent film build-up. Follow cleaning agent manufacturer’s instructions. Test small area before applying over entire surface. Hard water deposits may be removed with a 10% acetic acid solution in cold water. Rinse thoroughly. 

DEAR POLE BARN GURU: Is it normally cheaper to build a building long and narrow, but single story 30’x90′ or is it cheaper to build a building roughly 50’x50′ but, two stories including a basement with tuck under garage?  Which is the cheaper shape to build?  Is the eave light panel cheaper than windows?  Or is it cheaper all together to have a detached garage?

Sorry for all the questions… We are looking at buying an older house in our price range but they are on the market for about 5 days with multiple offers.  We have started looking at buying a cheaper lot and putting cheaper/reasonable house on it.  I am a drafter by trade and have numerous plan books.  We know what we want, just don’t know what styles or designs are cheapest.

Does Hansen Pole Building kits just include the exterior?  If our primary use is a residential home, would we have to finish the inside ourselves and cost above and beyond the shell cost, or does your cost include the shell plus interior finishes.  We know where we want to spend money and we know where we want to save.

Thanks any info helps. DEREK

DEAR DEREK: In post frame (pole) building construction, single story will always be less expensive than multi-floor. Buildings closer to square, will be slightly more cost effective than those which are long and narrow. And, as long and narrow becomes very long and very narrow, closer to square is even more cost effective. While polycarbonate eave lights are far less expensive than windows, they have next to no resistance against heat loss, so are not very effective for residential construction. Attached garage will be more affordable or convenient than detached.

Hansen Pole Building kit packages include structural elements – you would need to add non-load bearing interior walls & finishing.


Roof leaks: Where does condensation come from?

Roof Leaks: Where does condensation come from?

When the weather turns cool in the fall, we get calls from customers with “roof leaks”, even when it has not been raining. These “leaks” are actually from condensation and are often reported as, “My steel roof is sweating”.

Steel roofing does not sweat. Having no sweat glands, it cannot produce moisture on its own. Condensation is a result of warm, moist air coming in contact with anything below the temperature of the dew point.

A classic example – ice cold beer on a warm day, moisture forms on the outside of the glass. The beer glass is not sweating and probably not leaking. It is just colder than the dew point causing moisture from the warm air to condense on the outside of the glass. Glass cannot absorb moisture, causing water droplets to trickle down the sides of the glass, creating a puddle or ring around the base.

Like glass, steel does not absorb moisture. Condensation, forming on the underside, falls off and drips on everything below. As steel is a heat conductor, it gets to the same temperature as the outside air very quickly.

Where does this moisture come from? Even in naturally low humidity climates, some degree of moisture is always in the air. You, as well as any animals housed in your building, produce a tremendous amount of water vapor, merely by exhaling. However, most of the moisture is coming from the ground beneath your building.

Do you believe concrete is a solid? Concrete actually acts far more like a sponge, soaking up moisture from below and allowing it to pass through into your building.  Check out a concrete floor when frost is coming out of the ground and the air is warmer above.

Try this experiment either on a humid day this summer, or on a cool day this fall – lay a piece of cardboard on the concrete floor in your building overnight. The next morning lift the cardboard, the underside will be damp from moisture passing through the concrete slab!

Reflective Insulation

Reflective radiant barrier will prevent most condensation

OK, so what do you do about condensation issues in a building?  If the roof has steel siding, this is actually pretty easy.  We put a condensation barrier under the steel, such as reflective radiant barrier. This has white vinyl on one side and aluminum facing on the other, to reflect heat from the sun, with a layer of air cells sandwiched in between.  It’s actually the air cells doing all the “no condensation” work by creating a thermal “break”.  Bonus points are having deflection of heat with the silver surface, making the building cooler.  And yes, this reflective radiant barrier does have a very minimal “R” value.

Back to the water issues.  Putting just plastic sheeting or house wrap on your building won’t do the trick against condensation.  You need a thermal break between the warm air and the steel.  And down the line in another blog, I’ll discuss building ventilation to decrease condensation as well.  For now, just keep in mind roof “leaks” don’t have to happen.

To receive more pole building tips and advice subscribe to the pole barn guru blog!