Tag Archives: post frame building kit package

How Not to Sheetrock Your Barndominium

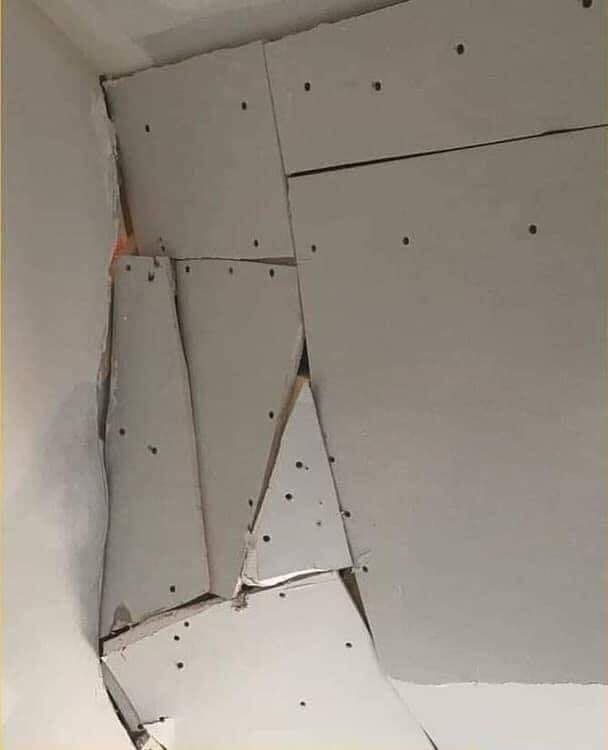
How Not To Sheetrock Your Barndominium

Gypsum wallboard (aka Sheetrock or drywall) is used as wall and ceiling covering of choice for nearly every barndominium, shouse (shop/house) or post frame home. It affords a plethora of advantages over other interior finishes – for many, it is about cost savings. For others it is fire protection or a desire for sound deadening.

For shop areas, I see too many (in my opinion) using steel liner panels as an interior finish – usually in a misguided belief they will be a less expensive solution. Rarely is this true and liner panels are not without their own issues, as I have expounded upon previously: https://www.hansenpolebuildings.com/2013/08/steel-liner-panels/

Drywall can be installed quickly. My first summer out of high school I worked for B & M Inland Wallboard as a laborer primarily doing taping and texturing.  My boss, Joe Borg, was several things – reasonably priced (material and labor for standard homes ran 50 cents per square foot of sheetrock – hung, taped and textured with 5/8” on ceilings and firewalls, ½” elsewhere), quick (his hanging crews would do 2000 square feet of rock per man, per day for a nickel a square foot) and a fanatic about quality.

Sheetrock back then (40 plus years ago) was even more of a bargain than today, roughly 1/3rd cost. Even then, I saw some jobs not far removed from what is pictured above! When I was Sales Manager for Coeur d’Alene Truss, we did a truss job for a contractor, Joe Michielli, directly across the street from a rival truss company’s sales person. Following up, to see how everything went, Joe was busily and proudly hanging drywall. Little pieces of drywall – as Joe was bound and determined to not have any scraps larger than a foot square. I can’t even fathom how he ever managed to tape and texture it!

(As a seven degrees of separation thing, in 2017 Hansen Pole Buildings provided a post frame building kit package in Laramie, Wyoming to Joe’s son!)

There are methods of hanging, taping and texturing drywall to get a finished product my boss Joe Borg would have been proud of. And post frame buildings are perfect for this, as you can read here: https://www.hansenpolebuildings.com/2019/09/11-reasons-post-frame-commercial-girted-walls-are-best-for-drywall/.

Shipping Post Frame Building Kits to Canada from U.S.A.

Canadians frequently ask about shipping our post frame building kit packages. This should be of assistance:

YRC Freight is the only transportation provider to maintain a dedicated full-time staff at primary border crossings between United States and Canada.

YRC Freight takes complexity out of cross-border shipping. They make sure your post frame building shipment moves through customs just as reliably as it does on road.

YRC Freight has dedicated border-crossing experts and twelve Canada/U.S. Customs gateway locations.

Blaine, Wash./Pacific Highway, BC

Sweetgrass, MT./Coutts, AB

Pembina, ND./Emerson, MB

International Falls, MN / Ft Frances, ON

Detroit, MI/Windsor, ON

Port Huron, MI/Sarnia, ON

Lewiston, NY/Niagara Falls, ON (Lewiston Bridge)

Buffalo, NY/Fort Erie, ON (Peace Bridge)

Alexandria Bay, NY/Lansdowne, ON

Champlain, N.Y./Lacolle, QC

Derbyline, VT/Stanstead, QC

Calais, ME/St. Stephen, NB

Where your shipment crosses the border depends on its origin and destination. YRC’s highway dispatch network uses most-direct routes for your post frame building kit, assuring efficient, on-time delivery.

When shipping from United States to Canada, Canadian importer or purchaser may use a Canadian Customs Broker. If possible, shipper should identify broker or party acting as a broker on bill of lading.

YRC Freight offers broker-inclusive service for U.S.-Canada cross-border business, providing customs broker service along with cross-border transportation.

It is important responsible party (Post frame building purchaser) contact the forwarding agent and/or customs broker(s) to set up an account. Like any business relationship, they will need to agree on services to be provided, charges for these services, set up payment or credit terms, etc.

When a customer fails to complete this important step of international shipping, delays are unavoidable at United States and Canadian borders. When a broker and/or forwarder relationship has been established, all parties involved must be informed as to your chosen forwarding agent and customs broker designated to process your post frame building shipment across the border. This should be done before YRC picks up your post frame building.

Importer of record is normally billed by his/her broker for duties and taxes. Customs broker determines duty (if applicable) along with appropriate taxes and reports those taxes to customs on client’s behalf.

YRC Freight has border coordinators available to answer all your questions and facilitate cross-border moves.

For Northbound (shipping from U.S. to Canada) Border Ambassadors can be reached at:

1- 800-329-0973.

Before shipping a post frame building kit package, Hansen Pole Buildings can provide all available information about the product, its components and manufacturing process to your customs broker.

Process of classifying some products can be time-consuming, depending on complexity and types of materials in your post frame building kit package.

Ready to get started? Dial 1(866)200-9657 to speak with a Hansen Pole Buildings’ Designer today!

Free Post Frame Foundation Building Calculator

Free Post-Frame Building Foundation Engineering Calculator

No, such a thing as a free post-frame building foundation engineering calculator does not exist. However there always seems to be someone out there who is in search of “engineering for free”.

Reader KELLY writes:

“Guru,

Do you have a link to a pole foundation engineering calculator?

Looking for column depth / diameter for:

40x60x14

10 ft column spacing

35 PFS load

115 wind load.

No floor for constraint.

thanks.”

Mike the Pole Barn Guru responds:

There is no such thing as a “pole foundation engineering calculator” therefore, there is also no link to one. The design of post frame (pole) building foundations is one which is best left in the hands of RDPs (Registered Design Professionals – architects or engineers). When provided with all the pertinent information about your proposed building, they can design not only a structurally sound column embedment, but also your entire structure (which I whole heartedly recommend).

You’ve provided some of the information a RDP would require, but I will expand upon it:

Will the building have adequate sheathing (which could be roll formed steel roofing and siding) to transfer wind loads from roof to ground through endwalls? And will the sheathing be adequately fastened to underlying frame to take advantage of sheathing stiffness? If yes, diaphragm design can be utilized in your building design.

The difference in forces carried by sidewall columns with and without an adequate diaphragm is a factor of 4! If diaphragm design cannot be utilized, expect significantly larger columns, deeper holes and more concrete around columns.

What type of soil is at building site? Strength and stiffness of your soil will impact both depth and diameter of holes.

How are you measuring your 14′? It should be from bottom of pressure preservative treated splash plank, to underside of roofing at sidewalls. It does make a difference.

Does your building have overhangs?

What is the roof slope?

What is wind exposure at your site? The difference in force against columns between Exposure B and Exposure C is roughly 20%.

In the event you are not interested in procuring services of a RDP, the NFBA (National Frame Building Association) has available a Post-Frame Design Manual and you could attempt to do calculations yourself. For more information please see: https://www.hansenpolebuildings.com/2015/03/post-frame-building-3/.

Of course you could always invest in a fully engineered post frame building kit package. Besides engineer sealed blueprints and calculations, you would also get materials delivered to your site and a multi-hundred page Construction Manual to guide you through to a successful completion.


Reader Put Up a Competitor’s Shed

We Put Up a Competitor’s Shed

Sadly not everyone does adequate research to realize how outstanding of a value added a Hansen Pole Buildings’ post frame building kit package truly will be. Long time readers of these blog articles (nearly 1600) and questions answered in Monday’s “Ask the Pole Barn Guru™” column (around 1000) have come to understand most problems solved by me come from other people’s buildings.

How serious am I about our value:
I am offering to shop for you. Yes you heard me right. You give me up to three names of competitors to Hansen Buildings, where you can purchase a complete wood or steel framed pole building kit package, and I will shop them to get quotes for you.
Now I say three, because frankly, some people just are not very prompt or cooperative when it comes to getting back with price quotes.

Why would I do this? Comparing “apples to apples”, I know our price will beat theirs, every single time. I am doing this for your peace of mind. I guarantee other prices will be higher. And I will provide you with documentation to prove it!

There is a catch…..before I go shopping, you have to place your order for your new Hansen Pole Building kit….. subject to me “proving my point” by going shopping. Your payment to us will not be processed for ten calendar days. Within seven days of order, you’ll have competitive quotes in hand, or my documentation of having hounded them every week day for a week trying to get pricing for you (seriously, if you have to hound someone for a price, what kind of service will you get after they have your money?).

After I email you proof, if you seriously want to purchase from one of these competitors, just let me know before ten days from your investment and we tear everything up and go away friends.

Ask The Pole Barn GuruReader DAVE in ROBERTS apologizes for buying from a competitor and writes:
“Sir. Your blog has been most helpful. We put up a shed not one of yours but a competitor. (sorry). Shed size is 36×48. First mistake was we did not put a barrier under the concrete. Our plan now is R 19 in walls. One inch of foam plus R 39 in ceiling. I wired in two ceiling fans to move air with natural gas heat. Does this sound like a good formula, oh wise one?

Mike the Pole Barn Guru says:
Start by sealing your building’s concrete slab. This will be a possible solution: https://www.hansenpolebuildings.com/2018/11/siloxa-tek-8505-concrete-sealant/.

I am just not a fan of natural gas heat as it adds a tremendous volume of water vapor into your building. You’re going to have to find a way to exhaust all this water, else your building will have humidity issues.

Although now too late for you, there would have been alternatives: https://www.hansenpolebuildings.com/2016/12/modern-post-frame-buildings-geothermal/.

Let’s discuss your ceiling. I am hopeful you have trusses designed to support a ceiling load of five psf (pounds per square foot) or greater. Also hoping you have ventilation covered with enclosed vented eaves and a vented ridge. Unless you specifically asked for it, your building’s roof trusses probably do not have raised heels to allow for full insulation thickness above walls and in area closest to sidewalls.

Provided your trusses will support weight of gypsum wallboard, install any necessary framing to reduce drywall spans to two feet or less. Place 5/8” Type X sheetrock across bottom of ceiling framing. If you do not have a vapor barrier under your roof steel, spray two inches of closed cell foam insulation across the entire underside. Once you have paid for this, you will regret not having made other condensation prevention decisions.

While spraying foam – have it added to area closest to eave sidewalls (spraying onto top of ceiling drywall). Make certain to leave an inch of airspace minimum above foam, so air can flow in from eave vents. Foamed area should continue towards center of building until it reaches at least a six inch thickness. Balance of ceiling should have no less than R-45 and ideally R-60 of fiberglass insulation blown in.

For walls, I am hoping you have placed a Weather Resistant Barrier (WRB – like Tyvek) between framing and siding. If not, you have a couple of choices. You can remove wall steel from a wall, install a WRB and reinstall steel (repeat for each subsequent wall), or spray two inches of closed cell foam to inside of siding. Unless your building has full thickness bookshelf girts, install framing across inside of walls to eventually support wall finish (I recommend sheetrock). Fill entire insulation cavity with BIBs https://www.hansenpolebuildings.com/2011/11/bibs/.

Glue two inch thick closed cell rigid insulation panels to inside of wall framing, sealing all joints. Glue sheetrock to inside of insulation. Now you have a truly well insulated post frame building.

Building Your Own Gambrel Barn Wood Roof Trusses

Gambrel style rooflines are often enticing, they offer the feeling (however not the reality) of getting added space for free. Building your own gambrel barn trusses might appear on the surface like a way to make this even a greater savings.

This was prompted by an inquiry from reader DON in WAYNE. Don writes:

“I am building a 24 ft. wide x 40 ft. length barn. I am going to build a gambrel truss with 2×8 and with 4 ft. wide gussets. How far apart should I space them using purlins and should I use 2×4 or 2×6 purlins. I was thinking of going 4’ wide with the trusses and using 2×4 spaced 2 ft. wide for the purlins.”

Mistake number one is even considering building your own trusses, on site, unless you are constructing them from drawings designed and sealed by a Registered Design Professional (RDP – licensed architect or engineer). Chances are way too good (100% guaranteed) you are dooming your building (and possibly its occupants) to failure. In all seriousness, prefabricated steel connector plated wood trusses are the only way to go – you will save money in the long run and you will be able to sleep soundly at night.

Your second mistake is in trying to be your own building engineer. If it was my own building (depending upon the design wind and snow loads), I would probably be using a single truss on each endwall and double (two ply) trusses every ten feet, bearing directly upon the columns. In my humble opinion this will give you the safest end resultant as the trusses can be notched into the columns and not possibly slide down the columns (or have a questionable connection to a header or truss carrier). You can then utilize 2×6 (or 2×8 depending upon loads) roof purlins on edge to support the roofing.

Your idea of using 2×4 (I am guessing flat over the tops of the trusses) every two feet and spanning four feet will not work unless you have the availability of lumber graded higher than the Standard and Construction material from your local lumber yard.

To avoid making crucial mistakes, which could waste your hard earned money, I would recommend you invest in a fully engineered post frame building kit package.


Animal Shelters

Animal Shelters – a Building Problem
Animal shelters have many challenges facing them in their quest to unite abandoned animals with good homes. Battling people’s preconceived notions about rescue pets, public ignorance over curbing animal overpopulation, lack of centralized funding for these non-profit shelters, and the staggering number of animals all contribute to a veritable host of problems to surmount. One of the best ways to help shelters combat this issue is to raise public awareness, and spread information about the difficulties faced in providing such a valuable service.

Agricultural Pole BarnRunning an animal shelter is difficult; you have to balance the desire to help as many animals as you can against the need to run profitably in order to keep your doors open. Compounding this issue is there is little federal or subsidized funding available for humane societies, meaning many of the non-profits have to make hard decisions in how many animals they can help, how much staff they can maintain, and how effective they can be.

I’ve seen both photos and in real life, some truly beautiful animal shelters. Some of these had to have costs over a million dollars! Not very many animal shelters can do fund raising and/or acquire grants and donations to this extent.

A highly affordable solution for animal shelters on a budget and in need of one or more structures is post frame building kit packages. For a fraction of the investment into an architecturally designed beauty, volunteer help can be mustered for a “barn” raising.

Allocating fewer hard fought funds towards buildings allows more animals to be rescued and placed in deserving homes. Hansen Pole Buildings has a program which helps stretch the budgets of non-profit animal shelters. Any 501(c)(3) exempted organization qualifies for a 10% discount off from the everyday retail price of a Hansen Pole Building.
For more reading on the Hansen Pole Buildings’ 501(c)(3) program please read: https://www.hansenpolebuildings.com/2013/08/charitable-organizations/.

With experts to assist in design, complete and detailed engineer sealed blueprints, a step-by-step construction manual and a discount – this makes for a winning combination which saves not only money, but most importantly animals!

School Bus Barn

Considering a Post Frame Building as a “Bus Barn.”

In Underwood, MN, school district chairperson Frank Fee recently toured the district’s new bus garage (aka school bus barn) and noted, “You’d never know it’s a pole barn”. Indeed though it is, with internal parking for 14 buses, it is heated, has an office and a wash bay.

As far as facilities go, new bus garages are often among school district’s biggest needs. The challenge being school district voters often vote against funding as they feel the proposed building plans are too expensive.

Overhead door pole barnThe costs of not having an appropriate bus garage will most usually be more than the cost of the structure. Buses deteriorate from weather and vandalism when stored in outdoor or unsecured areas. The lifespan of a regularly used route school bus varies from 10 to 16 years, depending upon weather and miles, with 20 years seemingly being on the extreme high end. With the price tag of a new bus being approximately $110,000 being able to squeeze an extra year or two of service out of each bus can result in some significant savings.

Smaller garages may contain the minimum engineering facilities, restricted to light servicing capabilities only. Garages may also contain recovery vehicles, often converted buses, although their incidence has declined with the use of contractors to recover break-downs, and the increase in reliability.

Overnight, the more valuable or regularly in-service buses will usually be stored in the interior of the garage, with less used or older service vehicles, and vehicles withdrawn for storage or awaiting disposal, stored externally.

Often bus garages will feature staff canteen/break rooms and rest rooms for drivers assigned to ‘as required’ duties, whereby they may be required to drive relief or replacement buses in the event of breakdown.

Post frame bus barns give an affordable solution to school districts on a budget. They are usually far less expensive than architecturally designed buildings. Architects are not cheap and an architect who does not understand post frame construction won’t design a building as optimally or cost effective as a company which specializes in post frame building kit packages.

While steel covered post frame buildings are the most durable and affordable, any material can be used for exterior finishes and roofing – keeping any review committees smiling.