Tag Archives: Pole Building Trusses

The Search for Building Steel Trusses

In my several years of being involved in the metal plate connected wood truss industry only twice times did we ever fabricate trusses which were over 80 foot in length. As the forces which have to be carried by a truss are increased by the square of the span, say a 120 foot span truss has to withstand 225% of force than an 80 foot span! Not only do the costs of wide span wood trusses increase dramatically beyond 80 feet, most fabricators do not have the equipment to build or deliver them.

The requirements for independent bracing design and inspection for prefabricated wood trusses of 60 foot span and greater also increases the associated challenges. (Read related article here: https://www.hansenpolebuildings.com/2013/12/wide-span-trusses/).

Because of this I have been keeping my eyes peeled for a fabricator of webbed steel trusses who could fill the niche of providing post frame building trusses which could span 80 to even 150 feet with a high degree of quality and a realistic price.

I recently saw a Facebook page for a company which builds steel trusses, so I commented on their page asking if they could produce wider spans. While I never got a reply from the company (obviously they do not keep up with their own social media), I did get an interesting message from one of their not too happily satisfied clients:

“Good morning Mike, you don’t know me but I wanted to express my concern to you about a post I saw you wrote on Sxxxxxxx Pole Barns Facebook page about large span trusses. I myself ordered an 80x100ft clear span kit from Matt Sxxxxxx. After the incomplete project of Matt and his 2 workers he left me with an incomplete kit and trusses that look good but aren’t strong. I am fixing a completely broken truss now and out of 11 trusses 8 are cracked at welds. He used too small of steel and welding and fabrication work is less than impressive. He has cost me over $30,000 so far and I’m still left with installing this building myself. I do not recommend him to anybody for anything. I will be pursuing him legally. I really just wanted to make you aware of my situation because I myself am dealing with the clear span kit as well.”

Certainly appears this company is not one which we will ever be doing business. Maybe somewhere in the future it will be Hansen Pole Buildings in the steel truss business, where we can control the quality of the product with a high degree of certainty!

My words of caution for anyone considering a webbed steel truss – ask for engineer sealed drawings to match the loading conditions of your particular site. Confirm the trusses are being welded by certified welders, and ask for documentation of passing independent third party inspections on no greater than a quarterly basis as a verification of quality control.

Carport Attachment: Part II

We Don’t Always Do Things Perfect, But We Do Listen Part II

Last summer Hansen Pole Buildings Supplied a pole building kit package to a client who experienced a few challenges and took the time to address them.

Here is a portion of the email I was responding to:
“On the design flaws, and other issues, here is what I have experienced.

If you just joined in this blog – read yesterday’s blog for Part I in a 4 part series from a client who experienced some construction challenges…

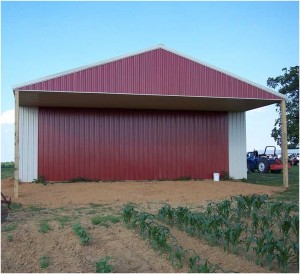
“2-Carport attachment.

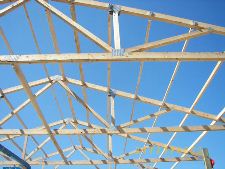
My plans have a 12 foot carport section on the front.  The engineering on this section is very confusing.  The plans state that the double truss system is supposed to be used but, the outside truss is supposed to lowered by roughly 6 inches to make room for the purlins to travel over the top of it.
With this system there is no double truss.  There is one truss that is supporting the load of two sections of roofing.  To further complicate the matter, the trusses that were engineered and supplied were constructed with 2 X 6’s.  What does this do, well, when I lowered the outside truss 6 inches there is absolutely NOTHING to attach that truss to the other truss.  A few spots of webbing is it.  This seems like a totally weak link in the system and I cannot figure out why this was done this way.
It seems to me that you would have run a normal double truss and then nailed a siding backer onto the outside truss for tin placement.  This dropped truss created other issues as well.
When placing the X bracing for the carport as well as the first bay in, the X is placed at 2 different locations on the bottom attachment.  On the carport section the X bracing is attached to the outside dropped truss, 6 inches below the other truss.  On first interior bay the X is attached to the upper truss.  The two braces are not pushing on each other.  And, I have no idea how I am going to place the tin on this section because I have a 2X4 10 inches above my garage door.  Am I supposed to cut around the 2X4 and try and figure out how to make it work?”

carportMy response: Actually in the hundreds of buildings we have provided with carports, you are quite honestly the first person who has ever brought forth any of these issues as being challenges. Your bringing this to our attention is greatly appreciated.

With Hansen Buildings knowing the carport to enclosed portion the trusses were not going to be at the same height (per the plans), the trusses for your building were ordered and designed to work with a single truss placed every six feet (the worst case scenario).

One truss does not support two sections of roofing, as the end of the purlins in the direction of the carport rests on top of the top chord of the lowered truss. Each truss at this juncture is supporting six feet of roof, just as it was designed to be.

Your recommendation of keeping both of these trusses at the same height and having a siding backing nailed to the face will be taken under serious advisement. The challenge will be, in many instances, the wall columns in this area are 4×6, oriented with the wide face against the wind. In those circumstances, it would be impossible to notch three inches into a 3-1/2” thick column. We are in the process of discussing with our engineers turning the corner and endwall columns 90 degrees to be able to notch in the two trusses, as you suggest. Because we do so many different applications, we need to see if this will cause other challenges.

The idea of the X braces is not to push against each other – it is to create a rigid brace frame which is restrained against buckling in both directions and transfers load into the roof diaphragm. There is no structural reason for them to be at the same height.

Install the steel siding on this wall first, then the X brace. A small slot can be created, using a punch, to slide the Simpson LSTA12 bracket through for attachment.

“3-Girt Spacing

The girt spacing is an interesting way to save a few hundred bucks, probably not mine.  The plans call for the girts to be about 40 inches on center.  I know this is not exact but close enough.  This is the absolute maximum allowed by the tin specs, I know because I called and spoke with the engineer.  Common practice is girts places 2 feet on center.  It does not take a rocket scientist to know that when those girts are placed in a funky location, like 40″ OC, you cannot hang insulation, drywall or anything else without a bunch of waste or owner supplied materials.  I chose to purchase my own 2X6’s to build the thing at 24″OC.  It cost me a whopping $250 for the lumber and a bunch of headache every place else.  I now need to order more screws because I do not have enough for attachment.  You would think that for $25,000 it could be done right without cutting corners.”

My response: There exists no “common practice” for the spacing of wall girts, other than what is needed to support the given load conditions.  Your building, with the loads imposed on it – came out to what we designed, 37-5/8″ spacing.

This is not about “cutting corners”, as with any structural member of a post frame building, the wall girts are located and spaced to carry the loads (in this case wind) being placed upon them, without added pieces being placed “just because”.

The information provided by you, in your request for your initial quote, indicated: “insulation_options: cold”, which precluded us from knowing your intention was to insulate the walls of your building. This is just one of the many reasons why we have each of our clients review and approve their building plans online prior to materials being ordered. At time of review you could have asked why the girts were spaced at 37-5/8” on the plans, or requested any spacing you desired, which would have gotten you not only the extra lumber, but also the screws. There is no indication in the notes in our records your intentions of insulating the building at a future date, or even of it having been discussed.

As for the spanning capabilities of the steel – your building’s steel roofing and siding is Imperial Rib® manufactured by American Building Components. In looking at the span tables for this product, for 29 gauge over three spans (crossing three or more framing members) and spanning 3.5 feet (42 inches), the allowable minimum loads in pounds per square foot (psf) are 54 for positive wind force and 53 for negative wind force. The formula to convert wind speed in mph (miles per hour) to force is Speed^2 X .00256 = psf, so force to speed is the square root of psf divided by .00256, or 143 miles per hour. AS the design load for your building is 100 mph, it doesn’t appear “This is the absolute maximum allowed by the tin specs”. I’d be happy to supply a copy of the chart, should you desire.

Tomorrow’s part III of a 4 part answer from Mike the Pole Barn Guru to a challenged client deals with ceiling loaded trusses. See you then

Wide Span Trusses

The year before I started my prefabricated metal-plate connected roof truss career with Coeur d’Alene Truss in 1977, they had provided hundreds of 60 foot span trusses for a cabinet manufacturing plant. The building was being erected by an experienced contractor who had an excellent reputation for quality. For my future employer, this was their largest sale, and he proudly went out to take photos of all of the trusses, set in place.

The next morning, the trusses were on the ground, nothing but a pile of kindling! Luckily (for the truss company anyhow) the photos taken showed the truss bracing had been installed only in one direction and a puff of wind caused them to topple in the opposite direction.

As a truss manufacturer, I’ve built wide span trusses, up to 100 foot span, and as a builder installed trusses up to 92 foot.

wide span trussesHigh grade msr (machine stress rated) and mel (machine evaluated lumber) have allowed for metal-plate connected trusses to practically and affordably be designed and fabricated for spans of 100 feet and wider. The pole building industry has taken advantage of these spanning capabilities to provide wider clearspans for commercial, industrial and manufacturing industries, as well as the traditional agricultural market.

For those who design, fabricate and build with wide span trusses, code and regulation changes have occurred effective with the 2009 edition of the building codes.

For the pole building industry, the involvement of a registered design professional (RDP – engineer or architect) who can design correctly and knows what they are doing, becomes critical.

The focus on wide span trusses is due to the liability, as problems tend to grow exponentially with the size of the truss. Everything tends to become more challenging beginning with the fabrication, handling, loading and transportation from the truss manufacturer.

When I had my truss plant in Spokane, we had the opportunity to do a large project (a hockey rink) with 114 foot span trusses. We could build them, but we could not figure out how to get them around one of the corners between our location and the proposed jobsite!

With wide span trusses, installation and bracing requirements become critical. They maximize the capabilities of the installation contractor and of the components of the truss.

As the forces which must be carried by a truss (or any beam) are a product of the square of the span, what must be carried by an 80 foot span is four times what a 40 span would carry! This makes for much heavier trusses and increases the impact in the event of an accident.

The Hansen Pole Buildings Construction Guide includes information on proper truss installation. There are other sources on current codes and regulations, including Building Component Safety Information Guide to Good Practice for Handling, Installing, Restraining and Bracing of Metal Plate Connected Wood Trusses, produced by the Structural Building Components Association and the Truss Plate Institute, and Truss Technology in Buildings by the Wood Truss Council of America, Inc.

You can find it here:

https://support.sbcindustry.com/docs/06_BCSI_booklet_FINAL.pdf

My personal pole building engineering mentors, wood engineers Frank E. Woeste, PhD PE, and Donald A. Bender, PhD PE, have authored articles which urge RDPs who specify wide span wood trusses for post-frame buildings to take special note of recent changes in the 2009 International Building Code and the ANSI/TPI 1-2007 truss design standard.

Owners of a project with metal-plate-connected wood trusses spanning 60 feet and greater are now required to engage an RDP to design and inspect both temporary and permanent bracing for trusses (See International Building Code Sections 2303.4.1.3, 1704.6.2, and 1704

Parallel Chord Scissor Trusses

As always, I enjoy finding real life solutions to client’s challenges.

One of the Building Designers, Rick, of Hansen Pole Buildings posed this to me today:

“Another thing came up yesterday, got a guy that wants everything, and is on a cost crunch, nothing new there, but one item that he wants is parallel chord scissor trusses.  He intends to put up a building for storage on the lower level and build office space in the second level.  Apparently he has had these in a house that he once built.” 

Yes, this can be done.

In a parallel chord truss, the top and bottom chords of the truss follow the same slope. The most frequent application of parallel chord trusses is for headers above wide span openings in building sidewalls. Provided enough depth is available, this allows for a design solution which is frequently more affordable than headers made of glu-laminated members, or LVLs (laminated veneer lumber).  Another use is for commercial buildings with a very low roof slope.

As a scissors truss, the slope of the top chord again follows the slope of the bottom chord, with both chords having a peak at the center of the truss.

There are some limitations.

As with most roof trusses, there exists a limitation on what can be manufactured and shipped down the highway. In the case of wider spans, or steeper roof slopes, the truss can be divided in half at the center; however this results in the need for an engineered field splice, which can add to the expense. To keep costs down, it is best for the overall truss height to be no greater than 12 feet.

Trusses also have to have a thickness. In low or no snow load areas, the trusses will be about an inch deep, for every foot of truss span, with a minimum thickness of about two feet. This thickness results in a loss of clear height at the eave of the building, which is going to reduce the headroom or useable space along the sides of the space.

In many cases, especially as in the example above with a second floor area, it may be more affordable to utilize a pole and raftered solution.

The pole and rafter building would have interior columns set in a grid, to support the lower (loft) floor. The columns extend through the floor and up to the rafters. This gives the same resultant as the parallel chord scissors truss, while taking up less thickness. The tradeoff is, the upper level will have columns in it.

An example would be a 36 foot square building, which (in the pole and raftered case) would typically have four interior columns placed on a 12 foot grid.

Don’t get me wrong.  I am in total support of scissor trusses.  My step-son put them in his Mother-in-law apartment in the upper story of his garage, which made for a much roomier feeling apartment.  It also afforded putting a ceiling fan up higher and out of the way of having fan blades accidentally cutting through someone’s hair.

My caution is to weigh the advantages with the cost, and then go with whatever is going to make you happiest in the long run.

Pole Barn Post Spacing Revisited

Pole Barn Post Spacing Revisited

By far, my most read blog has been on, “Pole Barn Truss Spacing”. With nearly 50% more reads than any other blog I have written, it clearly is a fan favorite. I’ve had it referenced by clients, building contractors and code officials.

So when one of our clients wrote: “After talking with the building inspector he does not like the idea of post spacing 12ft apart with double rafters. Can you quote a standard setup so I can compare apple to apples, post 8ft on center with double 2×12 header and trusses every 4ft, no joist hangers needed for perlins?”, I felt obligated to answer.

(For clarification of the above, “double rafters” are “double trusses”.)

My response: While the building inspector may not “like the idea” of using post spacing 12 feet on center, it is not only a tried and true method, but it is also one which our engineers recognize as being structurally superior and will engineer seal. We have thousands of buildings in all 50 states, done with the exact same design. It affords the benefits of fewer holes to dig, fewer pieces to handle and install, engineered connections and the reliability of doubled trusses.

Given the correct loading criteria and an engineered building, we will guarantee the ability to obtain a structural permit from our plans. The post spacing every 8′, single trusses every 4′ resting upon headers is a system our engineers are not interested in risking their careers on. In the event of a single truss failure, this system will result in a domino effect and the collapse of the entire roof system.

After the winter ice storm of ’96-’97, I spent quite a bit of time studying roofs that collapsed -some of which were on my own buildings!  At that time, we were using two trusses on a pole, so we had this part “right”.   But instead of putting the two trusses together to act as a single unit, we put one on each side of the column with blocking in between.  The trusses were notched in, so this was another part we were doing well – transferring loads into the ground.  But the one part we missed, was putting the two trusses together.  Lumber is after all, a tree…with inherent knots and defects.  With the huge loading of ice that year…the truss “weak spots” gave way – and if one truss fails, it pulls the rest of the roof down.  This is when I asked an engineer to evaluate the truss system I was using as well, and he concluded the “probability of a second truss adjacent to the first one having the same exact ‘weak spot’ – just could not be calculated.”

From then on, I started using double trusses, nailed together according to a specific nailing pattern (supplied on all our plans).  Since then we’ve had other winters with similar ice/snow loadings, and…no more failed roofs!  I had the engineer’s word, but even better – I had real proof from thousands of buildings which survived nature’s “test”.  We’ve been using the double interior trusses ever since.  Only one roof I’ve seen fail since then…and it was determined to have been due to the two trusses were not nailed together adequately – they had few nails holding them together.   Again – the trusses acted as “singles” and pulled part of a roof down.

We get the requests for abnormal (for us) truss spacings or post spacing every once in awhile. Instead, I prefer to turn it around and stress our advantages –

(1) Fewer holes to dig, digging is always the worst part, and the one which is outside of anyone’s control. If they hit a Smart Car sized rock on the next to last hole, are they going to move the whole building?

(2) Fewer posts to set, trusses to raise, purlins and girts to handle. The real advantage of pole building construction is having the least number of pieces, in order to do the job structurally. By using slightly larger pieces (generally 2×6 instead of 2×4, where it takes only 50% more wood, to be 246% stronger) we are being material efficient.

(3) Wider sidewall door openings without the need for structural headers. In the event someone wants to add a door or window at a later date, they have far more flexibility to do so.

(4) Does anyone REALLY want to stand on a 2×4 roof purlin 16, 20 or more feet up in the air? When the 2×4 purlin snaps, it is a long drop to the ground.

(5) Most building collapses come from connection failures. In our case the purlins connect to the trusses with engineered steel hangers (not just nails); the double trusses bear directly on the posts (not on the sides of the posts, or nailed onto a header). The load is transferred down into the ground and is not dependent upon nails to hold the entire weight of the roof.

(6) If you think about it, if you have a 48’ long building, with single trusses every 8’, you have a total of 5 interior trusses.  If you have double trusses every 12’, you have a total of six interior trusses, but only have to dig 3 holes instead of 5. Which would you rather do?

By the way – our client DID get his building permit issued, using our plans, by the very same inspector who originally “did not like the idea”.

There’s No Education Like Real Life Business Experience

In the summer of 1979, home interest rates began to rise. Idaho had a usury limit, home mortgages could not be written for 10% or more. When this ceiling was hit, home construction pretty much stopped in Idaho. I set out looking for other opportunities and ended up in Salem, Oregon.

I was offered the position of truss plant manager at Lucas Plywood and Lumber, in August 1979. It would be a smooth transition, as the prior manager would be there for a month or so to ease me into the system. At first glance, the operation was frightening. I was used to trusses being manufactured using hydraulic presses to embed the steel plates into the trusses, not teams of workers banging them in with hammers and pushing them through a set of “rollers”. Even more frightening was when I discovered all the lumber being used was green (I had no idea trusses were built anywhere with lumber which was not kiln dried). But my total heart failure nearly occurred when I found they were using lumber graded as Standard and better for truss chords, as someone had convinced them it was the same as #2 and better. Not even close!Well, the previous plant manager packed up at noon of the first day saying, “Good luck, son”. My first several months were spent on educating the troops and introducing dry lumber, both with some successes. The lumber sales team was my age as well, which helped to gain eager learners. I taught them how to do lumber lists from building plans, so they could quote framing packages.
In January 1980, the housing crunch I had fled from in Idaho hit Oregon. My truss plant, which typically produced 8 to 10 buildings worth of trusses a day, had only four orders in the entire month! Not good – however there was a single common denominator among those four orders, they were all for pole barn trusses. I didn’t have the slightest idea what a pole barn was, but it was time to find out. I picked the brain of a long time pole barn builder, George Evanovich, who explained the basics to me.

Now I have to confess, I was brought up with, “Wood is good”, so the entire concept of using roll formed steel for roofing and siding was a novel experience for me. Having convinced myself it had its place, we figured out material prices for some fairly typical pole barns and ran ads selling building kits. The response was overwhelming. By April, we were not only running the truss plant full time again (producing primarily pole barn trusses), we had also hired George and his two crews to construct buildings for our clients. By June, the truss plant was operating double shifts, just to keep up with the volume.

At 23, I thought I knew it all, and managed to get my walking papers by being over ambitious. I had all of  3 years of management and sales experience in the truss industry.  I had bought lumber wholesale and sold to both builders and the general public.  I had hired and fired 100’s of workers, dealt with subcontractors, routed trucks, etc.  So of course I new it all, or thought I did at the ripe old age of 23.  The owner had made it known he was considering stepping down and I threw my hat into the ring. However the owner’s son also worked there, as truck dispatcher. Short story was, the owner’s son got the position and I got a ride home in the company truck!  Three years later the company was in bankruptcy. I “packed my bags”, took my existing truss accounts and was hired immediately at Mac Truss Company, in McMinnville, Oregon. I introduced them to pole barns and we started a pole barn supply. The pole barn kit business was good.  One day in February 1981, I actually sold 13 buildings to 13 different customers in the same day!  But sadly, it still was not enough to offset and overcome the debts from the truss operations and we closed in May. It was terribly depressing loading up the inventory on truck and watching them drive away.

With my final paycheck, I was able to pay our family bills current and had $50 left over. The local “free advertising” paper would allow me 3 weeks of credit, if I paid for the first week’s ad up front.  I decided I couldn’t do any worse than the people I had worked for, and right then decided I was going  into the pole barn kit business. Now granted, I had no business location, no inventory, no truck, no anything….all I had was an ad in the local free newspaper!  The first week I sold three buildings, got down payments from the clients and… I was in business! One of my friends was in real estate and located six acres of highway frontage on Highway 99E just north of Canby, Oregon which could be rented reasonably.  Paying first and last month’s rent, I now had a place. The Chevrolet dealership had ordered a lumber delivery truck for the local yard, who had not taken delivery on it. With a small down, they got me financed on the balance and I could deliver. M&W Building Supply Company was a reality!

Without the faith of two people, my fledgling business would not have survived. Jerry Garland, at Georgia Pacific, and Jim Betonte, at American Steel, got me credit terms to purchase materials. Without the ability to have been able to utilize them, I would have been sunk. The first year was not without its challenges. I could not afford a forklift, so I had to go pick up all the lumber, dump it off the truck at my “yard” and reload it back on the truck as needed to fill orders. The property I had leased included a 20’ x 40’ unfinished shop with a garage door in the back. Inside the shop, I could pound together roof trusses (up to 40’ long, when I opened the door), also loading them on the truck by hand. On slow days, I would move the inventory around the yard, by hand, a few boards at a time. Locals would stop by and comment, “Wow…  business must be good.

Yesterday I saw you had piles of lumber ‘over there’….and today you have a pile….over here.”  Yes, and I had moved the lumber 100 feet away by hand! When the phone would ring, a horn would sound outside and I would run like crazy into the office to answer. People thought I was busy, because I always sounded so out of breath.

We aren’t finished yet! Join Mike Momb in Part III – Evolution of The Pole Barn Guru and his Building Philosophy