Tag Archives: pole building insulation

Insulating a Room in an Unheated Pole Barn

Insulating a Room in an Unheated Pole Barn

Regular readers of this column recognize insulation as being a hot (pun intended) topic of discussion – not just entire buildings, but also of a room or rooms in an unheated pole barn.

Reader RICHARD in WOODSTOCK writes:

“I have a 50 x 75 pole barn with 15 foot side walls. The building is 8 years old and is unheated; I did insulate the roof during construction to prevent the traditional roof condensation which has worked well. Currently, I am in the process of building a 22 x 26 shop in one corner of the barn which will be heated and cooled.

Insulating WallsOn the two outside walls of the shop I placed 1 ½ inch foam board between each of the barn wall girts then built 2×6 stud walls in between the pole legs. I then placed built two remaining free standing 2×6 walls to complete the shop walls. I placed faced R19 insulation in all the stud walls and finished them off with ACX plywood on the inside of the shop and CDX on the outside (free standing) shop walls. I then placed 22 foot long TGI’s as ceiling joists so I can have storage above the shop which I then placed ¾ inch tongue and groove plywood on top. I am now at the point to insulate the ceiling and finishing it off with a suspended ceiling with a gypsum type ceiling tile. I plan on placing R30 unfaced insulation in each of the shop ceiling bays but don’t know if I should use a poly type barrier before putting up the suspended ceiling.

I am concerned about moisture in the shop ceiling and issues that would cause.

Any advice you may have would be greatly appreciated.”

Mike the Pole Barn Guru responds:

Normally ceilings do not have a vapor barrier because you want to have warm moist air rise and escape into the vented attic space. In your instance, you are creating a cavity which could very well collect moisture as the 3/4 inch T & G plywood is going to pretty much prevent moisture from escaping. If you use a vapor barrier on the underside of the TGIs, you have now trapped the moisture inside of the shop you have created. My instincts tell me to use the vapor barrier and be prepared to have some sort of exhaust fan to remove excess moisture in the room, or to have a dehumidifier. You can minimize the moisture in the room by using a good sealant on the top of the concrete slab. You might also look at using a product such as Roxul (https://www.hansenpolebuildings.com/2013/03/roxul-insulation/) in the ceiling, as its function is not reduced by any moisture which may become trapped in the cavity.


One Inch of Insulation and R-50?

Efficient use of energy has arrived at the forefront of building design. More and more jurisdictions are adopting and utilizing the International Energy Conservation Code (IECC – https://codes.iccsafe.org/app/book/toc/2015/I-Codes/2015%20IECC%20HTML/index.html).

The IECC requirements are put in place to promote the conservation of energy, which (when done right) can result in a significant net savings in monthly heating and cooling expenses.

There is now an insulation available in a one-inch-thickness with an R-50 value!

R-50 Systems, LLC, launched a new-to-market, 1″ thick vacuum-sealed, patented and certified R-50 value insulation. This high-performance product not only delivers government mandated R-values in the slimmest profile ever, but it is a green, sustainable, ultra-thin insulation solution with measurable advantages over alternative products.

Insulation Panel

Conventional insulation requires thicknesses of up to 15″ to reach an R-Value of 50. R-50 Systems’ Rich-E-Board™ provides this same R value at 1″. The ultra-thin, lightweight design decreases costs of building modifications and structural retrofits, while creating more usable space for living and/or operations. Because Rich-E-Board is cut-to-spec, it can be used in any and all building and wall applications with little wasted material.

Rich-E-Board’s total cost of ownership and installation is far less than that of traditional insulation. Although the upfront rates per square foot of alternative products are lower, R-50 Systems has cut the total costs of 100,000 sq. ft. projects by more than 20%.

Rich-E-Board™ is 99% recyclable, reusable, and reclaimable, reducing the amount of landfill waste by over 8 times. GSA simulations have shown that this product can reduce electric and gas bills by 8% and 10%, respectively.

“Our vision was to solve the dilemma of high R-value mandates and the limitations posed by space constraints, which we have more than achieved,” says Joanne Collins, President and CEO of R-50 Systems, LLC. “Rich-E-Board is without a doubt a better way of envisioning, planning, and constructing a building.”

My take on this……I am highly skeptical.

Pole Building Church

Welcome to Ask the Pole Barn Guru – where you can ask questions about building topics, with answers posted on Mondays.  With many questions to answer, please be patient to watch for yours to come up on a future Monday segment.  If you want a quick answer, please be sure to answer with a “reply-able” email address.

Email all questions to: PoleBarnGuru@HansenPoleBuildings.com

DEAR POLE BARN GURU: Hello! I work for a church and we are currently interested in constructing a pole barn. Our main question is my pastor wants somebody to come in and talk it over with, not over a phone. We are located in Atlantic county NJ. Do you have a sales associate located nearby we could have in to talk to? Thanks! JONATHAN

DEAR JONATHAN: Thank you very much for your interest in a new Hansen Pole Building Church. While we can appreciate your pastor wanting someone with whom he can talk it over with face-to-face, in order to provide those types of services we would have to both charge a fee up front for it – whether your church ever ordered a building or not (like any consulting engineer or architect would), as well as significantly increase the selling price of our buildings.

Our mission is to provide the best possible pole building experience to each and every one of our clients. If it would prove helpful to your pastor, all of our Building Designers have and use Skype with clients to be able to achieve the look and feel of a personal meeting, without the unnecessary expenses. We have done many pole building churches, without ever having a “face to face” discussion, and all turned out beautifully.

Call to schedule a “live” Skype discussion today!

Mike the Pole Barn Guru

DEAR POLE BARN GURU:  First, I am located in CDA so saw you used to live here! Anyway, I purchased a piece of property with a newly erected pole barn.  I want to insulate and drywall it….for use as my workout/yoga place…yes I know, pole barns were not really meant for such things.  I am here and getting all sorts of quotes….but none seem to address what I think is common sense…condensation. Currently there is a condensation blanket between the metal and the horizontal wood 1×6…I think those are called the girts?  Anyway, can you direct me to someone who actually knows what the heck they are talking about here? Or can you suggest how I should go about insulating and drywalling so as to not create a festoon of mold and hotel for critters?  Thank you so much in advance, MICHON IN COEUR d’ALENE

DEAR MICHON: Actually “pole barns” are totally meant to be used for things such as workout/yoga places. Some proper design in advance between the previous owner and the builder would have made your life far easier. You are correct in your assumption condensation could pose some true issues.

The best thing to do with the walls would be to remove the wall steel (one wall at a time), take out the metal building insulation and install a high quality housewrap. Reapply the wall steel using 1-1/2″ long screws of a larger diameter than what was there previously. Hansen Pole Buildings can supply you with powder coated screws which would meet these structural needs plus the color stays on the screws!

I am going to guess your building has 2×6 wall girts placed flat on the outside of the columns – which probably does not meet code for deflection to begin with. Read why not here: https://www.hansenpolebuildings.com/blog/2012/03/girts/

While you have the wall steel off (in the first paragraph), if the girts are placed flat on the outside of the columns, they could be removed and replaced with what is known as commercial girts (https://www.hansenpolebuildings.com/blog/2011/09/commercial-girts-what-are-they/). This would create an insulation cavity in the walls, plus make the siding stiff enough to meet Code requirements. You can then place batt insulation horizontally between the girts from the inside (I would recommend using unfaced insulation with a vapor barrier on the inside). Then drywall over the inside.
Mike the Pole Barn Guru

Dear Guru: Why Vapor Barrier?

DEAR POLE BARN GURU: I constructed a pole building with the help of Iowa based Amish group. They put up the main structure including metal roof. Due to city codes, I enclosed the 40x60x12 structure using 1/2 osb, house wrap and then vinyl siding. I want to use paper faced 4x8x4″ Styrofoam sheets on the walls, and roll insulation for the ceiling. My question is, do I use a vapor barrier on the walls after putting in the Styrofoam or none at all? And for the ceiling I would assume I would attach a vapor barrier to the bottom side of the trusses and lay the R-25 unfaced insulation on top of that. I have ridge vent and soffit vents. Thanks for your help! Curt in Center Point, IA DEAR CURT: For a properly performing system, your building should have a vapor barrier on the inside of all walls. The paper facing on the Styrofoam™ panels should be a vapor barrier. In order to perform properly, you need to make sure all edges and joints are tightly sealed, to prevent moisture from entering the wall cavity.

A vapor barrier should NOT be placed across the bottom of the roof trusses. If your building has steel roofing, I am hoping some sort of thermal break (like a reflective radiant barrier or similar) has been installed between the roof purlins and the roof steel, otherwise you are in for a plethora of problems. Warm moist air from your building needs to be able to pass through the ceiling and into the non-conditioned dead attic space, where it can be properly vented out of the ridge vent. You also should consider a greater R value in the attic. According to the North American Insulation Manufacturers Association https://www.naima.org/insulation-knowledge-base/residential-home-insulation/how-much-insulation-should-be-installed.html a minimum of R-38 should be installed in Iowa.

Mike the Pole Barn Guru

Dear Pole Barn Guru: We had hail damage to a post frame office building last Summer. Several months prior to the storm we had the side walls spray foam insulated (closed cell) and then framed and dry-walled. We have finally settled up with the insurance company and are ready to “re-skin” the building. The spray foam insulation was a significant expense and if we take off the metal siding the insulation will come off too. Here is my question: Can we simply install another layer of 29 gauge metal siding over the existing siding? Or can we fur out and install a different type of siding? Your input would be greatly appreciated!   KEN in Ft. Collins, CO

DEAR KEN: Although hail damage to steel siding and roofing is unusual, you have now found the downside to spray foam insulation applied to the inside face of it. If you place furring strips on the outside of the existing siding, you are most likely going to end up with the siding on the eave sides extending past the typical steel roof overhangs provided with most pole buildings. Plus, anything other than pre-painted steel siding is likely to come along with a lifetime of having to maintain it. In all probability, your best solution may very well be to install siding of the exact same profile over the existing steel. Screws will need to removed from each panel as you work your way down the wall, and replaced with screws of a larger diameter, as well as longer – in order to properly hold both layers of siding in place. With some patience, the results should turn out satisfactory

Insulation for Box Beams

What I get to do every day is nothing short of fun. My life is full of interesting questions from many different angles. Today’s opportunity is compliments of Hansen Pole Buildings Designer Rachel who writes, Guy called asking on the vapor barrier.  I know we have discussed this before but I want to make sure to tell him correctly.

He has a barn with box beams,  basically 2×12 box beams with 2×6 purlins running in between.  There is no vapor barrier under the steel and he would like to insulate with fiberglass insulation.  So would you recommend cutting and putting a vapor barrier up against the steel and then insulation or what is the RIGHT way to do this.  He has conflicted answers from people he has asked. 

FYI…he can’t put in a flat ceiling.  Also he has vented soffits but no ridge vent.”

From the description it appears instead of trusses, this particular building has some combination of 2×12 built up box beams or rafters, supporting purlins on edge in between.

The building has been constructed omitting one of the most crucial elements – a thermal break between the roof framing and the roof steel. I am at a loss to come up with an answer as to why so many steel roofs do not have some method of controlling condensation.

Given what information I have, here are some solutions:

Spray Foam InsulationIf the client wants to add some actual R value to the solution – then spray foam is going to be the way to go. Yes, it is costly, but the other alternatives are not pretty as well.

If he is looking to only control condensation – remove the roof steel, install an insulated vapor barrier as a thermal break (such as a reflective radiant barrier available at www.buyreflectiveinsulation.com) and reinstall the steel, using larger diameter and longer screws than what were originally used.

At the same time, a continuous ridge vent should be installed.

In order to use a vapor barrier and gain actual R value (such as insulating between the purlins), the Building Code requires there to be airflow above the insulation, which would entail a rework of the roof framing (besides removal and reinstallation of the roof metal). And this choice would definitely require work and expense.

Back to my first suggestion – for time and money to accomplish the goal – use spray foam insulation underneath the box beams and roof steel.

Dear Guru: Can I Add Radiant Barrier?

Welcome to Ask the Pole Barn Guru – where you can ask questions about building topics, with answers posted on Mondays.  With many questions to answer, please be patient to watch for yours to come up on a future Monday segment.  If you want a quick answer, please be sure to answer with a “reply-able” email address.

Email all questions to: PoleBarnGuru@HansenPoleBuildings.com


DEAR POLE BARN GURU: I have an existing pole barn. Can a radiant barrier be added to the roof from the inside rather than taking the roof off and reinstalling? Thanks. CONSIDERING IN COUNCIL BLUFFS

DEAR CONSIDERING: Yes a radiant barrier can be installed from the inside. In order to be effective, it is essential to seal it tightly along all edges and seams.

I like products which come with adhesive tabs along one edge, for sealing to the next roll without having to use tape. Check out: www.buyreflectiveinsulation.com


DEAR POLE BARN GURU: I have an existing pole barn. I want to stop wind from coming in where the corrugated metal meets the trim at the top and bottom of the siding and wainscot. Would closure strips work for this? Or would housewrap be better. Can I add housewrap from the inside? Or do I have to pull the steel, wainscot, and trim off, wrap and reinstall? Thanks. INTERESTING IN IOWA

DEAR INTERESTING: In order to properly place closure strips, the building will now have to be stripped down to pretty much bare wall framing.

This is probably not the answer you wanted to hear, but the best way to solve your issues is to remove all of the siding, wainscot and wall trims and install a high quality house wrap AND install closed cell closure strips at every point possible. For the top of the angled panels on the endwalls, Hansen Pole Buildings has available a strip which expands to one inch square to entirely fill either beneath the tops of the panels, as well as between panels and rake trims. The same expanding closure also works well for beneath tops and bottoms of Outside Corner trims.

You can read more about housewrap here:

https://www.hansenpolebuildings.com/blog/2012/11/house-wrap/


DEAR POLE BARN GURU: Good afternoon, have you built any Fire Stations? if so pictures and cost, Thanks. DECIDING IN DELMAR

DEAR DECIDING: Thank you very much for your interest. As we are not contractors, we have not built fire stations (or any buildings) for anyone, anywhere. We have designed, provided the structural plans, delivered materials, provided assembly instructions and technical support for many. Because we do not do the construction ourselves, we are not onsite when the projects are completed, we have to rely upon our clients to send us photos – it turns out those we have received from our fire station customers are very limited. As to costs, those depend greatly upon the needs of the individual Fire Departments. Every building we provide is custom designed to best fit those needs. You might enjoy reading this article:

https://www.hansenpolebuildings.com/blog/2014/07/fire-stations/

To get the most accurate price quote on a new fire station (or any pole building for that matter), please go to our website and fill out the Request a Quote Form

https://www.hansenpolebuildings.com/freequote.htm

Are Concrete Piers OK in Earthquake Areas?

Welcome to Ask the Pole Barn Guru – where you can ask questions about building topics, with answers posted on Mondays. With many questions to answer, please be patient to watch for yours to come up on a future Monday or Saturday segment. If you want a quick answer, please be sure to answer with a “reply-able” email address.

Email all questions to: PoleBarnGuru@HansenPoleBuildings.com

DEAR POLE BARN GURU:Why are concrete piers not recommended for pole buildings in earthquake areas? YELLING FROM YELM

DEAR YELLING: Part of why I love what I do for a living is I get to learn new things every day. I’d never heard of concrete piers not being recommended for pole buildings in earthquake areas – and have researched it highly, without finding any data to back up the premise.

Post frame (pole) buildings perform admirably in earthquakes as they are very lightweight, as well as flexible, compared to most other construction techniques. The heavier a structure is, the more it will be impacted by seismic forces. Most pole building construction relies upon wooden columns which are embedded in the ground (usually in concrete). A true concrete pier (a hole entirely filled with concrete) with a bracket to attach a column to the pier could prove to be a different story. In the event of a seismic event, the bracket/column connection could very well act as a hinge point.

DEAR POLE BARN GURU:I’m building a Barndominium 36×40 and I wanted to know how should I insulate the walls? Without creating a mold and moisture problem. Should I wrap what type of plastic wrap around the outside of 2×6 outer walls between R-panel? Also on the inside of plastic wrap between Sheetrock walls put R-19? And put R-30 in attic? If I wanted to put tongue and groove piney knot boards on inside walls what should I put up over insulation and 2×6 studs to nail the tongue and groove boards up to? To also help insulate walls?

Do you recommend a certain size a/c and heat pump unit for a 36 x40 barndominum ? Thank you for your help. BARNDOMINIUM BOB

DEAR BOB: As for R-values, without knowing where you are geographically, I can’t speak to what level is appropriate for your specific climactic conditions.

Walls – I would housewrap the outside of my framing, use BIBs insulation, cover the inside with clear plastic for a vapor barrier. If you intend to run the boards vertically on the inside – you can use bookshelf style wall girts to create both the insulation cavity and the support for your inside finish.

Attic – make sure to order trusses with an “energy heel” – deep enough to allow for the full thickness of the insulation to extend to the outside of the building sidewalls.

As for HVAC – your local HVAC experts can recommend the proper size unit for the cubic footage of space you will be conditioning.

Dear Pole Barn Guru: How Much is Truss Weight??

New!  The Pole Barn Guru’s mailbox is overflowing with questions.  Due to high demand, he is answering questions on Saturdays as well as Mondays.

Welcome to Ask the Pole Barn Guru – where you can ask questions about building topics, with answers posted on Mondays.  With many questions to answer, please be patient to watch for yours to come up on a future Monday or Saturday segment.  If you want a quick answer, please be sure to answer with a “reply-able” email address.

Email all questions to: PoleBarnGuru@HansenPoleBuildings.com


DEAR POLE BARN GURU: Hello, I’m an engineering student doing a research about sustainable buildings, can you tell me the approximate 20′ metal truss weight and 24′ wood truss weight?

Please I need the answer urgently. CALCULATING IN KALAMAZOO


DEAR CALCULATING: Nice to have engineering students reading this column!

Having been given no parameters for load carrying capacity, truss spacing or roof slope, leaves me just winging out an answer.

For wood trusses with a total load of around 180 pounds per lineal foot (30 pounds per square foot spaced one at six foot or two at 12 feet), a single 24 foot span 4/12 slope truss weight should be about 125 pounds.

I’ve never dealt with steel trusses, however I was able to find several formulas, as well as a table for calculating the steel truss weight, W being weight per horizontal square foot, S = span in feet, P = capacity of truss in pounds per horizontal square foot, and A the distance center to center of trusses in feet:

Charles Evan Fowler, P. E., for Fink trusses:

W = .06S + .6 for heavy loads; W= .04S + .4 for light loads.

H. G. Tyrrell, P. E.:

W = .05S+ distance center to center.

C. W. Bryan, P. E.:

W = .04S + 4.

M. S. Ketchum. P. E.:

+ For scissors trusses increase one-third.

Weight Per Square Foot Of Roof Surface For Steel Trusses

6/12 Slope 4/12 Slope 3/12 Slope
Up to 40 ft. 5.25 6.3 6.8 7.6
50 ft. 5.75 6.6 7.2 8.0
60 ft. 6.75 8.0 8.6 9.6
70 ft. 7.25 8.5 9.2 10.2
80 ft. 7.75 9.0 9.7 10.8
100 ft. 8.5 10.0 10.8 12.0
120 ft. 9.5 11.0 12.0 13.2
140 ft. 10.0 11.6 12.6 14.0

As you can see – lots of opinions on the steel truss (as are probably huge variants in their configuration).

DEAR POLE BARN GURU:We’ve just had a 40’x60′ steel pole barn constructed (in the woods) for storing classic cars. We had the builder install and frame fiberglass insulation in. We’re installing OSB wall panels ourselves. Wondering if we should cover the fiberglass with ‘Visqueen’ for vapor barrier or would we be better served by installing foil faced OSB panels?

Thanks CONCERNED IN KOKOMO

DEAR CONCERNED: Most often fiberglass batt insulation which is used in walls has a paper (or “kraft”) facing on the inside, which when properly installed serves as the vapor barrier. If unfaced batts were used, then a clear plastic vapor barrier should be installed on the inside face. Foil faced OSB panels are designed to be placed below roofing to assist in keeping attics cooler in warm climates, it is not designed to be or replace vapor barriers in walls.


Dear Pole Barn Guru: Can I Use Spray Foam Insulation in My Pole Barn?

Welcome to Ask the Pole Barn Guru – where you can ask questions about building topics, with answers posted on Mondays.  With many questions to answer, please be patient to watch for yours to come up on a future Monday segment.  If you want a quick answer, please be sure to answer with a “reply-able” email address.

Email all questions to: PoleBarnGuru@HansenPoleBuildings.com

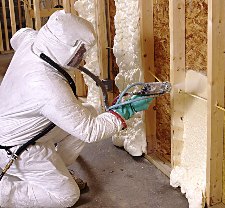
DEAR POLE BARN GURU: In northern Idaho, just east of Coeur d’Alene, I had a pole barn put up without insulation figuring I would build 2×6 walls between the posts and insulate with batts and then plywood the walls later for a work shop. Can spray foam be used instead? Could I frame 2×4 walls instead of 2×6? Can it be sprayed onto the metal siding and roof without any negative effects showing up later? I will have a heater in there, but probably not on full time. QUIRYING IN COEUR d’ALENE

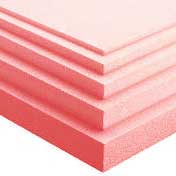
DEAR QUIRYING: Can you use spray foam? The answer is yes, however it is probably the most costly choice, and the Building Code requires any spray foam to be covered with non-combustible material (e.g. gypsum wallboard).

For the walls, you could frame a non-structural 2×4 studwall, holding it flush to the inside of the columns, and place batt insulation between the studs. The studs do not have to be the same depth as the insulation, and in doing so, you will eliminate a thermal bridge.

Beware, less costly (per inch of thickness, not R value) open cell foams are permeable to moisture – so condensation could become an issue. To obtain an R-19 rating from spray foam, be prepared to spend around $3 to $4 per square foot of insulated area.

While spray foam is relatively light weight, always check with the manufacturer of the roof trusses and the Registered Design Professional (RDP – engineer or architect) who designed your building to verify the weight of the insulation being added will not compromise the structural integrity of the building.

DEAR POLE BARN GURU: I sent in three pole barns that i am looking to get a quote for. my families barn just recently burned down a few days ago due to undetermined causes. We lost our animals in the fire which was devastating. Our pigs and chickens were our livestock and our food. We need to get a barn up and built soon to get our farm running again. I have a few questions about this, first off if i go ahead and purchase this kit how does it get delivered to my house. Second, if this is purchased is the supplies all in one kit that you ship out or is it a list a what we need and i have to get it? please get back asap thank you. NEEDY IN NEW YORK

DEAR NEEDY: I am deeply sorry for your losses. Fire is so devastating.

When you order from us, the materials are delivered to you via truck.

You are purchasing from us the design, the complete 24″ x 36″ blueprints which are specific to your building and show where every board is placed. Not only to we provide all of the materials for construction, but we give you detailed instructions as to how to assemble everything.

DEAR POLE BARN GURU:  What is your standard design practice to accommodate a wider O/C truss?  Double the truss? Or increase the truss member sizes?

VASCILATING IN VERSAILLES

DEAR VASCILATING:  Our most common practice design in general is a system using doubled trusses spaced most commonly every 12′ (although spacings 10′-16′ are also very common). The doubled (or more technically “ganged”) truss system affords some safety not found in single truss systems – as multiple trusses physically connected to each other all for true load sharing. The probability of two or more connected trusses having the exact same weak point is phenomenally low – reducing the risk of a catastrophic failure in an extreme loading situation. Ganged trusses also require less bracing than single trusses, adding to ease of installation, as well as lower costs and a “cleaner” finished appearance.  It also may mean no cumbersome (and expensive) truss carriers.  Lastly, if you put overheads in a sidewall, having the double trusses mean you could put as wide a door as 12’, and have plenty of room to put in a hoist system to lift a vehicle between the sets of trusses.

Vascilating then responded:

Thanks for the quick response. I assume, then, the practice is to utilize 12′ 2×6 purlins placed on edge on top of those trusses?

Is the spacing of 12′ the same for an attic truss? I recently got a quote from Hansen for a gambrel building with which I intend to have attic trusses. Is it common practice to finish a room using the knee walls of those trusses?

Dear Vacilating:

Every client gets my individual and undivided attention for as long as they need to get their questions answered.

The snow load will dictate purlin size, but they will be 2×6 or larger, joist hung between the trusses. Attic trusses will be the same, however may be more than just a 2 ply truss depending upon the span and load. Most typically people will finish those spaces with a knee wall.

Unless you are absolutely married to the gambrel look, the most efficient and cost effective design for multi-story space, is to just design a multi-story building. For about the same cost, you can get full room height from sidewall to sidewall
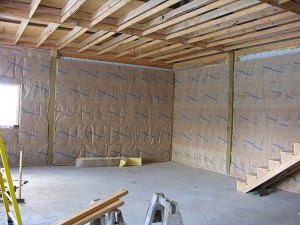


Insulation: Foam It or Fiberglass It?

I enjoy Hansen Pole Buildings’ Designers who really like to sink their teeth into a subject.

This morning Rick asks me, “Have you ever done a cost comparison on spray foam roof insulation vs the costs of condensation barrier, ceiling load trusses, joists, drywall ceiling and blown in insulation?”

The entire question was brought about, as Rick really gets his clients to think about how they will be using their buildings.

In order to do a comparison, I just plucked from the air a 40’x60’ building, double trusses every 12’ with a 4/12 roof slope and 12” overhangs. Fairly common, pretty standard.

So, what needs to be done in order to spray foam a pole building?

Spray Foam Insulation
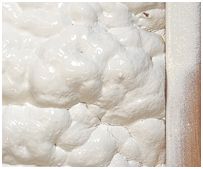
For starters, keep in mind (by Code) spray foam insulation cannot be left exposed, it has to be covered with inflammable material – like gypsum wallboard. Gypsum Wallboard is not as flexible as steel, so it has deflection criteria which mean upsizing the roof purlins from 2×6 to 2×8, or changing the column spacing to 10’ on center(o.c.). In the end, when I priced it out the change to 10’ o.c. was less costly, adding only about $900.

In either case, the truss loading will need to be increased to support the extra weight of the system – the top chord loading for spray foam or the bottom chord to create the dead attic space. Statistically – pretty much a wash in costs.

Due to the run of the roof, the spray version is going to take a little more drywall – call it $50

In the northern ½ of the United States, the recommended minimum attic insulation is R-49.

Spray foam is not inexpensive. With 2×6 purlins on edge, the maximum foam insulation thickness is 5-1/2 inches. At R-7 per inch for closed cell foam, will result in an R 38.5. The going rate for spray foam runs from $1 to $1.25 per square foot (sft), per inch of thickness – plus travel and fuel surcharges. To keep it easy, I will use $1 and ignore the rest. Including the run of the roof, roughly 2520 sft at $5.50 per sft is going to cost $13,860.

Total added costs for spray foam = $14,810

How about fiberglass in a dead attic space?

Increased truss load has previously been covered.

Ceiling framing must be added between trusses to support the wallboard – roughly $1200 including all of the Simpson hangers.

A reflective radiant barrier must be placed between the roof purlins and the roof steel, to prevent condensation, which would then rain on the insulation. $650

And the ridge must be vented. Under $200

According to Lowe’s, to get an R49 with fiberglass would require 74 bags of blow-in insulation at $32.75 a bag for just over $2400.

Total costs for fiberglass = $4450.

In summary, spray foam costs would be roughly 333% of the cost of fiberglass, to get to 78% of the R value. The other downside is with spray foam, the area of the trusses now has to be heated (almost 8000 cubic feet of space) before the area below it is going to feel warm!

Tyvek Thermawrap R5.0 Review

As my long time readers know, I am a proponent of having a high quality housewrap between framing (or sheathing) and siding for any pole building which will be climate controlled.

Therma WrapI also try to keep abreast of new products and innovations. Here is one which sounds good, but may not deliver.

After two years of research and development, DuPont announced the launch of what it calls an industry first: insulating housewrap.

“This is arguably the most important introduction in our product group in a long time,” says Jim Ash, new business development manager for DuPont. “It’s taking us into the insulation business, which is a big strategic push for us, and hopefully the first of many.”

In its construction, Tyvek Thermawrap R5.0 comprises the maker’s long-standing Tyvek housewrap bonded to an insulation blanket. The combination has allowed DuPont to enter into the continuous insulation category – an area which is getting increased attention thanks to requirements by the 2012 International Energy Conservation Code which went into effect October 18, 2013. Up to now, the category comprised mainly rigid foam panels for exterior insulation. Thermawrap R5.0 provides builders with another alternative to insulating pole buildings from the outside. The goal is to offer a net effective R-value of R-5.

It may seem counterintuitive to put padded insulation in a situation where contact with moisture is almost a certainty. Ash says not to worry.

“We all know it’s not a question of if, but when, walls will get wet,” says Ash. “Thermawrap R5.0 is as permeable as housewrap, which hits on the product’s No. 1 value proposition: it can dry from the inside or the outside. It breathes moisture vapor.”

DuPont says the Tyvek on the outside of the blanket works just as it would if it was installed on its own by keeping air and bulk water out of walls, but also serving as a breathable barrier allowing moisture vapor to escape to the outside. In addition, in cases where wall sheathing (typically plywood or OSB – oriented strand board) DuPont says the blanket increases the temperature of the sheathing, which decreases the chance for interstitial wall condensation in heating climates. “This reduces the likelihood of getting moisture vapor inside the walls,” Ash says.

For installation, Thermawrap 5.0 doesn’t require any unusual materials. Designed to be installed like housewrap with cap staples or cap nails (DuPont recommends its minimum 3/4-inch Tyvek brand fasteners), the rolls feature an uninsulated flap along the bottom edge which overlaps the course below to further prevent moisture penetration. Cutting the material, however is slightly different. Ash says shears, rotary cutters, or even a carpet knife work well for cutting and trimming Thermawrap R5.0.

Worried about compressing the material beneath siding? Thermawrap R5.0 measures 1.5 inches thick and DuPont says it will introduce Insulated Battens in mid-2014 to provide a stable base for the installation of fiber cement, wood lap siding, manufactured stone veneer, and stucco. The battens, however, are not needed behind vinyl siding, brick, or stone. This author’s take is – I am not seeing how it is the listed installation would not crush the insulation. Installers will, however, want to use 2×4 wood buck bump-outs around windows and doors so the openings are on the same plane as the blanket material.

Thermawrap R5.0’s benefits will come at a premium. DuPont says the total installed cost (including materials and labor) will run 15% to 20% higher than the total installed cost of a premium housewrap plus 1-inch exterior rigid foam insulation. The company expects Thermawrap R5.0’s thermal benefits, along with Class A fire rating and other benefits as mentioned will make the new material an attractive proposition to the industry.

The insulation blanket is made of proprietary fibers, including 20% pre-consumer recycled Tyvek. The product is available in 4-by-40-foot rolls. Each roll weighs approximately 26 pounds and Ash estimates about 20 rolls would outfit the average home.

Here is the rub when it comes to typical post frame construction, if being applied over wall girts and beneath steel siding, the insulation is going to be crushed down to nothing (basically R-0) every time it crosses a framing member.

In my humble opinion, to get the most bang for the buck, go with a thicker wall cavity to provide for thicker wall insulation, then use a traditional housewrap.

TextraFINE® Post Frame Insulation

TextraFINE® Post Frame Insulation

It is nice to hear from those who have read and learned from the articles I have posted over the past nearly three years. Even more rewarding, is when Hansen Pole Buildings’ team members come up with products for me to investigate.

Just today Justine (the Hansen Pole Buildings ordering and delivery wizard) asked me if I was familiar with “Textra fine” insulation. She had stumbled upon it during a web search and was unfamiliar with it, having always used either fiberglass or cellulose products previously.

Putting on my aluminum pyramid-shaped research hat, I jumped upon my trusty stead Internet and went on a search.

Anco TextraFINE® Post Frame insulation has excellent mechanical, thermal and acoustical properties making it ideal for insulating post frame structures where wide rolls of un-faced insulation are required.

Textrafine InsulationTextraFINE® Post Frame insulation is made from inorganic silica sand which is formed into long textile-type glass fibers which are bonded together in random orientation by a stable thermosetting binder. This process produces unusually strong, resilient insulation which will return to full thickness following compression.

Manufactured with 85% post-industrial recycled content, TextraFINE® Post Frame Insulation can be a contributor to LEED® credits.

Standard sizes are six inches thick by 48” or 93” in width.

Basically the product (in its 93” width) is designed to friction fit between columns spaced every 8’. The idea being with 6×6 or 3 ply 2×6 laminated columns, and wall girts placed flat on the exterior of the posts, the six inch thick insulation will not extend inside the columns.

Before the International Building Codes were adopted, this would not have been a challenge, however to be Code conforming under the now enacted deflection criteria for wall girts – it IS a problem.

To find out more about deflection in wall girts: https://www.hansenpolebuildings.com/blog/2012/03/girts/

The structural framing solution, most often places framing in conflict with the installation of these wide insulation rolls.

TextraFINE® is also available as a Condensation Control Blanket (CCB) in standard one and two inch thick rolls. The average (or above average) installer or DIYer might want to think twice about this method of trying to control condensation by reading: https://www.hansenpolebuildings.com/blog/2011/11/metal-building-insulation-in-pole-buildings-part-i/

My take on TextraFINE® insulation? It is very probably a great insulation product, however the product as designed to be applied, may not always provide the best or most practical design solution.  As more jurisdictions become savvy to the new code, it would behoove companies such as TextraFINE® to produce insulation in a size conducive to fitting between girts. Also having a vapor barrier would afford it more advantages.

Dear Guru: Can I Use Cellulose Insulation?

Welcome to Ask the Pole Barn Guru – where you can ask questions about building topics, with answers posted on Mondays.  With many questions to answer, please be patient to watch for yours to come up on a future Monday segment.  If you want a quick answer, please be sure to answer with a “reply-able” email address.

Email all questions to: PoleBarnGuru@HansenPoleBuildings.com


DEAR POLE BARN GURU: I am finishing a 36x40x14 pole building. The roof is asphalt shingles on osb and the siding is typical metal (.026 I think). I want to use dense pack cellulose blow in in the walls which will be covered with OSB and painted. There is no plastic or vapor barrier, just metal on the 2×4 frame members. Do I need to install plastic or housewrap with the insulation? Can I staple housewrap to the inside framing to hold the blow in insulation until I install the OSB wall sheathing?

I had a metal ceiling installed when they built it but no insulation exists.

I want to use blow in R38 for the ceiling and cellulose seems to be ok to use but I have read that it may corrode the metal.

Please give me your recommendations to insulate my pole barn. Thank you. CELLULOSED IN CRAWFORDSVILLE


DEAR CELLULOSED: The issues with cellulose insulation appear to be if it is or gets wet. There are two sides to the argument.

Side A (it is no problem) says: “There have always been concerns about insulation causing corrosion when in direct contact with metal building components such as sweaty pipes, electrical wires or metal boxes, etc. Consequently, ASTM standards for every insulation material contain testing which specifically addresses these concerns. In addition, in 1979, the CPSC promulgated a law, which regulated the fire and corrosive characteristics of cellulose insulation. A statement of compliance with these requirements is required on every bag of cellulose insulation. The types of metal tested with all insulation materials are copper, aluminum, steel, and additionally in Canada, galvanized steel. Our test requires placing soaking-wet cellulose insulation with an imbedded .003-inch thick metal coupon inside a humidity chamber under conditions that are ideal for promoting corrosion. After 14 days, the metal coupons are removed, cleaned, and examined under a light to detect the smallest pinhole. In all, there are two coupons of each metal and all must be free of even one pinhole. This is a very strict test!”

Side B can be read about at: https://www.chemaxx.com/cellulose.html

My recommendation would be to use fiberglass insulation. https://www.hansenpolebuildings.com/blog/2012/02/fiberglass-insulation-2/

For the walls, use BIBS (read more about BIBS here: www.hansenpolebuildings.com/blog/2011/11/bibs/). A vapor barrier should be installed on the inside face of any wall insulation, before the interior finish is applied (whether osb, drywall or steel liner). Housewrap is NOT a vapor barrier, and should not be installed on the climate controlled side of insulation.

DEAR POLE BARN GURU: I am having a local contractor build a pole barn cabin with a steel roof and vinyl siding. They do use bubble under the roof girts. I am having them use 2×10 for a vaulted ceiling so I can finish a loft. I want to insulate between the 2×10’s -24 on center. Just wanted to know how to best insulate between these and put a tongue and groove ceiling in. MASSILLON MARK

DEAR MASSILLON: My answer will assume your roof purlins are being installed the length of your building, rather than from eave to ridge (like rafters). On top of the purlins, install 2×4, laid flat (3-1/2” face towards the purlins) running from eave to ridge. Then install the reflective insulation. Next place 2×4 laid flat the same direction as the purlins, then the roof steel. Make certain to adequately ventilate the eave and the ridge. The insulation between the purlins should be unfaced, and no more than 9-1/4” thick.

Before you blow insulation into the attic space, make sure you have adequate attic ventilation. While this article is written with steel roofing in mind, the same ventilation requirements and solutions apply: https://www.hansenpolebuildings.com/blog/2012/08/ventilation-blows/

Today In: Ask the Pole Barn Guru

I recently got this email, and as The Pole Barn Guru, I am happy to respond to building questions which are not from Hansen Building clients, either prior or future.


Hello 

I live in Indiana.

I have a pole barn garage. I didn’t build it. It was built when I got the house. It has a metal drop ceiling. I am looking to insulate it. It will only be heated when I am working on stuff in the winter and not all the time. It will not be conditioned in the summer. I am not sure what the best way to insulate above the drop ceiling. Can I use blow in insulation? If I go this route do I need to put plastic down on top of the metal first then blow it in? I am using 1 inch Styrofoam board in the walls board since I can put it directly against the metal and moisture won’t affect it. I will eventually cover it with plywood. What should I do for the drop ceiling?”

The initial step is to find out what the load capacity of the trusses is. Very few pole buildings have trusses which are designed to support the weight of a ceiling and insulation. You should be looking for a minimum bottom chord dead load of five psf (pounds per square foot). If the prior owner did not provide you with the information about the building, the design loads are supposed to be stamped on the trusses.

Assuming the trusses can support the load, an insulated vapor barrier must be placed beneath any roof steel. If the building was not originally constructed with one, reflective radiant barrier (aluminum side up/white face down) can be added to the underside of the roof purlins. It is essential to have all seams tightly sealed. See www.buyreflectiveinsulation.com to calculate needed quantity and price.

Ventilation must be provided for, as you have a dead attic space. Hopefully the eaves have enclosed vented soffits – to provide an air intake. Along with this – a vented ridge is required, in order to give an outlet.

Finally, once all the above have been taken care of, insulation can be blown in directly above the steel ceiling liner panels. You do not want to have a vapor barrier directly above the existing ceiling, as it could allow moisture to collect above the liner panels and this could cause premature deterioration.

Do you have a burning building question (no pun intended) for The Pole Barn Guru?  Email me today!


Vapor Barrier – An Unforgiving Pole Building Mistake

One of the beauties of post frame (pole barn) construction, is they are very forgiving during construction. A virtual plethora of errors can be made, and overcome, leaving a fine looking and well-functioning building.

There is one error, which is one of advance planning rather than installation skill, which is not so easy to rectify. The great majority of pole buildings are constructed with steel roofing and siding. Light weight, strong and durable – steel remains the covering of choice in creating a maintenance free structure.

With the idea of “having the lowest price”, far too many providers (both builders and package providers) neglect to discuss with their clients how important it is to have an insulated vapor barrier between the roof purlins (framing) and the steel roofing. Without a properly installed thermal break, condensation issues will arise. Once the drips start forming on the underside of the roof steel (trust me – it WILL happen), the beautiful brand new building, becomes not quite so functional.

Now there are some after the fact solutions for adding a vapor barrier.

Adding a significant R value per inch (albeit an expensive fix) is the use of professionally applied spray foam insulation. Priced this solution? If so, you better have been sitting down when the quote arrived.

Another, less expensive method, is to apply reflective insulation as a vapor barrier to the underside of the roof framing. This application works well in both all steel as well as post frame buildings.

Reflective insulation can be applied from eave to eave beneath the framing, using double sided tape. In order to have the insulation be effective, it is imperative all edges be tightly sealed with appropriate tape. If the reflective insulation was not purchased with an adhesive pull strip tab on one edge of the rolls, the seams between each roll will also need to be taped.

While this is a fairly inexpensive solution, from a materials standpoint, it will require a fair amount of time, working above one’s head, and often at a considerable height.

Best solution of all – don’t end up being penny wise and pound foolish in trying to save a few dollars by leaving the insulation out initially. The drip-drip-drip of condensation will most certainly leave a bitter taste.

What House Wrap is Good For

Over the past three decades, house wrap has become a staple feature on millions of buildings. Wrapping a wood framed building in a protective envelope is a good building practice which helps combat a building’s worst enemies: water, moisture and air infiltration. House wrap behind a building’s siding is an excellent secondary defense against the weather.

House wrap is a weatherization membrane which provides a protective layer under a building’s siding and over the wall girts or sheathing. It is literally wrapped around a building, cut out around windows and doors and taped at the seams.

The unique, nonwoven-fiber structure of house wrap resists air infiltration and water intrusion, yet is engineered to readily allow moisture vapor to diffuse through the sheet, helping prevent mold and mildew buildup and wood rot. The fibrous structure is engineered with microscopic pores which readily allow moisture vapor to evaporate but are so small bulk water and air cannot penetrate. Siding, whether vinyl, wood, stucco, brick, or composite, does not completely prevent air and water penetration. House wrap is designed as a secondary defense to help manage a building’s wall systems.

R-Value ratings for insulation are only maintained as long as the air within the insulation stays still and dry. The Department of Energy estimates nearly 40% of a building’s energy loss is the result of air infiltration caused by wind driven pressures from the outside. The opposing forces of pressure between inside and outside walls cause heat and air conditioning to be virtually sucked from a building– through walls, ceilings, sill plates, sheathing joints, top plates, electrical outlets and every inch of the estimated half-mile of cracks in newly constructed buildings. As air infiltrates, it causes changes in temperature which require heaters or air conditioners to work harder. Constant temperature fluctuations also reduce comfort levels. Occupants feel too cold or too warm. Reducing air infiltration increases a building’s comfort factor.

Insulation can help increase the R-value, but it is only marginally effective in reducing air infiltration. When air infiltrates, the R-value itself can be reduced up to 60%. Adding thicker insulation won’t solve the problem. Stopping air from getting in, will.

Properly applied, house wrap helps reduce air infiltration, preserving R-values, conserving energy, reducing heating costs and creating a more comfortable interior.

The tighter the building, the more comfortable and efficient. Unfortunately, the tighter a home, the more susceptible to moisture problems which can cause mold, mildew and rot. So all systems need to be in balance–designed to manage water and moisture effectively.

There are two main ways water and moisture get into wall systems:

Bulk water intrusion from the exterior (rain and snow) can enter the wall and, if not allowed to dry in a reasonable amount of time, can raise the moisture content of the wood above 30% and cause rotting or mold and mildew.

Air transported moisture occurs when air leaks from the warm side of the wall to the cool side. Warm air will hold higher amounts of moisture than cold air. As warm air travels through a wall heading to the cold side, it will begin to cool and be forced to release moisture. This is called the dew point where condensation will occur. When there is a significant temperature drop across the wall, the dew point will occur somewhere within the wall. In the winter months the point of condensation is usually on the inside surface of the exterior sheathing. Moisture carried by air flow through the wall is deposited at the back side of the sheathing and accumulates. In hot and humid climates where air flow is traveling from the outside to the inside, warm moist air from the outside will be cooled on the way to the air conditioned inside, releasing moisture within the wall cavity. House wrap is a breathable membrane with microscopic pores which allow the moisture vapor to dissipate, helping to dry out a wall system to avoid damage.

Moisture Vapor Transmission Rate or perm rate of a material determines the ability for water vapor to diffuse or evaporate through the wall. The higher the perm rate, the more “breathable” the material is and the easier it is for water vapor to pass through. Materials with Perms below 1 are considered vapor retarders since the rate of moisture vapor flow through a 1 Perm material is so low there is essentially no flow. House wraps have Perm rates in the area of at least 58 Perms which is very open to allow moisture vapor to flow through.

What house wrap is not, is a vapor barrier or an insulation. I’ve seen instances where people have applied house wrap directly between roof purlins and roof steel, in an effort to control condensation. House wrap is quite permeable; any warm moist air which would rise to it will pass through to the underside of the roof steel and condense.

House wrap is great…if used for what it was intended for…a secondary defense against the weather.

And Now…Insulation Crime!

If you didn’t read yesterday’s blog – is good to catch up as a lead-in for today – well worth the time.  In it I discussed a problem a reader had asked for tech support about an insulation issue.

So today – yet another reader has written….

“I am in the process of finishing a pole building. The building will be used as my workshop and it will be heated, I live in Washington State. The contractor that put up the exterior placed R-23 Kraft Faced fiberglass insulation between the 2 X 6 rafters with the facing against the metal corrugated roof. This means that the vapor barrier is facing the roof, not the inside of my building. I plan to install sheetrock on the ceiling. It is not uncommon for the temperature to dip below zero here, and in the summer reach 100 for a month or more. My question is can I place a 4 mil poly vapor barrier on the interior side of the roof thereby wrapping the fiberglass insulation in two vapor barriers?”

What this building owner has is a pole building with 2×6 roof purlins on edge. Condensation on the inside of steel roofing applied directly on top of purlins can be an issue. This particular builder errantly installed batt insulation with the vapor barrier towards the steel, in efforts to reduce or eliminate the condensation problem.

If the builder would have properly installed the insulation between the purlins, with the Kraft facing towards the climate controlled area, making sure all seams were sealed, it would have been both effective as insulation and the vapor barrier would have kept the warm moist air inside the building, from condensing on the underside of the roof steel.

Why do I call this scenario “insulation crime”?  Because the builder took his client’s hard earned money and in return, gave him nothing but a problem to be solved.

Nearly every jurisdiction in the state of Washington requires both a Building Permit as well as the inspection of new buildings under construction. If this was a permitted building, the Building Inspector should have noticed the improper insulation installation and issued a correction notice – rather than signing off on a final inspection.

Rigid Insulation Boards

Foam boards—rigid insulation boards—can be used to insulate almost any part of your pole barn, from the roof down to the foundation. They provide good thermal resistance. Foam board insulation sheathing reduces heat conduction through structural elements, such as wood wall girts and roof purlins.

There are some who would feel the best application of these products is to the outside of wall girts and purlins, directly beneath the wall and roof steel. Doing so can create a huge structural problem with pole buildings.

A properly designed pole building utilizes the steel skin to create a diaphragm. The steel skin functions like the shell of a uni-body car or modern jet aircraft.

When rigid insulation boards are applied to the exterior framing, the screws must be ordered appropriately longer to attach the siding or roofing. When the pole building is then subjected to racking loads from wind or seismic forces, the shank of the screw between the steel skin and the underlying wood – which passes through the rigid insulation boards, may bend or break, resulting in a compromise of the building’s structural integrity.

The most common types of materials used in making foam board include foam building insulationpolystyrene, polyisocyanurate (also known as polyiso) and polyurethane.

Molded expanded polystyrene (MEPS) is a closed-cell material which can be molded into many everyday items (think coffee cups and shipping materials), or into large sheets of foam board insulation. MEPS foam board insulation is commonly known as beadboard.

To make beadboard, loose, unexpanded polystyrene beads containing liquid pentane are mixed with a blowing agent and poured into an enclosed container. The mixture is heated to expand the beads many times their original size. The beads are then injected into a mold. Under more heat and pressure, they expand to become foam blocks, which are shaped as needed.

The physical properties of MEPS foam board vary with the type of bead used. It’s manufactured at various densities, depending on the application. Beadboard for roofing materials has to be dense enough to walk on without damage; wall insulation foam boards are several times less dense than roof boards. R-values range from 3.8 to 4.4 per inch of thickness.

MEPS foam board is available with a variety of facings. Since spaces between the foam beads can absorb water, a vapor diffusion retarder is needed if water transmission through the insulation might become a problem. MEPS foam board also is often used as the insulation for structural insulated panels (SIPS) and insulating concrete forms (ICFs).

One of my personal pole buildings, at my home, utilizes rigid insulation boards, ICFs, on 2-1/2 walls of the lowest level.

Extruded expanded polystyrene (XEPS) is a closed-cell foam insulation similar to MEPS. To make it, the polystyrene pellets are mixed with various chemicals to liquefy them. A blowing agent is then injected into the mixture, forming gas bubbles. The foaming, thick liquid is then forced through a shaping die. When cooled, the panel is cut as required.

XEPS is more expensive than MEPS. Like MEPS, the R-value depends upon the density of the material and is generally about R-5 per inch. It’s also much more consistent in density and has a higher compressive strength than MEPS, making it better suited for use on roofs or for wall panels. Extruded polystyrene also has excellent resistance to moisture absorption.

Like MEPS, XEPS is available with a variety of facings and is also often used as the insulation for SIPs and ICFs.

Polyiso and polyurethane are very similar, closed-cell foam insulation materials. Because both materials offer high R-values {R 5.6 to R 8} per inch of thickness, a thinner foam board can be used to achieve the required thermal resistance. This can be an advantage in limited space applications.

Polyiso foam board insulation is available in a variety of compressive strengths. Compressive strength refers to the ability of a rigid foam board to resist deformation and maintain its shape when subjected to a force or load. Also, polyiso remains stable over a wide temperature range, making it good as roofing insulation. When used with a laminated aluminum foil facing, polyiso foam board provides an effective moisture or vapor barrier. These foam boards can also be used to make SIPs.

The maximum performance of rigid insulation boards depends heavily on proper installation. If you want to install it yourself, obtain and carefully follow instructions and safety precautions from the manufacturer. Also check local building and fire codes to see if it’s allowable to use foam board insulation in your new pole building. If so, are there any special requirements for using it?

Hold these thoughts until tomorrow – and I will delve into how to use foam board in foundations, using a fire barrier and a whole lot more more.  Stay tuned!