My wife, not so much – because she says I manage to pick out things which are wrong in nearly every one of them. Weirdly enough, when I do find errors, it is nearly always on buildings which have been constructed by “professional” barn builders. More often than not, when our clients do the work themselves – the pole building photos prove they followed the directions!
Weird?
Hardly.
I have made this statement repeatedly for years – the average building owner who can and will read instructions will construct a better finished building for himself, than most contractors will erect for them.
Read more about doing it yourself here: https://www.hansenpolebuildings.com/blog/2012/01/build-it-yourself/
We don’t make a fortune on the buildings our clients invest in. The little we do get paid for, is because we have spent decades going over minute details to make construction as easy as possible for the average Joe (or Jane) to arrive at a successful result.
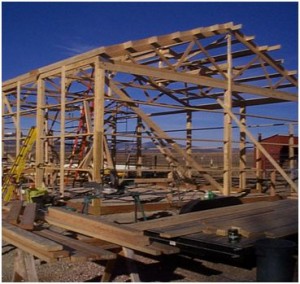 One of those “maybe simple” things is the overall footprint of our buildings. In the photo is a partially framed 30 foot wide by 48 foot long building. When we measure those dimensions, it is from outside of column, to outside of column. All of the wall framing is to extend out 1-1/2” past the posts. Done correctly, the finished framework of this building will be 30’3” by 48’3”.
Why might this make things easier?
Steel panels have a net coverage of three feet (36 inches). They also have an overlap. This means 10 sheets of steel will cover approximately 30’2”. The Hansen Pole Buildings Construction Manual has the first panel of wall steel starting ¾” outside of the pole, so at the far end of the wall, the last panel of steel does not have to be ripped to fit. So much easier to avoid the extra cutting!
Now, take a gander at the pole building photo. Look close – notice the wall girt framing does not extend out past the poles. Bookshelf girts, as described and shown in the Construction Manual and on a specific “blown up” detail on the plans, should project 1-1/2″ outside the building line. This client’s builder took it upon himself to disregard the building plans and instructions. He created a lot more work for himself, by cutting all of the 2×8 pressure treated skirt boards (https://www.hansenpolebuildings.com/blog/2013/08/composite-grade-board/) and headers to fit between the columns, instead of applied (more easily) to the outside face of them. He also ended up having to rip steel panels which would not have been otherwise cut lengthwise.
The Hansen Pole Building kit is the product of easily 100,000 pole buildings of experience. The great majority of folks follow the instructions and avoid extra work and pitfalls…..the few others, not so much!
 Here is an excerpt from the blog:


