Tag Archives: Hansen Buildings Construction Manual

Can I Correctly DIY My Pole Building?

I Have Limited Experience, Can I Correctly DIY My Pole Building?

Reader MIKE in WISE writes:
orf
“I have been reading a lot of your posts, trying to gain as much knowledge as I can. You are truly the Guru. I have a couple questions that I hope you can answer for me. The first is, how hard is it for someone with limited experience to build a pole barn themselves and do it correctly? Sinking the holes for the poles in the right spots, setting the trusses, and putting on the metal without leaks? The second is, how does one go about framing out the interior? Would I have to build walls along the exterior walls like in a traditional build? Sounds like ridiculous questions, but I guess it’s the only way to learn.”
Mike the Pole Barn Guru writes:

Thank you for your kind words Mike, they are greatly appreciated.

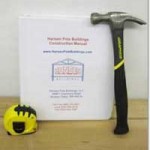
With a Hansen Pole Building, your limited experience is a benefit, as you have no preconceived notion of how to do it ‘wrong’. Included with your building is our now approaching 600 page Construction Manual, walking you through every step of assembling your new building shell. You also get unlimited free Technical Support, in an event you run across any challenges.

Most of our clients do DIY their builds. I manage our Technical Support Department and 90% or more of our work is due to clients who hired builders, who did not follow plans and directions, and now have problems!

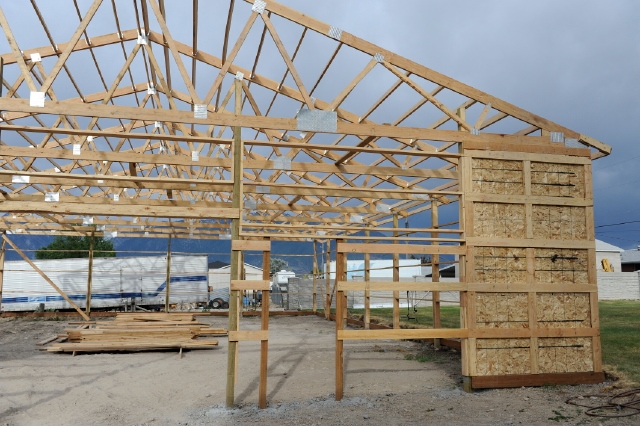
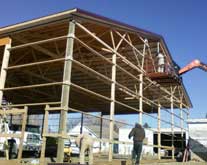
A major fear is setting poles correctly. Given a diagonal measure of a 6×6 is under eight inches and you are placing it in an 18 inch or larger diameter hole – you are shooting at a large target and have flexibility to move it to exactly where you want it. Our Construction Manual shares some great tips and tricks for not only settling columns, but also raising trusses and installing steel leak-free. All are much easier than one might suspect.

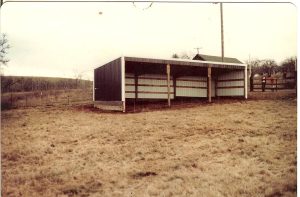
In all reality any average physically capable person, who can and will read and follow instructions, can successfully construct their own beautiful building shell, without extensive prior construction knowledge. We have hundreds and hundreds of clients, every year, who have done exactly this. In most instances, our DIY clients end up with a far better finished product than anything they could have paid to have assembled.

By utilizing commercial bookshelf wall girts, there is no extra framing required in order to have exterior walls drywall ready. https://www.hansenpolebuildings.com/2020/04/creating-extra-work-in-barndominium-framing/

There are no ridiculous questions – so please continue to ask them all until you are satisfied you are making correct decisions for your new building.

Converting a Stick Framer

Converting a Stick Framer

As my long term followers may remember, I grew up stick framing houses, apartments and commercial buildings working for my Father and his framing contractor brothers. While our (myself and my male cousins) education was focused far more on “do” as opposed to “why we were doing” we all got a pretty good grasp of things like walls are composed of 2×4 or 2×6 studs running vertically to support loads from subsequent floors and/or roofs.

Now when I built my very first ‘pole barn’ in South Salem, Oregon in early 1980 it would have been a step up for me to have considered myself as even having a clue as to how they went together:

Builder STEVE is erecting a barndominium for Hansen Pole Buildings’ clients in ROYSE CITY, Texas. He wrote to Bonnie (in our office, she prints and transmits plans, among other things, to our clients), and copied his client’s Project Coordinator, Justine:

“I have a couple of question about the girts…

I will be the first to admit this is a different type of building than what I’m used to.
We build houses, not pole barns. 

I’ve never seen Girts or this type of supporting walls so to speak in any of the houses I have built.

We typically use “sheer walls” or a totally different type of material when supporting “open portals” and bracing corners.

Can the engineer point to the locations, on the perimeter/outside walls that the girding is supposed to go. 

If they’re telling us that these only go in specific locations I would like to know what those specific locations are. 

Then after that please give me a detail of what runs between the Girts on the exterior wall where there are no Girts.

It was my understanding from previous emails that the Girts do not run continuously around the four exterior walls.

If they do, then please let me know that as well.

Thank you in advance.”

Even on a Sunday morning, Justine responded:

Good Morning Steve,

Bonnie is not tech support.  

I have CC’D tech support in on this email.  Also, please find the construction manual that shipped with the hardware. This book will help you on many levels in building this post frame building.

On previous conversations – it was the Girt blocking that I stated isn’t continuous which was 2×4.  The “girts” which are primarily 2x6s per materials list and plans are what go between the posts horizontally.”

While our Construction Manual clearly lays out proper contacts (saving emails having to be passed from team member to team member), it does require actually opening and reading said manual.

Here our Technical Support Department got to join it (yes, on a Sunday as well):
Mike the Pole Barn Guru;
Justine is correct in instructing you to go to your best resource for understanding post frame structural systems, our Construction Manual.

Post frame differs from stick frame, as roof loads are transferred downward through columns to ground – eliminating need (in most instances) for structural headers over door and window openings. I grew up stick framing and it wasn’t until I was able to ‘wrap my head’ around framing running left-to-right, rather than up-and-down I was able to make any money building post frame.

You will want to carefully review Sheets S-4.1, S-5.1 and S-5.2 of your engineered building plans, as they detail location, orientation and placement of all wall girts and associated framing members. Bookshelf wall girts run from column to column, not continuously around the building perimeter.

Please keep in mind, your entire roof surface should be finished prior to any wall framing. Last page of Construction Manual Chapter 3 gives an outline of installation processes and for best success you will want to follow it explicitly.

Blog 2000

2000
Thank you to loyal readers who have made this blog a success – today marks 2000 blog articles written and shared! It could not have been done without your continued support and encouragement.

Back in December 2015, I shared a milestone of reaching 1000 articles, and thought it was a very big number (https://www.hansenpolebuildings.com/2015/12/1000/). Having written now over a million words in these articles, I try to put it into perspective when compared to Hansen Pole Buildings’ Construction Manual. This manual walks through complete assembly of structural portions of fully engineered Hansen Pole Buildings. At just over 500 pages, it has nearly 70,000 words – meaning these blog articles are roughly 15 times as lengthy!

Sidebar – for those who are interested in acquiring one of these manuals, they are available by reaching out to Plans@HansenPoleBuildings.com. It does offer many tips for prospective Do-It-Yourselfers as well as builders.


Our industry has changed dramatically since article #1000. Although I have owned and lived in shop/houses (shouses) for over 25 years, and had clients from time-to-time invest in our post frame buildings for homes, there has been an explosion in demand for barndominiums. Over half of all inquiries we receive are for people in search of homes. Some are looking to create unique architectural features or just love their aesthetics, while others are trying to find an affordable housing option.

Post frame construction is going to be more affordable than what most people consider ‘traditional’ construction – stick framing. Most savings are to be found by utilization of ease of construction of post frame buildings. Average physical capable people who can and will read directions can successfully erect their own beautiful post frame homes – and many of our clients do. A total DIYer can cut costs in half! Want a $400,000 home for $200,000? Unless you knock down some huge dollars at your career, one could take a year or more off work to erect their new home, and come out ahead financially.

Consider also – when you pay someone out of pocket to do this work for you, you have had to pay taxes on your income, to pay a subcontractor. Depending upon which state you reside in and your tax bracket – it takes gross earnings of $100 to pay out $50 to $65. Yet one more reason to do it yourself.
Who would have thought, five years ago, our world view would be changed by a virus?

Certainly not I.

With Americans fleeing big cities with huge taxes, for rural and greener pastures – fully engineered post frame homes make sense. Your new home can be crafted to best meet you and your family’s wants and needs, both for today and for future decades of happy living. Your only limitations being your imagination, your budget and available space.

Searching for a Builder Embracing Hansen Building’s System

Loyal reader RUSS in PIPERSVILLE writes:

“We are in the process of having our floor plans and elevations done by Greg Hale. A pleasure to work with by the way. I’m wondering if you have any experience with pole frame builders in the east shore area of Maryland? We really want to purchase our building package from your company but it seems like all of the builders listed around that area are complete build companies only. None that I have seen offer stamped engineered drawings for the buildings and don’t want to use outside materials. I fear that I may not be able to find a builder that embraces the “Hansen” approach to building. Any help would be appreciated.”

For those of you who are unfamiliar with it, Hansen Pole Buildings offers an affordable (or even free) service to provide you with floor plans and building elevations crafted totally to best meet your wants and needs. For more information on this service, please visit: http://www.hansenpolebuildings.com/post-frame-floor-plans/?fbclid=IwAR2ta5IFSxrltv5eAyBVmg-JUsoPfy9hbWtP86svOTPfG1q5pGmfhA7yd5Q

Glad you are enjoying your experience with Greg, it has proven to be an extremely popular service for our clients.

Hansen Buildings Construction ManualOur buildings are designed for average physically capable person(s) who can and will read instructions to successfully construct their own beautiful buildings (and many of our clients do DIY). Our buildings come with full 24” x 36” blueprints detailing locations and attachment of every piece, a 500 page fully illustrated step-by-step installation manual, as well as unlimited technical support from people who have actually built post frame buildings. We have found those who DIY almost universally end up with a better finished building than any contractor will build for them (because you will actually follow plans and read directions, and not take ‘shortcuts’ in an attempt to squeeze out a few extra dollars of profit). We’ve even had couples in their 80s assemble our buildings!

For those without time or inclination, we have an extensive independent Builder Network covering the contiguous 48 states. Your Hansen Pole Buildings’ Designer can assist you in getting erection labor pricing as well as introducing you to potential builders.

There ARE some truly excellent builders: Hansen Building Disaster Part II

There ARE some truly excellent builders…

This just isn’t one of them.

In our last episode, the ‘builder’ had botched the shearwalls. A minor issue compared to what comes next.

This building was designed to have enclosed overhangs on all four sides.  On the endwalls the roof purlins project over the top of the end truss to support the overhang.

I said, “the purlins project over the top of the end truss to support the overhang”.

Obviously this escaped said “builder” as he cut off all of the purlins and fit them nicely behind the end truss.

The end truss was to have been lowered so the purlins could go over the top of it. The distance to lower the end truss is only spelled out twice on the plans, so it could easily have been missed. Well, maybe not easily. There is also a detail on page four of the engineered plans at 1-1/2” per foot which shows exactly this circumstance.

If this wasn’t enough, an entire chapter for the Hansen Pole Buildings’ Construction Manual is devoted to this overhang sequence!

But wait – there is more.

And it gets even (if this is possible) worse!

See the pretty truss on the end of the building? Not only is it 5-13/16” too high, it is designed to be placed into notches cut into each of the end and corner columns.

The lack of adequate bearing on these columns is a huge structural challenge, as under a load there is little to keep the truss from wanting to slide down the face of the column except nails.

When end trusses are properly notched in, there is 2×4 siding backing placed flat on the face of the bottom and top chords of the truss. A horizontal 2×4 is to be placed at mid height of the truss to attach the siding to, so it is not over spanning the capabilities of the siding.

The siding backing on the bottom chord of the truss also serves as bracing to create a three inch thick member, reducing the chances of the end truss bottom chord buckling under extreme loading conditions.

Stay tuned to this channel – the fun is not over yet!