Busting Post Frame Barndominium Myths
Yep, I have been web surfing again and I came across a stick frame building contractor’s website who obviously either doesn’t understand fully engineered post frame construction, or just frankly doesn’t care to add it to his arsenal of design solutions. My comments are in italics.
MYTH #1. MOST BANKS WON’T OFFER CONSTRUCTION LOANS ON POST FRAME POLE BARN HOUSES.
Many lenders refrain from offering traditional mortgages for pole barn homes. For example, Freddie Mac and Fannie Mae will not offer these loans at all.
The small percentage of entities that do offer mortgages for pole barn homes will typically have much higher requirements, because they’ll be using internal money to finance it.
They’ll likely require a 30% down payment (and oftentimes, more than this).
In reality, a fully engineered post frame building is no different than any other wood frame steel roofed and sided home and any lender will approve a mortgage for one as long as you do not use terms like “barndominium”, “pole barn house”, “post frame house”, etc. Apply the K-I-S-S method (Keep It Simple Stupid) and refer to it only as being a fully engineered, custom designed, wood frame home with steel roofing and siding. Period and 100% factual.
But won’t my lender send out engineers and inspectors who will “catch” me building a barndominium, shouse or post frame home? No. Your lender will be concerned about progress, not how you are getting there.
Before going to a lender you will need a place to build (land), blueprints (floor plans and elevations) and a budget (or contract subject to finance approval with a builder).
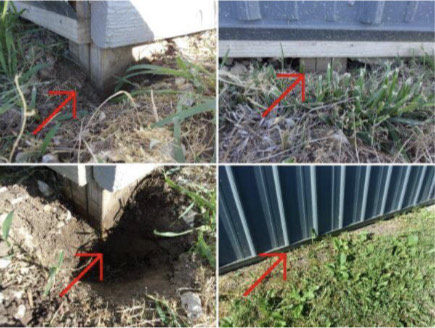
MYTH #2. THERE ARE NO FOOTERS IN POST FRAMES
Without having footers to protect the concrete slab from freezing, there is the potential that the concrete slab can move or heave around the edges in cold weather. In turn, this can shift interior walls, resulting in damage to drywall finishes and trim.
If you do go with post frame construction, you will have to add footers to stay in code compliance of the IRC. This will add that cost back into the total price of the home.
 Your fully engineered post frame home is 100% Building Code Compliant and most typically has pressure preservative treated columns embedded in ground with both concrete footings and bottom collars. Alternatively your home can be mounted to steel brackets set in concrete piers.
Either of these are designed to extend to or below frost lines or are frost protected by use of insulation. Footers themselves do not protect a concrete slab from freezing and heaving, using rigid insulation around slab perimeters is required for either stick frame or post frame. With fully engineered post frame, there is no need to incorporate thickened slab edges or continuous concrete footings and foundations.
MYTH #3. POST FRAMES WILL HAVE LARGER SPANS IN THE ROOF TRUSSES
This is an issue because they’ll have to be filled in before you can hang the drywall.
If you hang drywall “as is,” it will all sag over time, causing structural damage (and a pain in your wallet). Adding this extra framing after the fact will add to the total price tag again.
Most cost effectively your fully engineered post frame building will have double trusses every 10 to 12 feet. If you desire to insulate at ceiling lines, ceiling joists are placed every two feet to adequately support drywall. This combination of double trusses and ceiling joists will still be less expensive than conventional stick framing’s trusses every two feet with structural headers required in walls. By widely spacing trusses, it allows for greater flexibility in locating doors and windows in exterior walls.
MYTH #4. EXTRA FRAMING BETWEEN THE POSTS WILL BE NEEDED
As opposed to traditional wall building, you’ll have to build the walls between the posts after you build on the post frames. This is an added cost to the post frame structure that has already been built.
We can tell this builder has never built (or probably seen) a fully engineered post frame building with bookshelf girts every two feet. All exterior wall framing is taken care of at initial installation, you get a deeper insulation cavity and a better surface to drywall. https://www.hansenpolebuildings.com/2019/09/11-reasons-post-frame-commercial-girted-walls-are-best-for-drywall/
MYTH #5. INSULATION COSTS ARE HIGHER
Your pole barn home will require more insulation on a post frame wall because the walls are thicker than the typical two-by-four construction. Therefore, the cost of insulation will be higher to fill this cavity.
Would you really want an electric bill based off of R-13 insulation in a two-by-four exterior wall? Engineered post frame construction allows for thicker insulation cavities – reducing your energy costs for your barndominium’s lifespan.
MYTH #6. POST FRAME CONSTRUCTION IS TYPICALLY NOT USED WITH BASEMENTS.
Post frame construction is not very conducive when building on a basement, as the basement walls will be made from poured concrete. Trying to adapt a post frame construction to a basement will end up with higher costs than traditional home building techniques. The bottom line: If you want a home with a basement, post frame construction is not the best choice.
Your fully engineered post frame home can easily be engineered to attach to a concrete basement foundation, ICFs or even incorporated into a Permanent Wood Foundation, at similar or lower costs than stick frame.